Create Your Own Adorable Crochet Ragdoll Lion


Step into the enchanting world of crochet with the magnificent Crochet Ragdoll Lion. This adorable creation brings together the art of crochet and the regal beauty of a lion, resulting in a truly captivating masterpiece. Crafted with love and attention to detail, this crochet lion is sure to steal your heart and become a cherished companion. This unique project allows you to explore the art of crochet while creating a charming lion that is both cuddly and captivating. With its intricate stitches and vibrant colors, this crochet lion is a true work of art that will bring joy and warmth to any space. Whether you're a seasoned crocheter or just starting out, this project is perfect for honing your skills and creating a one-of-a-kind masterpiece that will be treasured for years to come. So grab your crochet hook and let your imagination run wild as you bring this majestic lion to life stitch by stitch.
Materials Needed
- 3.5mm hook for main hook;
- 2.25mm hook for toes and paw pads;
- 4.00mm hook for the mane;
- Lion Brand Vanna’s Choice in Mustard (150g)
- Lion Brand Vanna’s Choice in Terracotta (50g)
- Lightweight cotton yarn in pink for the cheeks;
- Dark Brown embroidery thread for the toes and pads on the paws (I used DMC embroidery cotton);
- Black crochet thread for mouth;
- 12mm Safety Eyes
- Safety nose
(or black crochet thread);
- Stuffing;
- Tapestry needle


*Ch 1 and turn at the end of each row*
Body (Make 2 Panels) in Mustard
Row 1: Ch 17, sc along (16 sts)
Row 2: Inc, sc 14, inc (18 sts)
Row 3: Inc, sc 16, inc (20 sts)
Row 4: Sc along (20 sts)
Row 5: Inc, sc 18, inc (22 sts)
Row 6: Inc, sc 20, inc (24 sts)
Row 7: Sc along (24 sts)
Row 8: Inc, sc 22, inc (26 sts)
Rows 9-18: Sc along (26 sts)
Row 19: Dec, sc 22, dec (24 sts)
Rows 20-21: Sc along (24 sts)
Row 22: Dec, sc 20, dec (22 sts)
Rows 23-24: Sc along (22 sts)
Row 25: In BLO: Inc, sc 20, inc (24 sts)
Row 26: Inc, sc 22, inc (26 sts)
Row 27: Sc along (26 sts)
Row 28: Inc, sc 24, inc (28 sts)
Row 29: Sc along (28 sts)
Row 30: Inc, sc 26, inc (30 sts)
Row 31: Inc, sc 28, inc (32 sts)
Row 32: Inc, sc 30, inc (34 sts)
Rows 33-40: Sc along (34 sts)
Row 41: Dec, sc 30, dec (32 sts)
Rows 42-43: Sc along (32 sts)
Row 44: Dec, sc 28, dec (30 sts)
Row 45: Sc along (30 sts)
Row 46: Dec, sc 26, dec (28 sts)
Row 47: Sc along (28 sts)
Row 48: Dec, sc 24, dec (26 sts)
Row 49: Dec, sc 22, dec (24 sts)
Row 50: Dec, sc 20, dec (22 sts)
Row 51: Dec, sc, hdc 3, dc 10, hdc 3, sc, dec (20 sts)
Tie off. Repeat all of the above for the second panel, EXCEPT you do not need to do row 25 in the BLO for the second panel (or whichever panel will be the back). You can crochet row 25 in both loops for the back panel. Put these aside for assembly later.
Toes (Make 6) in Brown Embroidery Thread or Lightweight Brown Yarn
Using a 2.25mm hook:
Rnd 1: Sc 5 into magic ring (5 sts)
Tie off, leaving a tail for sewing. Repeat for other 5 toes. Put these aside for assembly later.
Paw Pads (Make 2) in Brown Embroidery Thread or Lightweight Brown Yarn
Using a 2.25mm hook:
Rnd 1: Hdc 8 into magic ring (8 sts)
Rnd 2: Sc 2 into each st around (16 sts)
Tie off, leaving a tail for sewing. Repeat for other pad. Put aside for assembly later.
Back Paws (Make 2 Panels) in Mustard
Row 1: Ch 6, sc along (5 sts)
Row 2: Inc, sc 3, inc (7 sts)
Row 3: Sc along (7 sts)
Row 4: Inc, sc 5, inc (9 sts)
Rows 5-6: Sc along (9 sts)
Row 7: Dec, sc 5, dec (7 sts)
Rows 8-9: Sc along (7 sts)
Row 10: Dec, sc 3, dec (5 sts)
Row 11: Dec, sc, dec (3 sts)
Tie off. Do not start the second panel yet. Appliqué your toes and pad onto the first panel. When these have been attached, repeat rows 1-11 for the second panel. Do not tie off the second panel. Ch 1 and sc around the entire piece. Make sure the toes and pad are facing you as you crochet around the piece. (Sc, ch, sc) in each corner of Row 1. Stuff when you’ve crocheted about two-thirds of the way around. Slst to first st and tie off. Repeat for the second paw. Set aside for assembly later.
Front Paws (Make 4 Panels in Twos)
Using Mustard:
Row 1: Ch 4, sc along (3 sts)
Row 2: Inc, sc, inc (5 sts)
Rows 3-7: Sc along (5 sts).
Tie off.
Using Dark Brown embroidery thread, stitch three vertical lines on each paw to indicate toes. Repeat rows 1-7 for the second panel. Do not tie off second panel. Put both panels together, matching up all sides. Chain 1 and sc around the entire piece. Make sure your toe stitches are facing you as you crochet around. You don’t need to stuff these as they will be attached to the front of the body later and should lie somewhat flat. Slst to beginning st to close. Tie off. Repeat for the second paw. Set these aside for assembly later.
Ears (Make 4 Panels in Twos)
Using Mustard:
Row 1: Ch 10, sc along (9 sts)
Rows 2-5: Sc along (9 sts)
Row 6: Dec, sc 5, dec (7 sts)
Row 7: Dec, sc 3, dec (5 sts)
Row 8: Dec, sc, dec (3 sts)
Tie off.
First panel tied off. Repeat rows 1-8 for second panel. Do not tie off second panel. Put both panels together, matching up all sides. Chain 1 and sc around the entire piece. (Sc, ch, sc) into the bottom corners of Row 1. Stuff once you’ve crocheted about two-thirds around. Slst to beginning st to close. Tie off. Repeat for the second ear. Set these aside for assembly later.
Tail (Make 2 Panels) in Mustard
Row 1: Ch 5, sc along (4 sts)
Row 2: Dec, sc, inc (4 sts)
Row 3: Inc, sc, dec (4 sts)
Row 4: Dec, sc, inc (4 sts)
Row 5: Inc, sc, dec (4 sts)
Row 6: Dec, sc, inc (4 sts)
Rows 7-9: Sc along (4 sts)
Row 10: Inc, sc, dec (4 sts)
Row 11: Dec, sc, inc (4 sts)
Row 12: Inc, sc, dec (4 sts)
Row 13: Dec, sc, inc (4 sts)
Row 14: Inc, sc, dec (4 sts)
Rows 15-17: Sc along (4 sts)
Row 18: Dec, sc, inc (4 sts)
Row 19: Inc, sc, dec (4 sts)
Row 20: Dec, sc, inc (4 sts)
Row 21: Sc 2, dec (3 sts)
Row 22: Dec, inc (3 sts)
Row 23: Inc, dec (3 sts)
Row 24: Dec, sc (2 sts)
Row 25: Dec (1 st)
Tie off first panel. Repeat rows 1-25 for the second panel. Do not tie off the second panel. Put both panels together, matching up all sides. Chain 1 and sc around the entire piece. Make sure that the tip of the tail is pointing to the left (i.e., away from the lion’s face) as you look at it. Stuff after every couple of stitches once you’ve started to crochet up the other side. Slst to beginning st to close. Tie off. Set aside for assembly later.
Tail Tuft (Make 2 Panels) in Terracotta
Row 1: Ch 5, sc along (4 sts)
Row 2: Inc, sc 2, inc (6 sts)
Row 3: Inc, sc 4, inc (8 sts)
Rows 4-6: Sc along (8 sts)
Row 7: Dec, sc 4, dec (6 sts)
Row 8: Sc along (6 sts)
Row 9: Dec, sc 2, dec (4 sts)
Row 10: Sc along (4 sts)
Row 11: Dec twice (2 sts)
Row 12: Dec (1 st)
Tie off first panel. Before beginning second panel, cut off a length of Terracotta yarn and set it aside for a moment. Repeat rows 1-12 for the second panel. Do not tie off the second panel. Put both panels together, matching up all sides. Chain 1 and begin to sc around. Stop about halfway down the first side. Pull up a loop and leave this for now. Now with your length of Terracotta yarn that you cut earlier, sew the tail in place between the two panels of the tuft. When finished, continue crocheting around the outside. When you reach the tail, crochet in the stitches of the front panel only since this portion is already sewn shut. Stuff once you’ve crocheted about two-thirds around. Slst to beginning st to close. Tie off. Set aside for assembly later.
Cheeks (Make 2) in Lightweight Pink Cotton Yarn or Embroidery Thread
With 2.25mm hook:
Rnd 1: Sc 6 into a magic ring (6 sts)
Rnd 2: Inc around (12 sts)
Tie off. Repeat for second cheek. Put these aside for assembly later.

Assembly
Step 1: Attach Eyes, Nose, Mouth, Cheeks, and Front Paws
The first thing’s first! We need to attach all of our facial features to the front panel.
BUT WAIT! THIS IS REALLY IMPORTANT: Make sure your front panel is the one that you worked the BLO stitches on (row 25 of body) and that the free front loops of that row are facing out/you. This is where the mane will be worked later!
The first thing I did was attach the cheeks because I wanted the 12mm safety eyes to overlap onto the cheeks slightly.
Next, insert your 12mm safety eyes so that they are slightly overlapping onto the cheeks.
Next, insert a safety nose or stitch one on using embroidery/crochet thread in an upside-down triangle shape. Stitch on the mouth.
Finally, attach the front paws to the body by sewing across the top of each one. Tie a knot on the back to secure.
Step 2: Attach Body, Tail, Back Paws, and Ears
Okay, here are all the pieces you should now have at this step. Almost there!
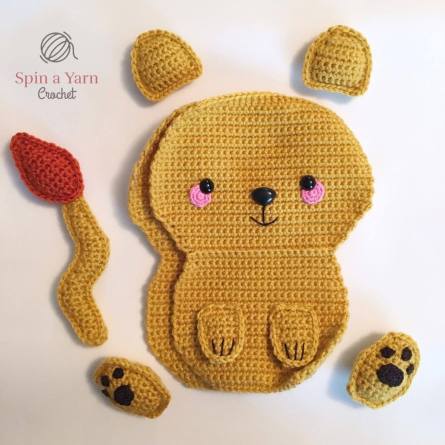
Cut off five lengths of Mustard coloured yarn about 30 cm (12 inches) long each. Put them aside for later.
Place the two body panels together, matching up all sides.
Make sure the front of your Lion is facing you as you crochet around the outside of the piece.
Starting on the left side of the head, in the middle begin attaching the panels together by chaining one and single crocheting around the outside of the panels in Mustard.
Stop about halfway down the body. Pull up a long loop and leave this for now.
Now, with your tapestry needle and a length of yarn that you set aside earlier, place the tail between the panels and attach it by sewing through all three pieces; the top panel, the tail, and the bottom panel. When finished, tie a knot to secure and hide the yarn tails between the panels of the body.
Next, you will attach the first back paw. With your tapestry needle and a length of yarn that you set aside earlier, place the back paw between the panels and attach it by sewing through all three pieces; the top panel, the paw, and the bottom panel. When finished, tie a knot to secure and hide the yarn tails between the panels of the body.
Now, picking up where you left off, continue single crocheting around the outside of the body. Remember, when you get to the tail and the back paw, simply sc in the stitches of the front panel only. Once you are past these, continue single crocheting both panels together as normal.
Stop when you’ve crocheted across the bottom of the body. Pull up a long loop and leave this for now. Now, with your tapestry needle and a length of yarn that you set aside earlier, place the second back paw between the panels and attach the same way you did for the first.
Continue crocheting around. Remember, when you reach the second paw, sc in the stitches of the front panel only. Continue to sc both panels together as normal once you are past the paw. Crochet around the body and stop a few stitches from the top.
Stuff the body.
Now, with your tapestry needle and a length of yarn that you set aside earlier, place the first ear between the panels and attach it by sewing through all three pieces; the top panel, the ear, and the bottom panel. When finished, tie a knot to secure and hide the tails between the panels of the head.
Now, picking up where you left off, continue single crocheting around the outside of the body. Remember, when you get to the ear, simply sc in the stitches of the front panel only, since this portion is already sewn shut. Once you are past the ear, continue single crocheting both panels together as normal.
Stop when you get about halfway across the head. Pull up a long loop and leave this for now. Top up stuffing.
When stuffed, place the second ear between the panels and attach it the same way you did for the first.
Continue crocheting around. Top up stuffing. Close with a slst to first st. Tie off. With your tapestry needle, poke the yarn tail back inside the piece.
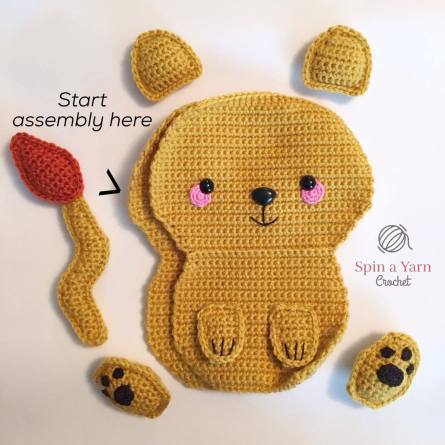
Step 3: Create the Mane
The mane is done using a 4.00mm hook and Terracotta yarn.
Join your yarn in a stitch on the left side of the lion’s head. Work the mane in the stitches that you just made as you crocheted around. When you get down to the bottom of the head, the mane is worked in the front loops of Row 25 of the body.
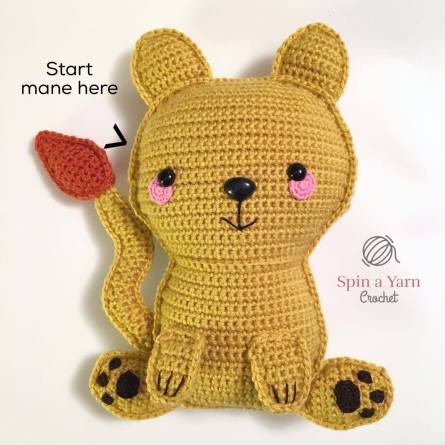
Mane: Ch 1, slst to next st, 5 dc in next st, skip 1 st, sc in next st, [skip 1 st, 5 dc in next st, skip 1 st, sc in next st], repeat [ ] around.
Join to first st with a slst and tie off. Hide yarn tail inside the body.
Finishing Touches
Lastly, I did some needle sculpting to indent the eyes a little bit to add a bit of character. With a length of Mustard yarn, you can do this by doing the following steps:
- Insert your tapestry needle behind Eye A (I started with the right eye, but it doesn’t matter);
- Exit the needle from behind Eye B;
- Reinsert the needle into a different stitch behind Eye B;
- Exit the needle out the back of your Lion’s head;
- Thread the yarn tail from Eye A into your needle. Reinsert your needle into a different stitch behind Eye A;
- Exit your needle out the same stitch in the back of your Lion’s head;
- Gently tug on both yarn tails to create the sculpting.
- Tie a knot in the yarn tails and poke back inside the piece.
Whew! You made it! Enjoy your Fearsome Lion!
- Funny Pictures
-
 These are the Pics That Simply Describe Your Life
-
 Hilariously Accurate Parenting Memes That Show the Other Side of Parenthood
-
 Great Pics That Just Depict Our Lives
- Recipes
-
 Crispy Baked Avocado Fries
-
 Baked Beans and Hot Dogs with Biscuit Topping
-
 Roasted Rosemary Lemon Chicken Breasts
- Lifehacks
-
 Crochet Basics: Twisted Fringe
-
 7 Crochet Tips And Tricks
-
 How To Work Crochet Into Denim
- Crochet Ideas
-
 Crochet Snorlax Plushie Doll
-
 Crochet Cat in 1 Row
-
 Crochet Beautiful Penguin Toy
- DIY
-
 Popsicle Stick and Jingle Bell Christmas Tree Ornament
-
 Upcycled Mason Jar Chicken Vase
-
 Crochet Namaste Stephanie Doll
- Knitting Ideas
-
 Knitted Keepsake Bag
-
 Knitted Textured Heart Dishcloth
-
 Knitted Snowfall Dishcloth