Crochet Cherry Pie Granny Square Tutorial

The Crochet Cherry Pie Granny Square is a fun and creative way to showcase your crochet skills while creating a beautiful and eye-catching piece. The square features a combination of stitches that mimic the layers of a cherry pie, with rich reds and browns for the crust, and vibrant greens for the cherries. The intricate details of the pattern make it a joy to work on, and the end result is a stunning square that can be used in a variety of projects such as blankets, pillows, or even as a standalone piece of art. Whether you're a seasoned crocheter or just starting out, this pattern is sure to inspire and delight. So grab your crochet hook and get ready to create a deliciously adorable Crochet Cherry Pie Granny Square!
Materials
- Worsted weight yarn in cranberry, beige, and an accent color for the square
- Sizes H 5mm and G 4mm crochet hooks (yes, you need both!)
- Tapestry needle
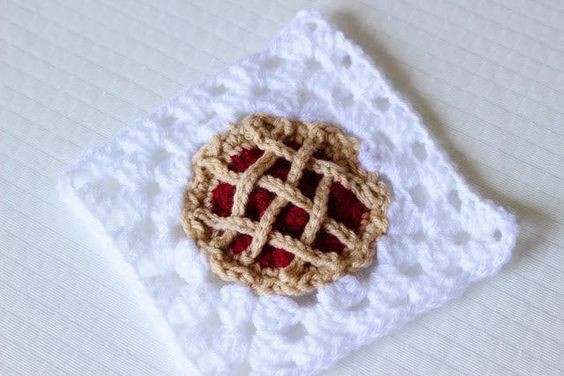
Cherry Pie
Note: I crochet this portion VERY loosely!
Begin with a magic ring in red using the H hook. Ch 1, 10 Sc in ring, sl st to join, switch to G hook, Ch 2.
Rounds Instructions
Round 2: *Bobble st in first st, Sc in next st*, repeat from * around (5 bobbles & 5 Sc), sl st to join, Ch 2.
Round 3: 2 Dc in each st around, sl st to join, Ch 2.
Round 4: *Bobble st in first st, Sc in next st*, repeat from * around, sl st to join, color change to beige, Ch 1.
Round 5: Sc in each st around, sl st to join, switch to H hook, Ch 1.
Round 6: *2 Sc in first st, sl st in next st*, repeat from * around, sl st to join, finish off, weave ends.
Lattice Crust
Step 1: Using G hook and beige yarn, begin with a slip knot, Ch 15, finish off leaving a 6in. tail for sewing.
Step 2: Repeat 5 times for a total of 6 individual Ch 15 strips.
Step 3: Using a tapestry needle, sew 3 Ch strips to the top of the pie parallel to each other. Don’t sew along the entire length of each Ch, just tack down each end of the Ch strip.
Step 4: Working perpendicular to the 3 strips sewn down, weave each of the other 3 strips in a lattice style.
- 1st strip: under 1st strip, over 2nd strip, under 3rd strip, tack down the edges.
- 2nd strip: over 1st strip, under 2nd strip, over 3rd strip, tack down the edges.
- 3rd strip: under 1st strip, over 2nd strip, under 3rd strip, tack down the edges.
*See video tutorial for any questions or leave me a comment below!*
Granny Square
Round 1: With new color, sl st into the top right corner of pie, all in the same st: CH 2, 2 DC, CH 3, 3 DC, CH 1, skip 1 fluted “pie crust” point, 3 DC in next fluted “pie crust” point, CH 1. *3 DC, CH 3, 3 DC, CH 1, skip 1 fluted “pie crust” point, 3 DC in next fluted “pie crust” point, CH 1*, repeat from * twice more forming a square, sl st to beginning CH 2.
Rounds 2-3: Continue in this same manner – in corners 3 DC, CH 3, 3 DC, CH 1 and in all other CH spaces 3 DC, CH 1.
- Funny Pictures
-
 Hilarious Memes for Those Bored to Tears
-
 Weekly Treat of Funniest Parenting Memes for Good Laugh out Loud Right Now
-
 Really Funny Pics to End These Weekend Perfectly
- Recipes
-
 Crispy Baked Avocado Fries
-
 Scrambled Chickpea and Spinach Pitas
-
 Cinnamon Pancakes
- Lifehacks
-
 Crochet Basics: Aligned Cobble Stitch
-
 Brick Stitch Crochet Tutorial
-
 Crochet Basics: Wattle Stitch
- Crochet Ideas
-
 Crochet Snorlax Plushie Doll
-
 Crochet Beautiful Penguin Toy
-
 Crochet Tiny Snowman
- DIY
-
 DIY Santa Craft For Kids
-
 Paper Plate Angel Craft
-
 Upcycled Mason Jar Chicken Vase
- Knitting Ideas
-
 Knitted Bridger Cowl
-
 Knitted Keepsake Bag
-
 Knitted Cutie Cupcake Dolls