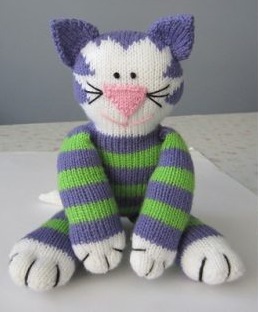
Create a Cute Knit Kitten Toy for Kids

Jessica
Jan 28, 2020 05:21 AM
Good day!
It's my first post here, though I've registered long ago.
I found a very interesting pattern for a knit kitten toy and made it for my children.
Good day!
It's my first post here, though I've registered long ago.
I found a very interesting pattern for a knit kitten toy and made it for my children.
Materials –
50gms Main colour (MC) – White 8ply /DK
50gms Colour 1 (C1) – Purple 8ply /DK
50gms Colour 2 (C2) – Green 8ply /DK
Small amounts of pink & black for ears, nose & features.
1 pair 3.25mm knitting needles.
Fibre fill, sewing notions.
Please read through pattern before starting.
BODY BACK
Stocking stitch is used throughout.
LEGS — Starting at bottom of leg at the paw, with MC, cast on 9 sts.
St st 2 rows.
Next row — Increase 1 st each end of this, and every K row until 15 sts.
Row 8 – Purl.
Rows 9 to 12 – St st
Row 13 – Changing to C1, continue in stripes of 6 rows C1 & 6 rows C2, until 54 rows from cast on edge.
Carry the alternate colour up the side of your work, linking in every couple of rows, ready to use for the next
stripe. You’ll have 7 stripes.
Leaving this leg on needle or stitch holder, do a 2nd leg the same.
Keeping in stripe pattern,
Knit across both legs to begin body – 30 sts.
Continue in 6 row stripes, for 42 rows (7 stripes).
SHAPE SHOULDERS
Keeping in stripes, St st 2 rows.
Decrease 4 sts at the beginning of next 3 rows,
Then decrease 3 sts at the beginning of next row – 15 sts. *
HEAD BACK
Now for the head, we are going to work in 4 row stripes.
The smaller stripes will blend in better with the face markings. You can do a plain colour back head if you prefer.
Continue now, in the same colour sequence, but in 4 row stripes. AT THE SAME TIME, shape head by following the outside stitches on the graph. Disregard the pattern, & colour key, that is only for the face. On the very last stripe, you’ll be doing 6 rows of C1 instead of 4 to finish the head.
BODY FRONT
Work the same as back until you reach *
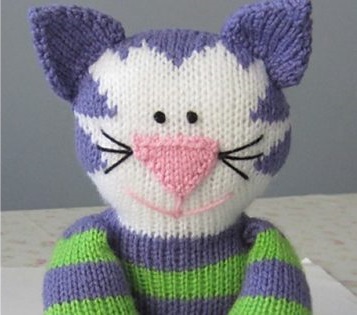
FACE
Follow the above graph to shape head as you did for the back. AT THE SAME TIME knit the face
markings.
Knit in the Intarsia method, use separate balls of yarn to do the colour work, remembering to twist yarns, when changing colours to prevent holes. I use small spindles of C1 & a ball of white to make untangling each row easier. If you are unfamiliar with Intarsia, there are many tutorials on the net.
ARMS – Make 2
Starting at the paw with MC, cast on 15sts.
St st 2 rows
Row 3 – Inc in every 3rd st (ie knit in front & back of stitch) — 20sts.
St st 3 rows.
Row 7 – Inc in every 4th st – 25sts.
St st 3 more rows.
Changing to C1, continue in 6 row stripes of C1 & C2 until 6 stripes have been worked.
Keeping in stripes, St st 2 more rows.
Next row – (K2, K2tog ) to last st, K1 – 19 sts.
P 1 row
Next row — (K2, K2tog) to last 3 sts, K3.
P 1 row.
Cast Off.
EARS – Make 4
It’s up to you if you do 4 ears “cat colour”, or 2 inside ears pink.
Cast on 12sts.
St st 2 rows.
Decrease each end of every K row until 2 sts remain.
P2 tog, fasten off.
TAIL – Make 1
Starting with the darker colour (C1 or C2),
Cast on 16 sts.
St st 5 (6 row stripes) – 30 rows. Change to White.
St st 4 rows straight.
Row 35 – (K2, K2tog) to end – 12sts.
St st 3 rows.
Row 39 – (K2, K2tog) to end – 9sts.
St st 3 rows.
Row 43 – K2tog to last st, K1.
Row 44 – P2tog to last st, P1 – 3sts
Thread through remaining sts, pull tight & fasten off.
NOSE – Make 1
(Easier than trying to embroider on a nose).
With pink, cast on 2 sts.
Purl 1 row
Increase each end of every K row, until 10 sts.
Purl 1 row.
Cast off.
MAKE UP
BODY
Sew in all the ends of the colour work on the face. I tend to use some of the ends on the toy to sew up, sew in all other ends not needed.
With right sides facing out sew up around the whole cat, using a mattress stitch, BUT leave an opening at one side of the body for stuffing.
Fill the legs first, but only ¾ fill them so the cat is flexible enough to sit. Sew a small running stitch across the first row of the body to separate the legs from the body. Finish stuffing the rest of the body & head firmly, especially at the neck and stitch up gap at side of body.
ARMS
Run a thread through the cast on edge of paw & gather in tight. Continue seaming up arm until about an inch
from the top, to give yourself some room to stuff. Stuff arm, again not too full (¾) and continue sewing up
seam. Flatten top of arm opening, so the arm seam is positioned at the back, not the side of the arm, before
sewing across.
Sew arms to the body at shoulder, with the seam facing in towards the body.
EARS
Join 2 ears right sides facing out & slip stitch together for each ear. Sew to head, see photo for guide.
NOSE
Stitch nose to face, then embroider on mouth. Use black yarn to make French knots for eyes, & sew on
whiskers.
NOTE – do not put buttons, beads or removeable eyes on any toys meant for children under 5 years.
Check in your area for local standards.
TAIL
Sew up seam from tail up, and stuff, again ¾ full and sew on to back of cat.
PAWS
To sew in the toes on the paws, knot a long length of 8ply black yarn. Make a large knot. From the back of paw, off to one side, sew through from back to front, pulling knot inside the toy to anchor. Stitch three stitches over edge of paw, one to the side, middle and other side. As you do, pull each stitch to form the toes and fasten at the back of each stitch before going to the next one. Bury yarn back inside the toy to finish.
Its gorgeous .