How to Make Your Own Harry Potter Wand

I saw that Harry Potter toy attracted you, so I decided to continue this topic. Here is the tutorial on how to make Harry Potter's wand. Let the magic begin!
Materials
– Less than 25 yards each of 2 shades of brown, one more milk chocolate and one more rust brown
Shown: Caron Simply Soft in Chocolate (which is actually the rusty shade) and Taupe (which is the milk chocolate one).
– Size F (3.75mm) crochet hook (NOTE: You want this to be TIGHTLY stitched; I crochet very tightly; you may need to drop down a hook size or two to be sure the stitches are tight)
– A chopstick or pencil and a small amount of stuffing
– Scissors, tapestry needle, stitch marker (I used a bobby pin), tape measure
– (Optional) Some black eyeshadow to enhance and a Q-tip or eyeshadow applicator
Finished Size
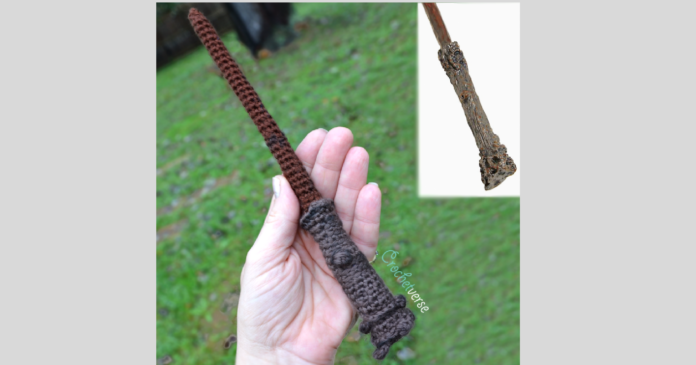
About 11” tall, the length I researched his wand in the shows to be!
Rated: Intermediate, you must pay close attention to counts and stitches as some of this is worked non-conventionally.
Abbreviations
- Ch: chain
- Sc: single crochet
- Nxt: next
- Rem: remaining
- St(s): stitch(es)
- Hdc: half double crochet
- Dc: double crochet
- Scbp: single crochet back post (insert the hook from back to front around the post of the stitch)
- Sc dec: single crochet decrease (work a partial sc in each of the nxt 2 sts, yarn over, and pull through all loops at once to complete decrease)
Instructions
Begin with the chocolate color brown (Taupe shown).
Make a magic ring, ch 1:
Do not turn rounds, do not join rounds; this is worked in a spiral.
Mark the 1st st of each round to keep track. I like a bobby pin in one loop only so as not to stretch the stitches.
The right side of the piece is the right side of the sts. It is easy to accidentally flip crochet worked in the round inside out; be sure you do not do this.
Round 1
(Worked from the base of the handle to the tip of the wand) 6 sc in the ring. (6)
Round 2
2 sc in each sc around. (12)
Round 3
Sc in the nxt 9 BACK LOOPS ONLY (these are the ones to the back/inside of the work), in the nxt st FRONT LOOP ONLY make (hdc, dc, hdc, sl st) all in the same loop, now push those sts out of the way to the outside and work an sc in the SAME st but in the BACK LOOP ONLY, sc in the last 2 back loops only. Only the 12 sc are counted in this round:
The (hdc, dc, hdc, sl st) created the “bump” at the bottom of the wand. Do NOT work into these stitches or count them as part of round 3. Simply keep the sts to the outside of the work and ignore them for the next round. As you work, keep all bobbles and bumps to the outside/right side of the wand.
Round 4
First, you work around in the front loops, then you come back and work into the back loops.
Part A
(Worked in the front loops only of round 3) place the marker in the back loop of the stitch you are about to work, in the FRONT LOOP ONLY of the stitch you just marked make a 2dcbobble as follows (yarn over, insert hook in the indicated loop, yarn over, pull up a loop, yarn over and pull through 2 loops on the hook, yarn over and insert the hook in the same loop, yarn over and pull up a loop, yarn over and pull through 2 loops, yarn over and pull through all 3 loops on the hook, then sl st in the same loop), sc in the nxt 2 front loops only, make the same 2dcbobble as described above in the nxt front loop only, sc in the nxt 2 front loops only, 2dcbobble in the nxt front loop only, sc in the last 5 front loops only.
These stitches in Part A only create “cragginess” and do not count as a st count for the round; you will NOT work into these for round 5.
Part B
(Worked in the remaining back loops only of round 3) beginning in the back loop you marked at the beginning of part A, go back around and work 1 sc in each of the 12 rem back loops that are not worked from part A. (12 sc) These loops can be a little hard to see; most importantly, you need 12 sc at the end of this round. If one sc ends up in the wrong loop, it is not the end of the world.
Rounds 5-6
Make 1 sc in each sc around. (12)
Round 7
Repeat round 4, both parts A & B.
Round 8
Sc in each sc around. (12)
Rounds 9-10
(Sc in the BACK LOOP ONLY of the nxt st, sc in the FRONT LOOP ONLY of the nxt st) six times total. (12 sc)
Rounds 11-12
Sc in each sc around. (12 sc)
Rounds 13-15
Sc in the BACK LOOP ONLY of each sc around. (12 sc)
Round 16
Mark the back loop only of the st you are about to work from round 15, then create a 2dcbobble in the front loop only of the stitch you just marked, sc in the rem 11 sts, then make one more sc in the back loop you marked at the beginning of this round. (12 sc; the bobble does not count as a st)
Rounds 17-19
Sc in the BACK LOOP ONLY of each sc around. (12 sc)
Round 20
Sc in the nxt st, scBP (single crochet back post, insert hook from back to front around the post of the st) in the nxt 4 sts, sc in nxt 3 sts, scbp in the last 4 sts. (12 sts)
Round 21
Scbp in each st around. (12 sts)
Round 22
(Sc in the FRONT LOOP ONLY, ch 1) in each st around, (you are chaining one between every sc made), sl st to the 1st sc made, cut yarn, leaving a long tail to stitch to mold into shape as needed later.
Pause and Measure
At this point, my piece measures right at 4″ tall. If you are longer, your tension is looser than mine, so you’ll need to drop a hook size if you want to have yours identical to mine. If yours is shorter, it is likely okay, as we want this to be tightly stitched like an amigurumi. If you are a LOT shorter and you want yours to be identical to mine, go up a hook size and try again. I tend to be on the tight side of crocheting; my testers often have to drop a size hook to meet my gauge.
Round 23
Join the rusty brown in the remaining back loop of the 1st stitch from round 22, ch 1, sc in same loop and each rem back loop around. (12 sc)
Round 24
Stuff the handle a bit at the point. (Sc in the nxt st, sc dec over the nxt 2 sts) four times total. (8 sts)
Round 25
Sc in each sc around. (8 sc)
Rounds 26-35
Sc in each sc around. (8 sts)
Stuff at this point somewhat firmly.
Round 36
(Sc in the nxt 2 sts in the BACK LOOP ONLY, sc dec over the nxt 2 sts in the BACK LOOPS ONLY) two times total. (6 sts)
Rounds 37-56
Sc in each st around. (6 sc) I did NOT stuff the rounds of 6 sc; the chopstick inserted upon a firmly stuffed bottom was perfect to stabilize the wand.
INSERT THE CHOPSTICK/PENCIL INTO THE WAND NOW
Round 57
(Sc dec over the nxt 2 sc) three times total, cut yarn leaving a tail to seam any rem hole closed. (3 sc)
Finishing
Weave in all the tails. I used the tail from the handle’s last round (round 22) to bring it closer into the base of the wand tip and make it appear a bit more seamless.


