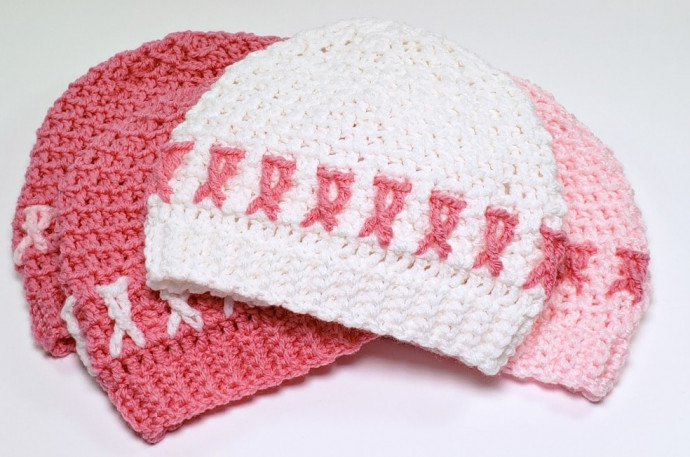
Crocheting a Stylish Hat: Instructions and Techniques

You’ll Need:
Red Heart Baby Hugs Light Weight Yarn [3] 4.5 oz / 127 g and 318 yds / 290 m. 100% Acrylic Yarn in the following colors:
- Child size: White and Happy
- Adult Small size: Pinkie and Happy
- Adult Medium size: Happy and Pinkie
Crochet hook 4 mm and 5 mm;
Yardage: 43 g / 108 yards (child), 47 g / 117 yards (adult small), 52 g / 131 yards (adult medium);
Scissors;
Yarn Needle;
Stitch Marker.
Size:
- Child (6-10 years): Finished hat circumference 20-21 inches; hat height 8 inches.
- Adult Small (teen): Finished hat circumference 21-22 inches; hat height 8.25 inches
- Adult Medium (women): Finished hat circumference 22-23 inches; hat height 8.75 inches.
- Adult Large (men): Finished hat circumference 23-24 inches; hat height 9 inches.
Stitches Control:
4 sts x 9 rows = 10 x 10 cm.
Special Techniques
Back Bar of the Double Crochet
The back bar is the horizontal bar that falls beneath the back loop.
Triple Treble (abbreviated trtr)
Wrap your yarn around your hook 4 times. Insert your hook into the specified stitch, yarn over and pull up 1 loop. *Yarn over and pull through 2 of the loops on your hook. Repeat from * to 5 times.
Notes
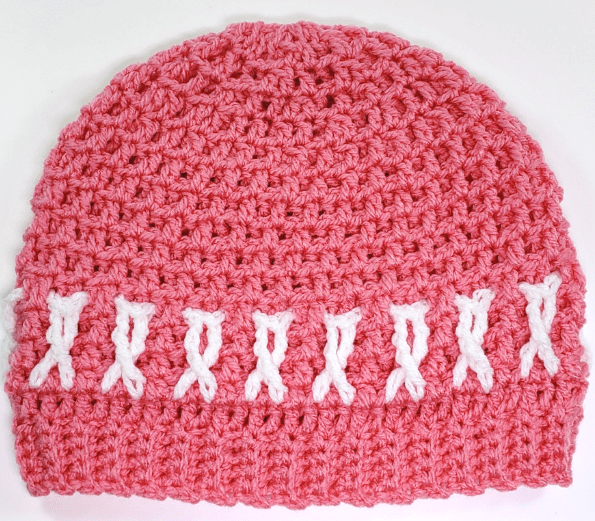
Choose 2 colors: The Main Hat Color and the Ribbon Color.
Ch 2 does not count as a stitch and you do not work into it.
Sl st does not count as a stitch and you do not work into it.
Using the yarn end you left at the beginning of the band, whipstitch the edges of the band together.
Stitch Multiple: 4
Instructions
The hat is crocheted from the band to the top of the head in one piece. The band is worked back and forth in rows. The main body of the hat is worked in joined rounds. We shape the hat to fit the curve of the head and close after your decrease rounds using my hat seaming technique.
The instructions are for the Child Size pattern. Changes for sizes Adult Small, Adult Medium and Adult Large are in parenthesis.
Hat Band
The Hat Band is worked back and forth in rows using your crochet hook 5 mm and the color you chose for the main hat color. Leave a 6-10 inch tail of yarn before beginning Row 1. You will use this tail to seam the hat band closed at the very end of the project.
Row 1: Ch 6, begin in the 2nd ch, 1 sc in each st across, ch 1, turn. [5]
Row 2-60 (64, 68, 72): 1 sc in the bl of each of the next 4 sts, 1 sc in the last st, ch 1, turn. [5]
Do not finish off. Proceed to The Hat Body section below.
Hat Body
The Hat Body is worked in joined rounds using crochet hook 5 mm and the Main Hat Color.
First, we need to work along the row ends of the band. Rotate your work to allow you to work along the row ends and proceed to Round 1 below.
R1: Ch 2 (*see notes section), 1 dc in each row end of the band. Sl st to the first dc to join. [60 (64, 68, 72)]
R2-3: Ch 2, 1 dc in the first st, 1 dc in the back bar of the next st. *1 dc in the next st, 1 dc in the back bar of the next st. Repeat from * to around. Sl st to the first dc to join. [60 (64, 68, 72)]
R4: Ch 2, 1 dc in the first st, 1 dc in the back bar of the next st. *1 dc in the next st, 1 dc in the back bar of the next st. Repeat from * to around. Place a stitch marker on the working loop of yarn and remove your hook. The Hat Body Section will be continued again following The Ribbon Section Below.
Ribbon Section
The Ribbon Section is worked onto the main hat with your chosen Ribbon Yarn Color and crochet hook 4 mm. You will be working into the unworked loops (the front and back loops) of stitches in Round 2.
Finding the unworked loops in Round 2.
The stitches to skip after you work the second trtr.
R1: Skip the first 3 dc of Round 2. Join yarn with a standing trtr stitch (*see special stitches) in the unworked loops of the fourth dc of R2. If you find this too difficult, join instead using a sl st and ch 6. Trtr in the unworked loops of the second skipped dc of R2. *Ch 5, skip the next dc, skip the dc you worked the trtr into, skip the next 3 dc, 1 trtr in the unworked loops of the next dc. Trtr in the unworked loops of the second skipped dc (in the last 3 dc set). Repeat from * to across. Ch 5 and sl st to the top of the first trtr to join. Finish off, leaving a yarn tail for seaming. [30 (32, 34, 36) trtr and 15 (16, 17, 18) ch5sp]
Hat Body Continued
Remove your stitch marker and with crochet hook 5 mm, place your hook into the working loop of Main Hat Color yarn and sl st in the first dc of R4 to join.
Be sure to work in front of the ch 5 loop of the Ribbon Yarn Color.
We work in front of the ch 5 from the Ribbon Round.
We do not work around it (we are not enclosing it).
Push the ch 5 loops to the inside of the hat and work in front of it but do not enclose it (work around the actual chain), instead, let the chain hang loosely inside the hat.
When we work behind the trtr stitches, we will be locking them in place by picking up the back bar of the second trtr after our first yarn over for the dc st we are working.
This is where the back bar of the ribbon stitch is. We pick this back bar up for 2 stitches.
We pick up the back bar from the ribbon stitch before we insert our hook into the dc behind it.
We do the same thing for the next dc we work. We pick up the same back bar from the same ribbon stitch.
Each dc will be worked in the same manner as before, working (1 regular dc in the next st, 1 dc in the back bar of the next dc, 1 regular dc in the next st, 1 dc in the back bar of the next dc).
R5: Ch 2. Working in front of the ch 5 loop of the Ribbon Yarn Color, 1 dc in the first st, 1 dc in the back bar of the next st. Working behind the trtr sts, pick up the back bar of the second trtr, 1 dc in the next st, pick up the same back bar of the second trtr, 1 dc in the back bar of the next st. *Working in front of the ch 5 loop of the Ribbon Yarn Color, 1 dc in the next st, 1 dc in the back bar of the next st. Working behind the trtr sts, pick up the back bar of the second trtr, 1 dc in the next st, pick up the same back bar of the same trtr, 1 dc in the back bar of the next st.** Repeat from * to ** around. Sl st to the first dc to join. [60 (64, 68, 72)]
R6-10 (10, 12, 13): Ch 2, 1 dc in the first st, 1 dc in the back bar of the next st. *1 dc in the next st, 1 dc in the back bar of the next st**. Repeat from * to ** around. Sl st to the first dc to join. [60 (64, 68, 72)]
Hat Shaping (Decrease Section)
R11 (12, 13, 14): Ch 2, *dc2tog, 1 dc in each of the next 2 sts**. Repeat from * to ** around. Sl st to the first dc to join. [45 (48, 51, 54)]
When working into the dc2tog, I worked in whatever loop the first half was initially worked in. So if the first half of the dc2tog was worked in the back bar and I need to work a dc into the st for the pattern below, I worked a dc in the back bar of the dc2tog. As before, if this is too confusing, please just work regular (under the front and back loops).
R12 (13, 14, 15): Ch 2, *dc2tog, 1 dc in each of the next 2 sts**. Repeat from * to ** around. If you only have 1 stitch remaining after your last repeat, work 1 dc into that last st. Sl st to the first dc to join. [34 (36, 39, 41)]
R13 (14, 15, 16): Ch 2, *dc2tog, 1 dc in each of the next 2 sts**. Repeat from * to ** around. If you only have 1 stitch remaining after your last repeat, work 1 dc into that last st. Sl st to the first dc to join. [26 (27, 30, 31)]
R14 (15, 16, 17): Ch 2, *dc2tog, 1 dc in each of the next 2 sts**. Repeat from * to ** around. If you only have 1 stitch remaining after your last repeat, work 1 dc into that last st. Sl st to the first dc to join. [20 (21, 23, 24)]
R15 (16, 17, 18): Ch 2, *dc2tog, 1 dc in each of the next 2 sts**. Repeat from * to ** around. If you only have 1 stitch remaining after your last repeat, work 1 dc into that last st. Sl st to the first dc to join. [15 (16, 18, 18)]
Finish off and leave a 10 to 12 inch tail of yarn for closing the top of the hat.
Finishing
Closing the Top of the Hat
Weave the yarn end through the last round of stitches, between the front and back loops. Tighten to cinch the top closed. Thread the needle through the small center opening and weave it inside securely. Trim your yarn ends.
Seaming the Hat Band
Using the yarn tail you left at the beginning of the hat band, thread your yarn on your yarn needle and whipstitch the two edges of the band together.
Weave in any remaining ends.