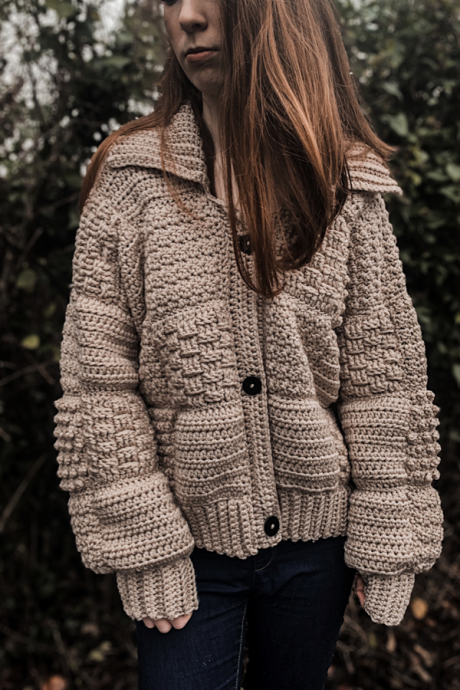
How to Make a Cozy Cardigan with Chunky Monkey Yarn


You’ll Need:
Approx. 1392(1624)m of Scheepjes Chunky Monkey Yarn– Bulky/weight 5/chunky;
Crochet hook 6 mm;
3 buttons;
3 stitch markers;
Measuring tape.
Size:
S/M(L/XL)
To fit bust 32-38(40-46)
Back width: 25(30) inches
Length (without ribbed hem) is 20″.
Sleeve length: 18 inches.
To make a size 2XL-3XL I would suggest following the pattern for size L/XL but instead of using a 6mm hook, I would use a 6.5 or 7mm hook.
Special Stitches
Berry Stitch (BST): Insert hook into specified stitch, draw up a loop, ch 3, yarn over, draw yarn through both loops on hook.
Stitches Control
Each square should measure 5″x 5″. Add more stitches to each square if needed to get to the width of 5″ but make sure to pay attention to stitch multiples.
Instructions
Size S-M
HDC Square x 21:
Stitch multiples: Any
Ch 14
Row 1: hdc in 2nd ch from hook, hdc in each ch across. Turn.
Row 2: ch 1, hdc in each stitch across. Turn.
Repeat Row 2 until square measures 5″ in height.
Fasten off.
Griddle Square X 13:
Stitch multiples: Even number
Ch 14
Row 1: sc in 2nd ch from hook, *dc in next stitch, sc in next stitch, repeat from * across, ending the last stitch with a sc. Turn.
Row 2: ch 3 (counts as a dc), *sc in next stitch, dc in next stitch, repeat from * across ending last stitch with a dc. Turn.
Row 3: ch 1, sc in first st, *dc in next st, sc in next st, repeat from * across ending the row with a sc. Turn.
Repeat Rows 2-3 until square measures 5″ in height.
Fasten off.
Bobble Stitch Square X 7:
Stitch multiple: Any even number
Ch 14
Row 1: sc in 2nd ch from hook, sc in each st across. Turn.
Row 2: ch 1, sc in first st, *BST in next st, sc in next st, repeat from * across row. Turn.
Row 3: ch 1, sc in each st across. Turn.
Row 4: ch 1, BST in first st, sc in next st, *BST in next st, sc in next st, repeat from * across row, ending with a sc in last st. Turn.
Row 5: ch 1, sc in each st across. Turn.
Repeat Rows 2-5 until square measures 5″.
Fasten off.
Basketweave Square X 13:
Stitch multiples: 6+5
Ch 17
Row 1: dc in 4th ch from hook, dc in each ch across. Turn.
Row 2: ch 2 (counts as a hdc), FPDC around each of next 2 sts, BPDC around each of next 3 sts, FPDC around each of next 3 sts, BPDC around each of next 3 sts, FPDC around next 2 sts, hdc on top of turning chain. Turn.
Repeat Row 2 until square measures 5″ in height.
Fasten off.
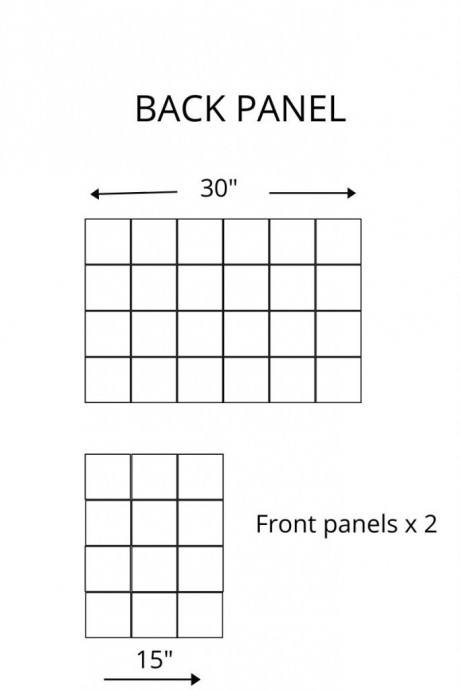
Back
For the back panel, you will need:
7 hdc squares; 5 griddle squares; 3 bobble squares; 5 basketweave squares.
Assemble squares as follows:
Using a yarn needle and some yarn, sew all the squares together. Weave in all your ends and leave to one side.
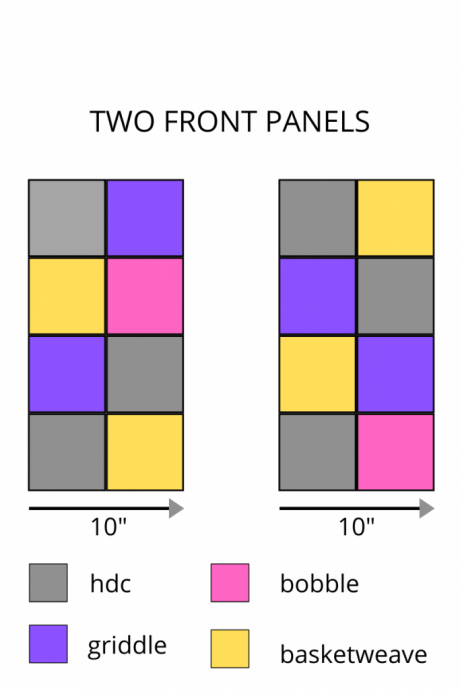
Front
For the front panels, you will need:
6 hdc squares; 4 griddle squares; 2 bobble squares; 4 basketweave squares.
Using a yarn needle and some yarn, assemble the squares as follows:
Using your yarn needle and some yarn, sew the squares like shown above. You will be making two front panels. Weave in all ends.
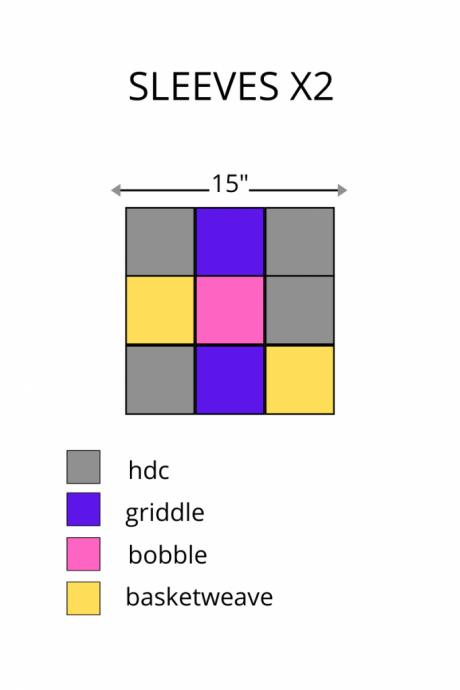
Sleeves
For the sleeves, you will need:
8 hdc squares; 4 griddle squares; 2 bobble squares; 4 basketweave squares.
You will assemble the squares as shown below:
Using your yarn needle and hook, sew all squares together. Weave in all ends.
Assembly
Lay your back panel on a flat surface with the right side facing up. Next, lay both front panels with their right sides facing down. Using a yarn needle, sew across the shoulders. Fasten off.
Next, lay your entire piece out flat with the wrong side facing up. Grab a sleeve and with a stitch marker, mark the centre stitch of the sleeve. Now align that marker with the shoulder seam of the cardigan and connect. Sew across to connect the sleeve to the cardigan. Repeat on the other side with the other sleeve.
Fold your cardigan over and sew along the under edge of sleeves and down along the sides of the cardigan. Turn the cardigan right side out now.
Ribbed Hem
Ch 11
Row 1: sc in 2nd ch from hook, sc to end. Turn.
Row 2: ch 1, sc in BLO of each st across. Turn.
Repeat Row 2 until ribbing is long enough to go around the entire bottom edge of cardigan (that includes the bottom edges of the two front panels and the bottom edge of the back panel). Fasten off leaving a very long tail. With your yarn needle and long tail, sew the ribbed hem to the bottom edge of cardigan.
Sleeve Cuffs
Make 2.
Ch 11
Row 1: sc in 2nd ch from hook, sc in each ch to end. Turn.
Row 2: ch 1, sc in BLO of each st across. Turn.
Repeat Row 3 until ribbed cuff measures 11 inches. You can add more rows here if you want a wider cuff. Fasten off leaving a long tail. Now with your yarn needle and long tail, sew the cuff to the bottom of the sleeve. You may have to cinch the bottom of the sleeve slightly for the cuff to fit around it. Repeat for the other sleeve.
Collar
Ch 22
Row 1: sc in 2nd ch from hook, sc in each ch to end. Turn.
Row 2: ch 1, sc in BLO in each st across. Turn.
Repeat Row 2 until you have a total of 64 rows completed. You can add more rows here if needed. You just need to make the collar long enough to go around the neckline.
Fasten off leaving a long tail. Sew the collar to the neck of the cardigan.
Inner Front Panel Edging
Make a chain long enough to go from beneath the collar to the bottom edge of cardigan. Then hdc into the 2nd ch from hook, hdc in each ch to end. At the end of the row ch 1, hdc in each st across. You will do a total of 5 rows in hdc. Fasten off leaving a long tail and sew to one of the inner front panel edges.
Now make another chain of the same length and do 3 rows of hdc. Then with three stitch markers, lay out where you want your buttons to be.
Next row: ch 1, hdc in each st until you reach the first stitch marker. When you reach the marker, ch 1, skip that st with the marker in it and continue placing a hdc in each st until you reach the next stitch marker. When you reach the 2nd marker, ch 1, skip that stitch with the marker and continue on placing a hdc in each st until you reach the final marker, ch 1, skip that stitch, hdc to end. Fasten off leaving a long tail.
Sew this buttonhole strip to the other inner front panel edge.
Sew buttons corresponding to the buttonholes on the other strip.
Sizes L-XL
Just like the size S-M you will make 4 types of squares; hdc squares, griddle squares, bobble squares and basketweave squares. However, you will need to make an extra 12 squares. These extra 12 squares can be 4 hdc, 3 griddle, 2 bobble and 3 basketweave. It’s entirely up to you.
Aim for 5×5 inches for each square.
The sleeves will be the same as for size S-M, however, you can go 4×4 squares if you want a larger sleeve. It’s up to you.
Sizes 2XL-3XL
Follow for sizes L-XL but use a larger hook. I would suggest a 6.5 hook or even a 7mm hook. The aim here is to make each square 5.5×5.5 inches.
I would suggest each sleeve to be 4 squares x 4 squares.