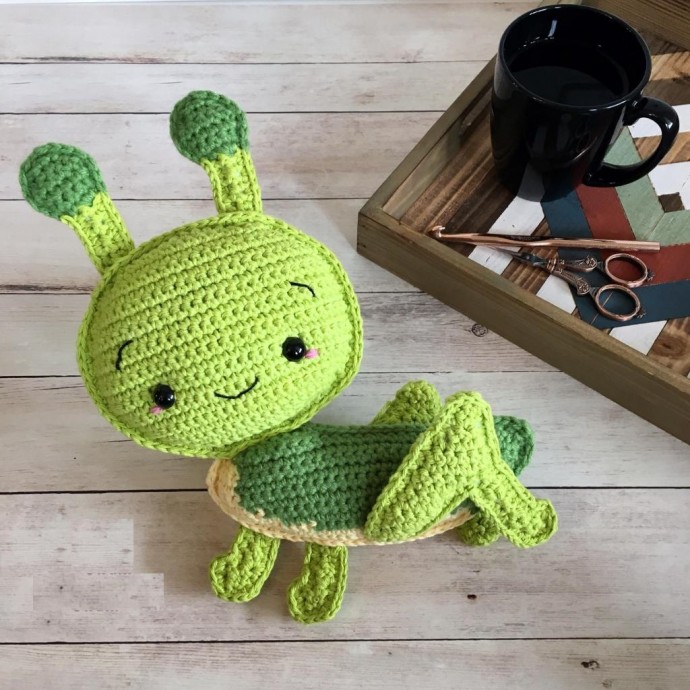
How to Crochet a Cute Grasshopper


You’ll Need:
50g of Bernat Handicrafter in Hot Green for the head, antennae, and legs;
50g of Bernat Handicrafter in Pale Yellow for the belly;
50g of Bernat Super Value in Lush for the body and antennae;
Crochet hook 3.5mm;
12mm Safety eyes;
Light weight pink yarn for cheeks;
Stuffing;
Tapestry needle.
Size: 10” x 11” from top to bottom.
Instructions
Head
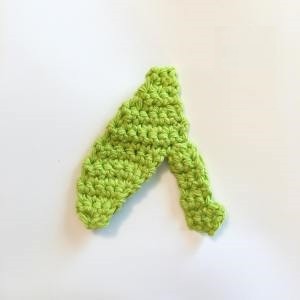
Make 2 panels in Hot Green and 3.5mm hook:
The panels are worked from the bottom up. The panels will have a slight curve (i.e. they won’t be completely flat), but this won’t be noticeable after stuffing. Ch 1 and turn at the end of each row.
- Row 1: In Hot Green ch 11, sc 10 across (10 sts)
- Row 2: Inc twice, sc 6, inc twice (14 sts)
- Row 3: Inc twice, sc 10, inc twice (18 sts)
- Row 4: Inc twice, sc 14, inc twice (22 sts)
- Row 5: Inc, sc 20, inc (24 sts)
- Row 6: Inc, sc 22, inc (26 sts)
- Rows 7-8: Sc across (26 sts)
- Row 9: Inc, sc 24, inc (28 sts)
- Rows 10-16: Sc across (28 sts)
- Row 17: Dec, sc 24, dec (26 sts)
- Row 18: Dec, sc 22, dec (24 sts)
- Row 19: Dec, sc 20, dec (22 sts)
- Row 20: Dec, sc 18, dec (20 sts)
- Row 21: Dec, sc 16, dec (18 sts)
- Row 22: Dec twice, sc 10, dec twice (14 sts)
- Row 23: Dec, sc, hdc 2, dc 4, hdc 2, sc, dec (12 sts)
Tie off. Repeat rows 1-23 for the second panel. Put these aside for assembly later.
Body
Make 2 panels starting in Yellow and 3.5mm hook:
The panels are worked from the bottom up. Ch 1 and turn at the end of each row.
- Row 1: In yellow, ch 16, Y15 (15 sts)
- Row 2: Yinc twice, Y11, Yinc twice (19 sts)
- Row 3: Yinc twice, Y15, Yinc twice (23 sts)
- Row 4: Yinc twice, Y5, G12, Y3, Yinc (26 sts)
- Row 5: Yinc, Y1, G18, Y5, Yinc (28 sts)
- Row 6: Y5, G23 (28 sts)
- Row 7: Ginc, G23, Y3, Yinc (30 sts)
- Row 8: Y4, G26 (30 sts)
- Row 9: Ginc, G25, Y4 (31 sts)
- Row 10: Y4, G27 (31 sts)
- Row 11: Ginc, G26, Ydec twice (30 sts)
- Row 12: Gdec twice, G26 (28 sts)
The next two rows are worked only part way across the previous row before chaining and turning to create a pointed little tail section.
- Row 13: Ginc, G4 (6 sts)
- Row 14: Gdec three times (3 sts)
Tie off.
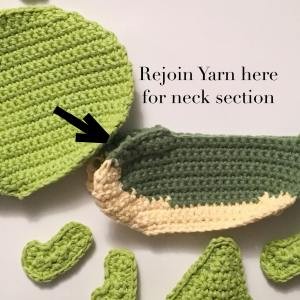
Now you will join your yarn in the first stitch of Row 12 to create a neck curve for you to attach the head to later.
Neck Section
- Row 1: Gdec twice, G5 (7 sts)
- Row 2: Gdec twice, G1, Gdec (4 sts)
Tie off. Repeat all of the above for the second panel, except make sure you carry your yarn for the colour changes on the opposite side as you did for the first panel. Put these aside for assembly later.
Bent Leg
Make 4 panels in Hot Green and 3.5mm hook:
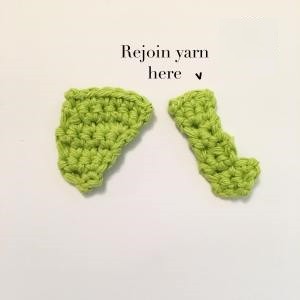
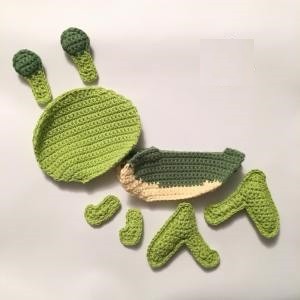
Each bent leg panel is made in two separate pieces, comprised of the main leg and the foot piece, as shown in the photos below.
Main Leg Piece
- Row 1: Ch 3, sc 2 (2 sts)
- Row 2: Inc twice (4 sts)
- Row 3: Sc across (4 sts)
- Row 4: Sc 3, inc (5 sts)
- Row 5: Inc, sc 4 (6 sts)
- Row 6: Dec, sc 3, inc (6 sts)
- Row 7: Sc across (6 sts)
- Row 8: Dec, sc 3, inc (6 sts)
Tie off. Set aside for now.
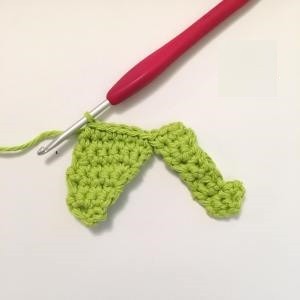
Foot Piece
- Row 1: Ch 4, sc 3 (3 sts)
- Row 2: Sc across (3 sts)
- Row 3: Inc, sc 1 (3 sts) [Leave the last st unworked.]
- Row 4: Dec, sc (2 sts)
- Rows 5-6: Sc across (2 sts)
- Row 7: Inc, sc (3 sts)
- Row 8: Sc across (3 sts)
Tie off.
Rejoin your yarn in the last stitch of the foot piece and continue to Row 9 (below) to join the main leg piece and the foot piece.
Completed Bent Leg
- Row 9: Dec, sc 7 (8 sts)
- Row 10: Dec, sc 6 (7 sts)
- Row 11: Sc across (7 sts)
- Row 12: Dec, sc 5 (6 sts)
- Row 13: Dec, sc 2, dec (4 sts)
- Row 14: Dec, sc 2 (3 sts)
- Row 15: Sc across (3 sts)
- Row 16: Dec, sc 1 (2 sts)
Tie off. Repeat all of the above to create a second panel of the bent leg.
Place both panels together, matching up all sides, then join the panels by ch 1 and sc around both panels. (Sc, ch, sc) in the same st at the heel of the foot. Stuff when you’ve crocheted about two-thirds of the way around. Continue crocheting around. Top up stuffing as you go. Slst to first st to close. Tie off and poke the yarn tails back inside the piece. Repeat for second Bent Leg.
Front Legs
Make 4 panels in Hot Green and 3.5mm hook:
- Row 1: Ch 4, sc across (3 sts)
- Row 2: Sc across (3 sts)
- Row 3: Inc, sc 1 (3 sts) [Leave last st unworked.]
- Row 4: Dec, sc (2 sts)
- Rows 5-6: Sc across (2 sts)
Tie off. Repeat Rows 1-6 for a second foot panel.
Place both foot panels together, matching up all sides, then join the panels by ch 1 and sc around both panels. (Sc, ch, sc) in the same st at the heel of the foot. I did not bother to stuff the feet. Slst to first st to close. Tie off and poke the yarn tails back inside the piece. Repeat for the second foot.
Antennae
Make 4 panels starting in Hot Green and 3.5mm hook:
- Row 1: In Hot Green, ch 3, sc 2 (2 sts)
- Rows 2-6: Sc across (2 sts)
- Switch to Lush (i.e. the same colour green you used for the body).
- Row 7: Inc twice (4 sts)
- Row 8: Inc, sc 2, inc (6 sts)
- Row 9: Inc, sc 4, inc (8 sts)
- Row 10: Dec, sc 4, dec (6 sts)
- Row 11: Dec, sc 2, dec (4 sts)
- Row 12: Dec twice (2 sts)
Tie off. Repeat Rows 1-12 for the second antenna panel.
Place both panels together, matching up all sides, then join the panels by ch 1 and sc around both panels. (Sc, ch, sc) in each of the bottom corners. Stuff when you’ve crocheted about two-thirds of the way around. Continue crocheting around. Top up stuffing as you go. Slst to first st to close. Tie off and poke the yarn tails back inside the piece. Repeat for second antenna.
Assembly
Step 1: Body and Legs
The first thing we will do is join the body panels together, attaching the legs as we go.
Cut two lengths of Pale Yellow yarn approximately 30cm/12″ long and set these aside for now.
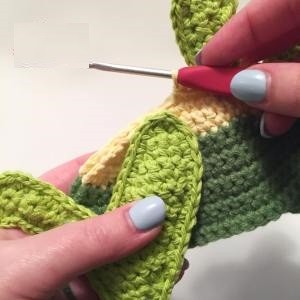
Place the two body panels together, matching up all sides.
**Make sure the front of the body is facing you as you crochet around the outside.**
Starting on the left side as shown above, begin attaching the panels together by chaining one and single crocheting around the outside of the panels in yellow.
Crochet around the front curve of the body, then stop before you get to the bottom. Pull up a loop and leave this for now. With a length of yarn you set aside earlier, sew the first foot in place by placing it between the panels and sewing through all three pieces, the back panel, the foot, and the top panel. Tie a knot in the yarn tails to secure and hide the yarn tails between the panels.
Repeat for the second foot.
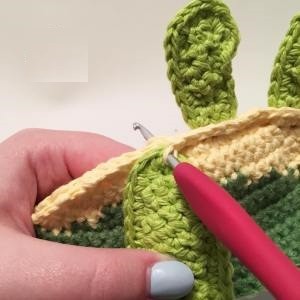
Continue crocheting around. When you get to the feet, simply crochet in the stitches of the front panel only, since this section is already sewn shut. Crochet both panels together as normal once you are past the feet.
After only one or two stitches, stop here to attach the first bent leg.
Place the bent leg on top of the body panels (i.e. not in-between them) and line up the bottom of the bent leg with the bottom of the body panels, as shown above. As you crochet across, crochet through all three pieces, the leg, and both body panels. You will only crochet through the 3 stitches at the bottom of the leg. The leg will be super floppy at the moment; don’t worry, we’ll stitch it down later.
Continue crocheting around. Switch to Lush coloured yarn where appropriate.
Stop when you are about halfway across the top of the body. Stuff the body.
Now you can stitch down the upper part of the Bent Leg to the front body panel. The yarn tails will be hidden inside the panels.
Continue stuffing and crocheting across. Close with a slst to first st. Tie off. With your tapestry needle, poke the yarn tail back inside the piece.
Stitch the second Bent Leg on the back of your grasshopper’s body. This leg is kind of optional; if you are mounting it as a wall-hanging, it will lay flatter without the back leg. Since it’s simply stitched on, you can add it or remove it any time!
Step 2: Face, Head and Antennae
Now it’s time to add our facial features to the front head panel. I used 12mm safety eyes and then used black crochet thread to stitch on a mouth and eyebrows.
Feel free to stitch on cheeks using light weight pink yarn.
Cut three lengths of Hot Green yarn about 30cm/12″ long and set them aside for now.
Place the two head panels together, matching up all sides.
**Make sure the front is facing you as you crochet around the outside.**
Starting on the left side as shown above, begin attaching the panels together by chaining one and single crocheting around the outside of the panels in Hot Green.
Stop when you get to the bottom of the head. Pull up a loop and leave this for now. With a length of yarn you set aside earlier, sew the body in place by placing it between the head panels and sewing through all three pieces, the back panel, the body, and the top panel. Tie a knot in the yarn tails to secure and hide the yarn tails between the panels.
Continue crocheting around. When you get to the body, simply crochet in the stitches of the front panel only, since this portion is already sewn shut.
Stop when you get to the top of the head and stuff.
Now with a length of yarn you set aside earlier, sew the first antenna in place by placing it between the head panels and sewing through all three pieces, the back panel, the antenna, and the top panel. Tie a knot in the yarn tails to secure and hide the yarn tails between the panels.
Continue crocheting around, topping up stuffing as you go. When you get to the antenna, simply crochet in the stitches of the front panel only.
Place and attach the second antenna the same way you did for the first.
Top up stuffing. Continue crocheting around. Close with a slst to first st. Tie off. With your tapestry needle, poke the yarn tail back inside the piece.
Finally, add some character by needle sculpting the eyes as follows:
- With a length of Hot Green yarn, insert your tapestry needle behind Eye A (I started with the right eye, but it doesn’t matter);
- Exit the needle from behind Eye B;
- Reinsert the needle into a different stitch behind Eye B;
- Exit the needle out the back of the head;
- Thread the yarn tail from Eye A into your needle. Reinsert your needle into a different stitch behind Eye A;
- Exit your needle out the same stitch in the back of the head.
- Gently tug on both yarn tails to create the sculpting.
Tie a knot in the yarn tails and poke back inside the piece.