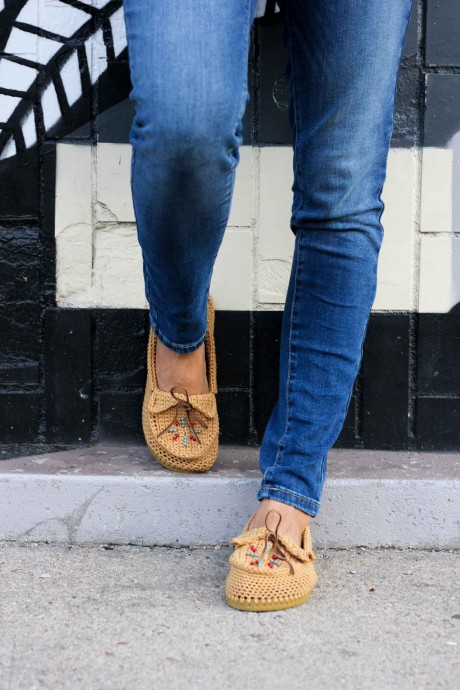
How to Create Stylish Flip Flop Moccasins


You’ll Need:
Lion Brand 24/7 Cotton – 1 skein (100g/186 yds) – color: Camel;
Tapestry needle;
1 pair of flip flops (One size smaller than you wear normally);
Stitch markers;
Crochet hooks 2.5 and 3.5 mm;
Sewing needle;
Sharp tool to poke holes in flip flops;
Approx 2 yards leather laces cut into 1-yard pieces;
Sharp scissors;
Monofilament (fishing line) – optional;
Seed beads – optional.
Stitches Control:
8 sts and 7 rows/rnds = 2.5 cm in single crochet
Instructions
Moccasin Sides and Heel
Notes: This section is worked in a spiral. Therefore there is no need to join or ch 1 at the beginning of each round.
To Begin:
Use a sharp instrument to poke holes every ¼ inch (.25”) around each flip flop sole. You want the hole to go at an angle from about the middle of the way down the sole to about ¼ inches into the top of the sole. Make your holes far enough from the edge that the yarn won’t rip through the rubber.
With a smaller hook, attach MC yarn at the back of the heel by inserting your hook from the top of the flip flop toward the bottom of the sole, grabbing the yarn and pulling through to the top of the sole. Ch 1 through the loop you’ve created. The resulting tail inside the flip flop marks the first st of this and subsequent rows. Add a proper stitch marker here if desired.
Round 1:
(using smaller hook) sc into each hole on the flip flop sole, sl st to join. Do not turn.
Rounds 2-3:
(switch to larger hook) sc in each sc around. Do not turn.
Round 4:
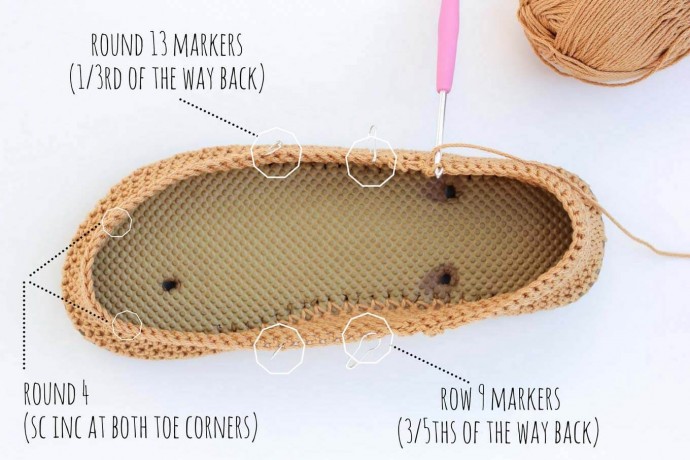
sc in each st until the front toe area, sc 2 in one of the st near where your pinky toe will go, sc in each st, sc 2 in one of the st where your big toe will go, sc in each sc to back of heel. Do not turn.
Rounds 5-8:
sc in each sc around. Do not turn.
Begin Short Rows for Heel Shaping:
Notes: Place a stitch marker on either side of the moccasin, 3/5th of the way back toward the heel. The following rows are worked back and forth around the back of the heel. Pattern notes assume the flip flop is positioned with the heel toward you and the toe away from you when the “right” or “left” stitch marker is mentioned.
Row 9:
(Without turning work) sc in each st until left marked st, sl st into marked st, turn.
Row 10:
ch 1, sk first st, sl st into next st, sc in each st until right marked st, sl st into marked st, turn.
Row 11:
(work toward left marker) ch 1, sk first st, sl st into next st, sc in each st until 1 sc of previous round remains, turn.
Row 12:
(work toward right marker) ch 1, sk first st, sl st into next st, sc in each st until 1 sc of previous round remains, turn.
Begin Rows for Leather Laces “Tube”:
Notes: Remove original markers for short rows. Place markers 1/3rd of the way back from the toe on either side of the moccasin. The following round is worked in the round as 1-8 were. Work sc stitches in an even density to create a smooth edge over the “bump” where the short rows taper. Round 13 is a total of approx 1.25 laps around the flip flop sole.
Round 13:
(work toward left marker and continue counterclockwise) ch 1, sk first st, sl st into next st, sc in each st around entire moccasin, ending at original marked st at back of heel. Do not turn.
Notes: The following rows are worked back and forth. Pattern notes assume the flip flop is positioned with the heel toward you and the toe away from you when the “right” or “left” stitch marker is mentioned.
Rows 14, 16, 18:
(work counterclockwise) ch 1, sc in each st ending in left marked st, turn.
Rows 15, 17, 19:
ch 1, sc in each st ending in right marked st, turn.
Row 20:
sc in each st ending at marked st at back of heel. Fasten off yarn and weave in ends.
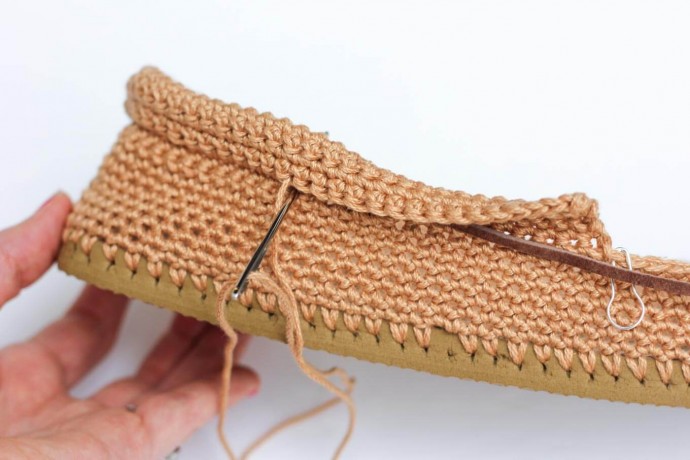
Finishing Leather Laces "Tube"
Fold the flap just created over and tuck one yard of the leather laces inside. With MC yarn and a tapestry needle, sew the laces into the tube using a whip stitch.
Moccasin Top
Row 1:
(using larger hook) ch 19, turn.
Row 2:
working into the second ch from the hook, sc in each ch, turn.
Rows 3, 5, 7:
ch 1, sk first sc, sc in next st, sc in each st until 1 st remains, sc 2 in last st, turn.
Rows 4, 6, 8:
ch 1, sc 2 in first st, sc in each st, turn.
Row 9:
ch 1, sk first st, sc in next sc, sc in each st, turn.
Row 10:
ch 1, sc in each st, turn.
Rows 11-12:
repeat rows 9 and 10.
Sizing Note:
If your foot is on the wider side, add 2 or 4 rows of sc here to make the top toe section wider. (Simply repeat row 10 twice or four times.)
Row 13:
ch 1, sc 2 in first sc, sc in each st, turn.
Rows 14, 16, 18, 20:
ch 1, sk first sc, sc in next st, sc in each st until 1 st remains, sc 2 in last st, turn.
Rows 15, 17, 19:
ch 1, sc in each st until 2 st remain, sk 1 st, sc in last st, turn.
Row 21:
ch 1, sc in each st until 2 st remain, sk 1 st, sc in last st. Do not turn. Place marker in the last st of this row.
Note: The following round is worked around the entire top piece. Take care to keep stitches loose enough that the fabric doesn’t pucker.
Round 22:
(Without turning) work in sc around curved toe section and up the flat side of the piece. At the corner of the moccasin “point,” sc 2 in the corner and sl st down the slant of the point and back up the other slant, sc 2 in the other “point,” sc in each sc across the last flat side ending in the st before the marker. (See Diagram F.) Fasten off and weave in ends.
Finishing
Sewing Together
Block the top piece if desired. Identify the best-looking side of your top piece–specifically look at the points because one edge should be smoothest due to the slip stitching. This side should face your foot—the points will be folded over, revealing the smoothest edge.
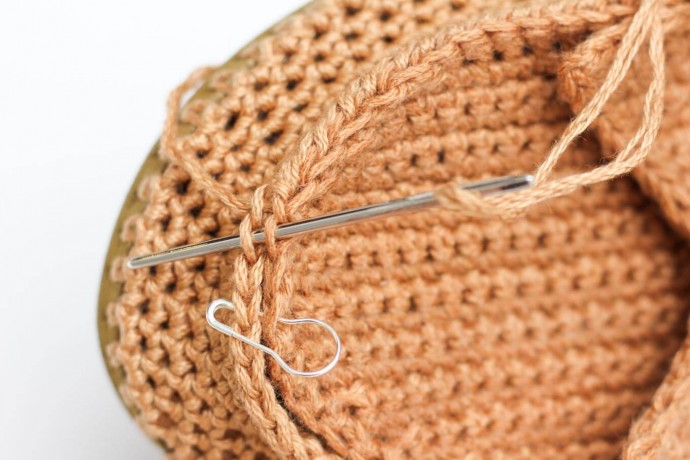
Align the toe with the shoe rim and pin using stitch markers or safety pins. Using one strand of yarn (not doubled up), attach yarn inside the shoe at the right corner side of the top piece. Whip stitch around the toe, working from the top piece into the shoe rim as pictured. Work from the top down, going through the bottom loop of the top piece and the bottom loop of the shoe rim.
Before tying off yarn, do one stitch through the moccasin top into each folded-over “point” to keep them tacked down. Fasten off yarn.
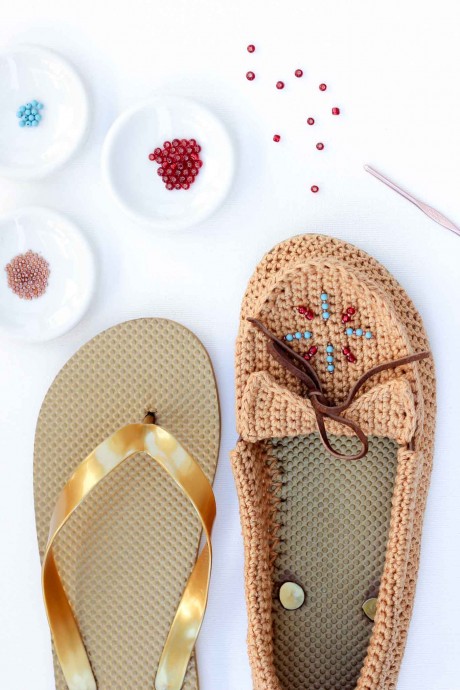
Adding Beads
Using a sewing needle, attach monofilament inside moccasin with a knot. Pull monofilament to the outside top of the slipper and add beads (you may, unfortunately, have to remove the needle for this and then rethread after adding the beads), putting the needle back into the shoe once one strand of beads has been added. Repeat for each spoke of the design.
N/A