


Easy Crochet Pineapple Pattern — Make a Cute Pineapple Motif with Leaves

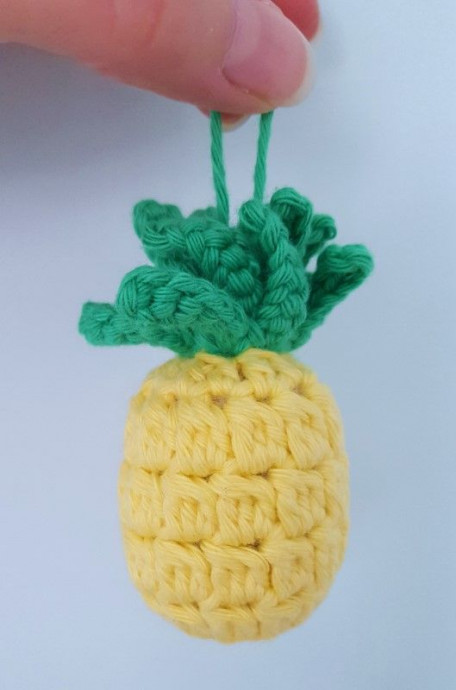
Crocheting a cute pineapple motif is a fun way to add a playful, tropical accent to blankets, keychains, garlands or amigurumi. This pattern is a compact, stuffed pineapple with two layers of leaves on top. Below you’ll find the materials, stitch notes, step-by-step instructions for the yellow pineapple body and the green leaves, plus finishing tips.
I made up my own pattern, inspired by a lot of the crochet pineapple images on Pinterest.
Materials Needed
Terms are in US (even though I'm from the UK!). To convert this to UK, replace all dc stitches with tr.
Use a yellow yarn and a green yarn, and a hook size appropriate for your yarn and to keep the crochet nice and tight for stuffing. I used Rico Creative Cotton Aran yarn that I had in stash. You can buy this yarn from Love Crafts*.
Short stitch notes / Abbreviations
- ch = chain
- dc = double crochet (US)
- sl st = slip stitch
- dc2tog, dc3tog = double crochet 2 together, 3 together (cluster decreases)
Yellow Pineapple Instructions
- Magic ring
- ch2 (counts as first dc), 11 dc into ring, join with sl st to ch2 (12 dc)
- ch2 (counts as half of first dc2tog), dc into same st (to complete first dc2tog), dc2tog into each st, join with sl st to first dc (after the ch2) (12 dc2tog clusters)
- ch2 (counts as first part of first dc3tog) dc2tog into same st (to complete first dc3tog), dc3tog into each st, join with sl st to dc2tog (12 dc3tog clusters)
- ch2 (counts as first part of first dc3tog) dc2tog into same st (to complete first dc3tog), dc3tog into each st, join with sl st to dc2tog (12 dc3tog clusters)
- ch2 (counts as first part of first dc3tog) dc2tog into same st (to complete first dc3tog), dc3tog into each st, join with sl st to dc2tog (12 dc3tog clusters)
- Stuff the pineapple.
- ch2 (counts as half of first dc2tog), dc into next st (to complete first dc2tog across 2 sts), dc2tog across 2 sts around, join with sl st to first dc (6 st)
- Cut yarn
Green Leaves Instructions
(When I slip stitched into the yellow stitches to create the leaves, I did this by working my hook from the inside of the pineapple to the outside. Rather than working as if I was continuing the rounds of the pineapple, by working my hook from the outside of the pineapple to the inside. I’m sure the leaves would look fine either way – it just meant that the top of the leaves were the right side, although they stick up in the air anyway.)
- Join green yarn with a sl st to any of the 6 sts in the last round of the yellow, ch7, sl st into 2nd ch from hook and into all stitches down
- sl st into next st, ch7, sl st into 2nd ch from hook and into all stitches down
- sl st into next st, ch7, sl st into 2nd ch from hook and into all stitches down
- sl st into next st, ch7, sl st into 2nd ch from hook and into all stitches down
- sl st into next st, ch7, sl st into 2nd ch from hook and into all stitches down
- sl st into next st, ch7, sl st into 2nd ch from hook and into all stitches down
- sl st into first st again (you will be going around the 6 stitches again to create another layer of leaves), ch7, sl st into 2nd ch from hook and into all stitches down
- sl st into next st, ch7, sl st into 2nd ch from hook and into all stitches down
- sl st into next st, ch7, sl st into 2nd ch from hook and into all stitches down
- sl st into next st, ch7, sl st into 2nd ch from hook and into all stitches down
- sl st into next st, ch7, sl st into 2nd ch from hook and into all stitches down
- sl st into next st, ch7, sl st into 2nd ch from hook and into all stitches down
- sl st somewhere to finish and cut yarn
This should give you 12 leaves, two layers of 6, but they should all wriggle about into a nice cluster of leafiness!
Sew ends in the best way to neaten the top and create a loop if you'd like one. Your pineapple is made!
Finishing tips
- Use a tight tension so the stuffing doesn't show through the stitches.
- Neaten yarn ends by sewing them into the inside of the pineapple or weaving them into the underside of the leaves.
- Make a hanging loop or sew the pineapple onto a larger project like a blanket or bag for a summery accent.