Crochet Triangle Top Guide

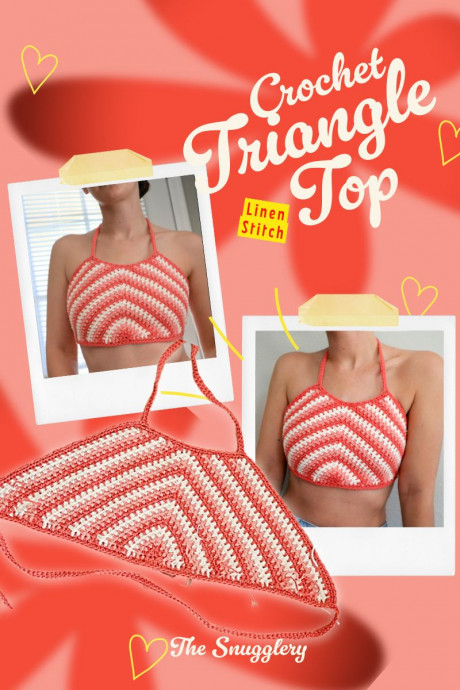
Crochet triangle tops are the perfect blend of comfort and style for warm, sunny days. These tops are not only cute but also versatile, pairing well with high-waisted shorts, jeans, or even flowy skirts. The intricate crochet design adds a trendy bohemian touch to any outfit, effortlessly elevating your look. Whether you're headed to the beach or a music festival, a crochet triangle top is a fun and flirty choice that will have you feeling fabulous all day long. Don't be afraid to mix and match colors and patterns to create your own unique style with this delightful wardrobe essential!
What You’ll Need
Materials:
- 3 colors of worsted weight cotton yarn (I used Lily’s Sugar and Cream)
- 4.5mm crochet hook
Getting Started: The Triangle Base
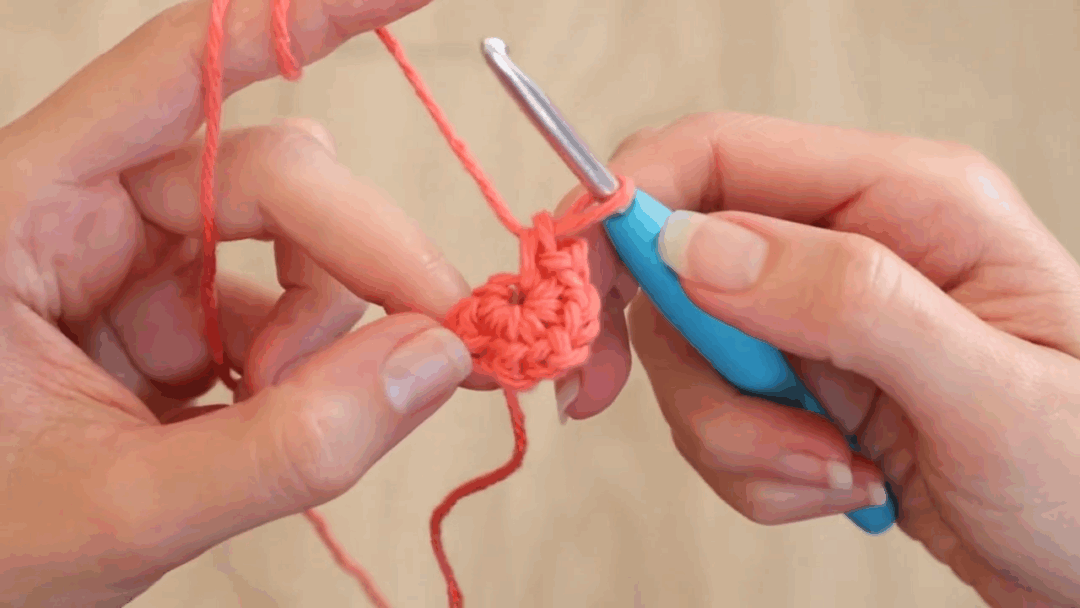
Row 1
- Create a magic circle
- Chain 1 to fasten onto the circle
- Into the circle, work *1sc, ch1* repeat between ** a total of 5 times, then work 1 more sc (6scs, 5ch1s)
Row 2: Setting Up Your Increases
- Chain 1, turn
- In the chain-1 space between your last 2 single crochets: work 1 sc, ch 1, 1 sc (increase)
- Chain 1, then 1 sc in the next chain space
- Chain 1, then work another increase in the 3rd chain space
- Chain 1, 1 sc in the next chain space
- Chain 1, then work a final increase in the last chain space
Change color after every 2 rows.
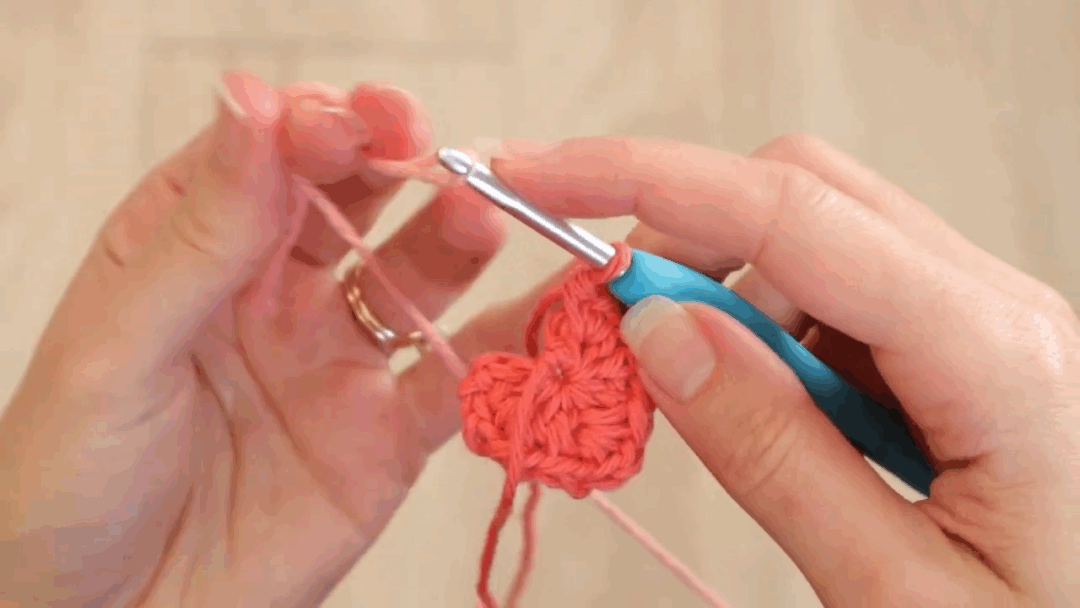
Rows 3 and Beyond
- Chain 1, turn
- Work an increase (1sc, ch1, 1sc) in the ch sp of the previous row’s corner increase
- *Ch1, 1sc in the next chain space* repeat up to the next increase
- Ch1, work another increase in the center increase ch sp.
- *Ch1, 1sc in the next chain space* repeat up to the next increase
- Ch1, work a final increase in the last chain space
Repeat row 3, changing color every 2 rows, until your triangle measures, from tip to bottom, 7″ -S/M, 8″ -L/XL, or 9″ -2X, 3X.
Growing the Sides
- Starting at the corner, begin your next row normally with a corner increase.
- Work in linen stitch pattern up the side.
- When you reach the chain space before your center increase, slip stitch into that space instead.
- Chain 1, turn, and work back down the same side.
- Work an increase in the corner as normal.
Continue growing your sides this way, being sure to maintain your striping pattern and slip stitch into the last ch sp of the row on the forward pass.
Sizing
Grow each side of your triangle until the long side of your parallelogram measures 10 inches (25cm) less than your bust measurement. For me this was 22″. To reach a width of 22″, I added 12 rows on either side of my triangle.
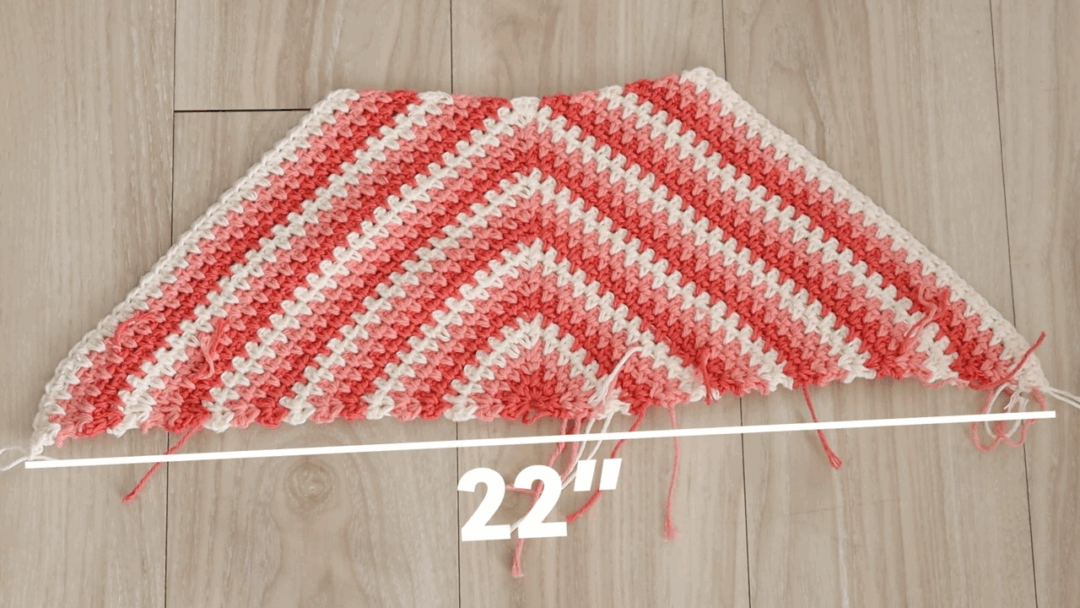
I found that every 2 rows to each side (so, basically, each full color stripe) added about 1″ to the width.
You can also hold your piece up to your chest at this point and make sure the girls are covered!
Border
- Fasten your next color to a corner increase space.
- Work linen stitch up the side.
- Along the top edge: work 1 sc in each space that you slip stitched into from previous rows, putting chain 1’s between them to maintain the linen stitch pattern.
- Continue down the other side with regular linen stitch.
Don’t forget corner increases!
Bottom Border
- Work 1 sc in-between each increase space.
- No chains between stitches for this border.
- Slip stitch to your first sc to complete border round 1.
Border Round 2 And Straps
- Right at the start of the round, begin chaining (back strap). Make an 18″ long chain.
- Single crochet back down the chain.
- When you reach your top, continue working a second row around the border in linen stitch.
- When you reach the top corner of your parallelogram, begin chaining the first neck strap. A 24″ chain.
- Single crochet back down the chain.
- Work in linen stitch to the space before the next corner.
- Work another 24″ neck strap.
- Continue in linen stitch down the 2nd side. At the corner increase, begin chaining another 18″ back strap.
- Single crochet down the chain.
- Work in single crochet along the bottom edge.
Finishing Touches
Weave in all yarn ends (there will be quite a few from the color changes!).
Enjoy your adjustable top!