Crochet Window Pane Stitch

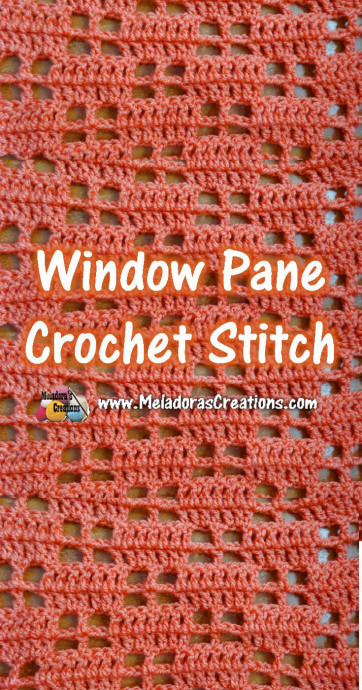
Crochet Window Pane Stitch is a versatile and visually appealing technique that creates a beautiful grid-like pattern resembling window panes. This stitch is perfect for adding texture and interest to your crochet projects, whether you are making a cozy blanket, a stylish scarf, or even a charming home decor piece like a throw pillow cover. By working alternating rows of basic stitches like single crochet and double crochet, you can achieve a stunning lattice design that is both elegant and easy to create. The Crochet Window Pane Stitch allows you to play with different colors and yarn weights to customize your project and make it uniquely yours. So grab your favorite yarn and crochet hook, and give this stitch a try - you'll be amazed at the lovely results you can achieve with just a few simple stitches!
Materials Needed
For this project you will need:
Hook
Any size, but I used a 5 mm hook or size H hook for the US.
Yarn
Any size, but I used worsted weight yarn, 4 ply US, 10 ply AU.
Abbreviations
- ch = Chain
- sl st = Slip Stitch
- st = Stitch
- sk a st = Skip a stitch
- sk 2 chs = Skip two chains
- SC = Single Crochet
- DC = Double Crochet
Repeat what’s in between * for the rest of the round.
Multiples of the Stitch
You need multiples of 12 then + 6 sts when you’ve reached your desired size.
To Start
Chain in multiples of 12 + 6, which means to chain in multiples of 12 until you reach your desired size. Once you do, then chain 6 more, and you’re ready to start row 1.
Row Instructions
Row 1
DC in the 9th ch of the row.
Ch 2, sk 2 then DC in the next st.
- *DC in the next 6 sts for a total of 7 DC’s in a row.
- Ch 2, sk 2 then DC in the next st.
- Ch 2, sk 2 then DC in the next st.*
Repeat for the row. Ch 3 and Turn.
Row 2
The ch 3 counts as your first st of the row.
DC in the next 6 DC’s.
- *Ch 2, sk the ch 2 and DC in the DC.
- Ch 2, sk the ch 2 and DC in the DC.
- DC in the next 6 sts for a total of 7 DC’s in a row.*
To end the row: You should be on the second part of your window pane. Skip 2 chains and DC in the 3rd chain over.
Repeat for the row. Ch 3 and Turn.
Row 3
The ch 3 counts as your first st of the row.
DC 1 into the next 2 chains. Don’t use the space, but use the actual ch stitch.
Then DC in the DC,
DC 1 into the next 2 chains.
DC in the next DC.
This gives you a total of 6 DC’s and the beginning ch 3 counts as your 7 DC’s in a row. So now we’re ready to do our window pane again.
- *Ch 2, sk the ch 2 and DC in the next.
- Ch 2, sk the ch 2 and DC in the next.
- DC 1 into the next 2 chains.
- Then DC in the middle DC.
- DC 1 into the next 2 chains.
- DC in next DC.*
Repeat for the row.
To End Your Row with a Window Pane
Ch 2, sk the ch 2 and DC in the next DC.
Ch 2, sk the ch 2 and DC in the top of the ch 3.
Ch 5 and Turn.
Row 4
Skip the first ch 2 space and DC in the middle DC.
Ch 2 and skip the next ch 2 space and DC in the next DC.
DC in the next 6 DC’s,
- *Ch 2 and DC in the middle DC.
- Ch 2 and DC in the next 6 DC’s.*
Repeat for row.
To End Row
You finish your Windowpane by DCing the ending ch 3.
Ch 5 and turn.
Row 5
Ch 5 counts as the first section of the window pane.
- *Skip 2 sts and DC in the next.
- Ch 2 and skip 2 and DC in the last DC before your ch 2.
- DC 1 into the next 2 chains.
- Then DC in the middle DC.
- DC 1 into the next 2 chains.
- Ch 2, sk the ch 2 and DC in the next.
- Ch 2, sk the ch 2 and DC in the last DC before your ch 2.*
Repeat for row.
Final Steps
End row by double crocheting in the next ch space to get your 7th DC in a row.
Repeat rows 2 – 5.