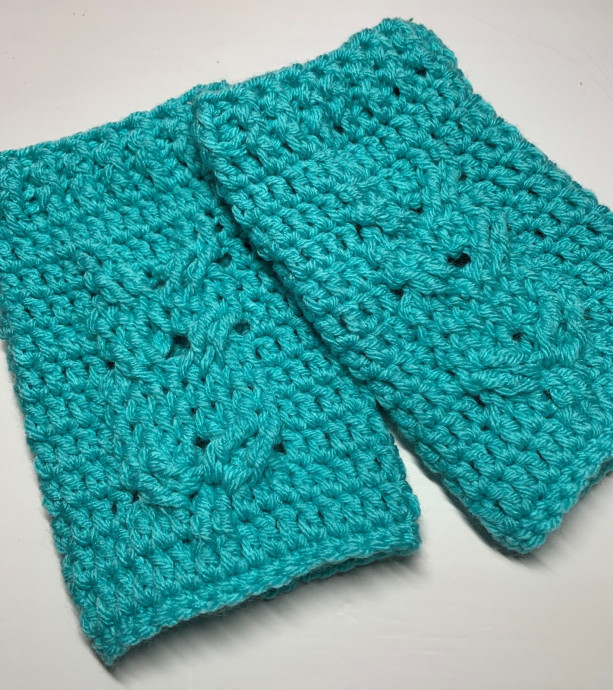
Crochet Cable Owl Fingerless Mittens

Introduction
Crochet Cable Owl Fingerless Mittens are a delightful and charming accessory that combines both style and practicality. These mittens not only keep your hands warm but also showcase a cute owl design that adds a touch of whimsy to your outfit. The intricate cable stitches bring a unique texture to the mittens, making them stand out from traditional designs. Whether you're a crochet enthusiast or just looking for a fun and cozy accessory, these mittens are sure to bring a smile to your face every time you wear them.
Materials Used
- Hobby Lobby I Love This Yarn #4 Worsted Weight Acrylic - 2 oz.
- #7/4.5mm hook
- Large Eye needle to sew in ends
Gauge
5 dc rows x 8 dc stitches = 2" x 2"
Pattern for Left Mitten
RND 1: ch32, be careful to keep straight and join to make a circle
RND 2: ch1, sc in each chain around. (32) Join after each row
RND 3: ch2 (does not count as a stitch), dc in join and each stitch around. (32)
RND 4: ch2, dc in join and next 14, ch2, sk2, dc in remaining 15. (30)
RND 5: ch2, dc in join and next 11, sk2dc, fptrc around next dc and 1st ch of ch2, working behind last 2 stitches - fptrc around 2 sk dc, working behind ch2 space - fpdtrc around 2 open dc from R19, sk remaining ch from ch2 and next dc, fptrc around next 2, working in front of last 2 stitches - fptrc around sk ch from ch2 and dc, dc in remaining 12. (34)
RND 6: ch2, dc in join and next 11, fpdc around next 4 stitches, sk2 fpdtrc, fpdc around next 4 stitches, dc in remaining 12. (32)
RND 7: ch2, dc in join and next 11, fpdc around next 4 stitches, sk2 fpdtrc, fpdc around next 4 stitches, dc in 5, ch4, sk 3, dc in last 4. (29)
RND 8: ch2, dc in join and next 11, sk 2fpdc, fptrc around next 2, working behind - fptrc around 2 skipped fpdc, sk next 2 open fpdc, fptrc around next 2 fpdc, working in front - fptrc around skipped fpdc, dc in 5, 4dc in ch4, dc in last 4. (33)
RND 9: ch2, dc in join and next 11, fpdc around 8, dc in 6, dc decrease over next 2, dc in 5. (32)
RND 10: ch2, dc in join and next 11, sk 2fpdc, fptrc around next 2, working behind - fptrc around 2 skipped fpdc, sk next 2 open fpdc, fptrc around next 2 fpdc, working in front - fptrc around skipped fpdc, dc in remaining 12.
RND 11: ch2, dc in join and next 11, fpdc around 2fpdc, dc in 4fpdc, fpdc around next 2 fpdc, dc in 12.
RND 12 & 13: ch2, dc in join and all stitches. (32)
RND 14 & 15: ch1, (fpdc around dc, bpdc around next dc) around. Join.
Cut off after R15. Tuck ends.
Pattern for Right Mitten
Make the same as the Left mitten except for the following rows:
RND 7: ch2, dc in 4, ch4, sk 3, dc in 5, fpdc around next 4 stitches, sk2 fpdtrc, fpdc around next 4 stitches, dc in remaining 12.
RND 8: ch2, dc in 4, 4dc in ch4, dc in 5, sk 2fpdc, fptrc around next 2, working behind - fptrc around 2 skipped fpdc, sk next 2 open fpdc, fptrc around next 2 fpdc, working in front - fptrc around skipped fpdc, dc in the last 12. (33)
RND 9: ch2, dc in 5, dc decrease over next 2, dc in 6, fpdc around 8, dc in 12.