Crochet Granny Baby Blanket

Creating a Crochet Granny Baby Blanket is not only a fun and rewarding craft project, but it's also a delightful way to show your love and care for a little one. The timeless granny square pattern adds a touch of charm and coziness to the blanket, making it perfect for wrapping babies in warmth and snuggles. Whether you're a seasoned crocheter or just starting out, this project is a great way to hone your skills and create a meaningful keepsake that will be treasured for years to come. So grab your yarn and hook, and let's get crocheting a beautiful blanket that will surely be cherished by both baby and parents alike!
Materials
Yarn: 1 skein each of Lion Brand® Basic Stitch Anti-Microbial® (Worsted Weight, Art. #204) in the following colors:
- Color A: #124 Hazelwood
- Color B: #172 Olive Branch
- Color C: #144 Lavender Mist
Crochet Hook: Size H-8 (5 mm)
Notions: A large-eyed blunt needle (tapestry needle) for weaving in those ends.
Before You Begin: Notes & Sizing
Finished Size: Approximately 25 x 25 inches (63.5 x 63.5 cm).
Gauge: Rounds 1-8 should measure about an 8.25-inch (21 cm) square. Checking your gauge ensures your blanket will be the correct size and you won’t run out of yarn.
Construction
This blankie is worked in rounds, starting from the center and growing outwards. You will change your yarn color at the end of every round.
Abbreviations (US Terms)
- ch: chain
- ch-sp: chain space
- st(s): stitch(es)
- sl st: slip stitch
- sc: single crochet
- dc: double crochet
- rnd(s): round(s)
- RS: right side
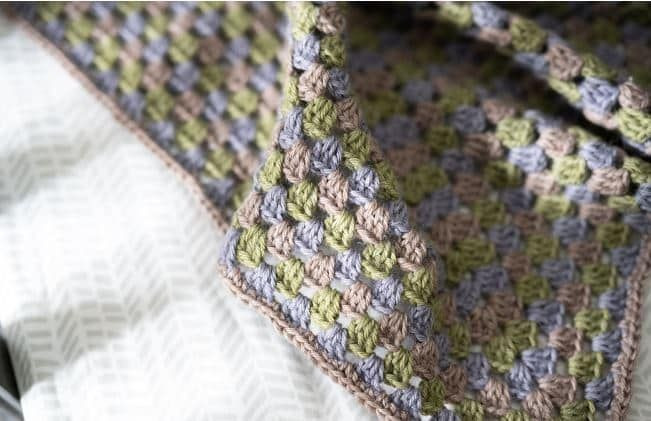
(A close-up, detailed shot of the granny stitch clusters and the corner spaces.)
Let’s Get Crocheting: The Granny Blankie Pattern
This blanket is built upon the classic granny stitch—a group of 3 double crochet stitches worked into the same space. Let’s start!
Stripe Sequence
You’ll be changing colors every round in this simple sequence:
- Round with Color A
- Round with Color B
- Round with Color C
Repeat this sequence throughout the pattern.
Round 1 (RS): Starting with Color A
Chain 6. Join with a sl st to the very first chain to form a ring.
Now, let’s make the first round inside that ring:
Ch 3 (this counts as your first dc). Work 2 more dc into the center of the ring. (This is your first “granny cluster”.)
Ch 2, then work 3 dc into the ring.
Repeat (ch 2, 3 dc in ring) two more times.
To finish the round, ch 2 and join with a sl st to the top of your beginning ch-3.
You should now have a tiny square with four 3-dc groups and four ch-2 corner spaces. Fasten off Color A.
Round 2: Using Color B
Join Color B with a sl st in any ch-2 corner space.
Ch 3 (counts as your first dc). In that same corner space, work (2 dc, ch 2, 3 dc). This creates your first corner of the new round.
Ch 1. In the next ch-2 corner space, work (3 dc, ch 2, 3 dc).
Repeat (ch 1, and work a corner in the next corner space) two more times.
To finish, ch 1 and join with a sl st to the top of your beginning ch-3.
You’ll now have a bigger square. Each side has two 3-dc groups separated by a ch-1 space. Fasten off Color B.
Round 3: Using Color C
Join Color C in any ch-2 corner space.
Ch 3 (counts as first dc). In that same corner space, work (2 dc, ch 2, 3 dc) to make your corner.
Ch 1, work 3 dc in the next ch-1 space along the side.
Ch 1, then in the next ch-2 corner space, work (3 dc, ch 2, 3 dc).
Repeat this pattern of working the sides and corners two more times.
To finish, ch 1, 3 dc in the last ch-1 space, ch 1, and join with a sl st to the top of your beginning ch-3.
Fasten off Color C. Are you seeing the beautiful logic of the granny square? It grows so easily!
Round 4: Using Color A
Join Color A in any ch-2 corner space.
Ch 3 (counts as first dc). In that same corner space, work (2 dc, ch 2, 3 dc).
Now, working along the side: (Ch 1, work 3 dc in the next ch-1 space). Repeat this until you reach the next corner.
Ch 1, then in the corner ch-2 space, work (3 dc, ch 2, 3 dc).
Continue this pattern all the way around. Join with a sl st to the top of your beginning ch-3.
Fasten off Color A.
Rounds 5 – 24: Growing Your Blanket
Now for the wonderfully repetitive part! You will simply repeat Round 4 for 20 more rounds, continuing to follow the Stripe Sequence (A, B, C, A, B, C…).
With each round, your blanket will grow, and you’ll have one more granny cluster to work along each side. By the end of Round 24, your blanket will have 24 granny clusters along each side! Fasten off after completing Round 24.
(The finished blanket, folded neatly or draped over the arm of a chair, showing its full size and beautiful stripe pattern.)
Round 25: Finishing with a Simple Border
For our final round, we’ll add a clean and simple single crochet border.
Join Color A with a sl st in any ch-1 space.
Ch 1. Work 1 sc in that same ch-1 space.
Continue around the blanket, working 1 sc in each dc stitch and 1 sc in each ch-1 space.
When you get to a corner ch-2 space, work 3 sc into that space. This keeps the corners sharp and flat.
Continue all the way around and join with a sl st to the first sc.
Fasten off.
Finishing Touches
The final and most important step! Take your tapestry needle and carefully weave in all of your ends. This ensures your beautiful blanket is secure and will last through many cuddles.
Make It Your Own: Tips & Ideas
Color Your World: While the suggested colors are lovely, this blanket is the perfect canvas for your creativity! Try a bright rainbow palette for a playroom, soft pastels for a nursery, or two shades of gray with a pop of yellow for a modern look.
Go Bigger or Smaller: Want a larger throw blanket? Just keep repeating Round 4 until it’s the size you want! Want a smaller lovey? Stop after fewer rounds. It’s that easy to customize.
Stash Buster: This pattern is fantastic for using up leftover skeins of worsted-weight yarn. Don’t be afraid to mix and match colors for a truly unique creation.
Happy Crocheting