Crochet Fly Agaric Gnome Instructions

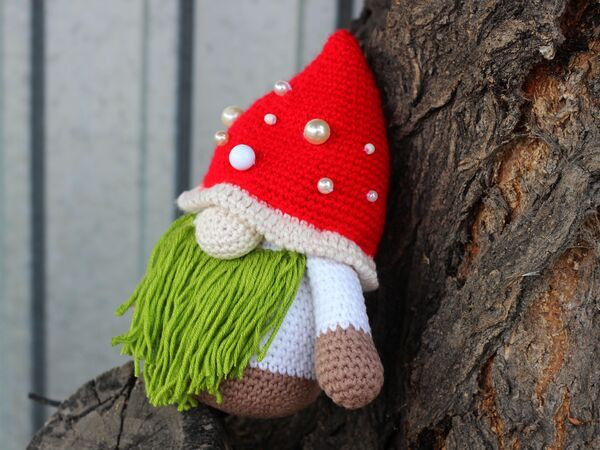
The Crochet Fly Agaric Gnome is a whimsical and charming creation that adds a touch of magic to any space. Its vibrant red cap and playful expression bring a sense of joy and wonder to those who admire it. This little gnome, lovingly crafted with crochet, is a delightful addition to any collection of handmade treasures. Whether placed on a shelf or used as a cute decorative piece, the Crochet Fly Agaric Gnome is sure to bring smiles and warmth to all who encounter it.
Supplies
To create your Crochet Fly Agaric Gnome, you will need the following supplies:
- Cotton yarn (e.g. Schachenmayr Catania 125m/50g) in four colors: red, green, white, and beige
- Crochet hook (size 2.5 mm)
- White beads
- Scissors
- Yarn needle
- Fiberfil stuffing
Skill Level
Easy
Size
The finished amigurumi is approximately 15 cm long, but it can be adjusted to be larger or smaller depending on the yarn and hook used.
Skills You Need
- Chain
- Single crochet
- Double crochet
- Half double crochet
- Slip stitch
- Increase
- Decrease
Abbreviations
- Ch = Chain
- St = Stitch
- Sc = Single crochet
- Sl st = Slip stitch
- Dec = Decrease stitch (two single crochets together)
- Inc = Increase stitch (two single crochets in one stitch)
- Dc = Double crochet
- Rnd = Round
- * = Repeat instructions for the times indicated
- (...) = Total amount of stitches
Tips
- Do not join rounds; work in a continuous spiral.
- Use a stitch marker or piece of yarn to keep track of the last stitch in each round.
- All stitches are worked into both loops unless stated otherwise in the pattern.
- When filling with polyester stuffing, pull apart each large chunk into many smaller chunks for even firmness.
- Amigurumi can be made in any desired colors.
Seamless Way of Changing Color When Working in the Round
Pick up the new color at the end of the round: insert your hook into the stitch, yarn over with the new color, and pull through the stitch and the loop on your hook to complete the stitch.
To Make a Magic Ring
- Loop the thread twice around your middle finger.
- Put the hook under both loops, pull the yarn under the loops, and hook the thread again.
- Pull the thread through the new loop. The first crochet stitch is ready!
- Repeat the needed number of times.
- Pull the inner threads to tighten the ring.
Shift Stitch
Sometimes during the spiral amigurumi, you need to keep the work symmetrical. If you notice that the work tends to twist to the right, you need to periodically adjust the position of the marker (beginning of the round).
The shift stitch is an extra stitch you work at the end of a round to maintain symmetry. If the marker moves to the right, work one extra stitch at the end of the round and move the marker forward by one stitch (the second stitch of the round becomes the first). This does not change the stitch count.
To check if it’s time to work a shift stitch, fold your work in half. If the marker still goes straight, you are on track, or use a yarn that marks a straight line.
Instructions
The gnome consists of several parts that you will crochet separately and then sew together.
Body
Start your work using beige color yarn.
Round 1: 6 sc into Magic Ring
Round 2: Inc 6 times (12 stitches)
Round 3: *Sc in the next stitch, inc* (18 stitches)
Round 4: *Sc in each of the next 2 stitches, inc* (24 stitches)
Round 5: *Sc in each of the next 3 stitches, inc* (30 stitches)
Round 6: *Sc in each of the next 4 stitches, inc* (36 stitches)
Round 7: *Sc in each of the next 5 stitches, inc* (42 stitches)
Round 8: *Sc in each of the next 6 stitches, inc* (48 stitches)
Round 9: *Sc in each of the next 7 stitches, inc* (54 stitches)
Rounds 10-12: Sc in each of the next 54 stitches
Change the yarn color to white.
Rounds 13-22: Sc in each of the next 54 stitches
Round 23: *Dec, sc in each of the next 7 stitches* (48 stitches)
Rounds 24-26: Sc in each of the next 48 stitches
Round 27: *Dec, sc in each of the next 6 stitches* (42 stitches)
Rounds 28-29: Sc in each of the next 42 stitches
Round 30: *Dec, sc in each of the next 5 stitches* (36 stitches)
Round 31: Sc in each of the next 36 stitches
Round 32: *Dec, sc in each of the next 4 stitches* (30 stitches)
Round 33: *Dec, sc in each of the next 3 stitches* (24 stitches)
To add weight to the bottom, you can add little stones, rice, or Poly Pellets.
Stuff the body firmly.
Round 34: *Dec, sc in each of the next 2 stitches* (18 stitches)
Round 35: *Dec, sc in the next stitch* (12 stitches)
Round 36: *Decrease* 6 times.
Bind off and hide yarn ends.
Arm (2x)
Start your work using beige color yarn.
Round 1: 6 single crochets into Magic Ring
Round 2: Increase 6 times (12 stitches)
Round 3: *Single crochet in the next stitch, increase* (18 stitches)
Rounds 4-7: Sc in each of the next 18 stitches
Round 8: *Sc in each of the next 4 stitches, inc* (15 stitches)
Change the yarn color to white.
Rounds 9-18: Sc in each of the next 15 stitches
Stuff slightly.
Round 19: *Dec, sc in each of the next 3 stitches* (12 stitches)
Round 20: Sc in each of the next 12 stitches
Round 21: *Decrease* 6 times.
Bind off, leaving a long tail for sewing. Work the second arm the same way.
Nose
Work using beige or white color yarn.
Round 1: 6 sc into Magic Ring.
Round 2: Inc 6 times (12 stitches)
Round 3: *Sc in next st, inc* (18 stitches)
Rounds 4-6: Sc in each of the next 18 stitches
Round 7: *Dec, sc in the next stitch* (12 stitches)
Round 8: Sc in each of the next 12 stitches
Stuff the nose slightly.
Bind off, leaving a long tail for sewing the nose to the gnome.
Hat
Start with red color yarn.
Round 1: 6 single crochets into Magic Ring
Round 2: Single crochet in each of the next 6 stitches
Round 3: Increase 6 times (12 stitches)
Rounds 4-5: Single crochet in each of the next 12 stitches
Round 6: *Single crochet in the next stitch, increase* (18 stitches)
Round 7: Single crochet in each of the next 18 stitches
Round 8: *Single crochet in each of the next 2 stitches, increase* (24 stitches)
Round 9: Single crochet in each of the next 24 stitches
Round 10: *Single crochet in each of the next 3 stitches, increase* (30 stitches)
Round 11: *Single crochet in each of the next 4 stitches, increase* (36 stitches)
Round 12: Single crochet in each of the next 36 stitches
Round 13: *Single crochet in each of the next 5 stitches, increase* (42 stitches)
Round 14: *Single crochet in each of the next 6 stitches, increase* (48 stitches)
Rounds 15-17: Single crochet in each of the next 48 stitches
Round 18: *Single crochet in each of the next 7 stitches, increase* (54 stitches)
Rounds 19-20: Single crochet in each of the next 54 stitches
Round 21: *Single crochet in each of the next 8 stitches, increase* (60 stitches)
Round 22: Single crochet in each of the next 60 stitches
Round 23: *Single crochet in each of the next 9 stitches, increase* (66 stitches)
Rounds 24-26: Single crochet in each of the next 66 stitches
Change the yarn color to white or beige.
Round 27 (working into the back loop): Single crochet in each of the next stitches until the end of the round.
Rounds 28-29: Sc in each of the next 66 stitches
Round 30: *Dec, sc in each of the next 4 stitches*
Bind off, leaving a long tail for sewing the hat to your gnome.
Assembly
Since all elements of your amigurumi are crocheted, it’s time to sew them together. Use a blunt sewing needle.
Sew the arms to the body, making sure they are even.
Beard
Using the green yarn, cut about 16 cm lengths, fold in half, and loop through the stitches. Using a tapestry needle, you can split the yarn for a more beard-like appearance.
Mark where you want the nose to be and sew it onto the head of the gnome.
Sew white beads onto the hat and hide yarn ends.
Sew the hat onto the body so that it fits around the nose slightly. Weave in all ends.