Cozy Crochet Wrist Warmers: A Stylish Accessory for Every Occasion

Introduction to Crochet Wrist Warmers
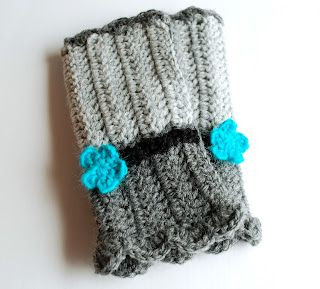
Crochet wrist warmers are a cozy and stylish accessory that adds a touch of warmth and charm to your outfit. These snug wrist warmers are perfect for keeping your hands toasty while allowing your fingers to stay free for everyday tasks. The intricate crochet patterns not only provide a unique look but also give a personalized touch to your wardrobe. Whether you're a seasoned crocheter or new to the craft, creating these wrist warmers can be a fun and rewarding project to showcase your creativity. So, grab your yarn and hooks, and let's crochet our way to warmth and style!
Supplies Needed
Supplies:
~ F hook [3.75mm]
~ Worsted weight yarn [I used Wool Ease yarn for these. I LOVE this yarn!]
~ Yarn needle
Stitches Used
Stitches used [in US crochet terms]:
- ch = chain
- ss = slip stitch
- sc = single crochet
- dc = double crochet
Tips for Success
Tips:
~ Check the fit of the first glove [including the thumb hole size] as you go; you'll be glad you did! Make adjustments whenever necessary...these are very customizable.
~ In order to have evenly spaced scallops, it helps if you have an even number of rows at the end of step 5.
~ This pattern assumes the mitts are a single color. To make stripes like mine, you just need to pick up and drop colors as you're moving back and forth across the rows.
Making the Left Hand Glove
- ch 28
- Row 1: dc in third chain from hook (counts as first dc); dc in each chain across; [27 dc total]
- Row 2: ch 2 (counts as first dc); turn; dc in next stitch from previous row and in each stitch across [27 dc total]
- Rows 3-14: repeat row 2
- Check for size by wrapping around hand/wrist. It should be a little smaller since it will stretch when you put it on. I used 14 rows total for my mitts.
- Do not finish off but fold rectangle in half with rows running horizontally
- sl stitch two sides together until you are 9 stitches from the end
- Stitch only on side closest to you for 5 stitches, creating a thumb hole, and then continue stitching sides together to the end; do not finish off.
- ch 1, sc in same stitch; *in next gap between row stitches 3 dc, in next gap 1 sc*, repeat pattern evenly around and join in first sc [this is the top where your fingers will come out]
- Now you can finish off [Can you tell I don't like ends :D]
- Join yarn at seam on opposite side, ch 1 in same stitch, *in next gap between row stitches 5 dc, in next gap 1 sc*, repeat pattern evenly around and join in first sc, finish off.
- Weave in ends
Crafting the Right Hand Glove
- 1-6. Same as left hand
- sl stitch two sides together for 4 stitches
- Repeat step 8 above
- ch 1, sc in same stitch; *in next gap between row stitches 5 dc, in next gap 1 sc*, repeat pattern evenly around and join in first sc
- Finish off
- Join yarn at seam on opposite side, ch 1 in same stitch, *in next gap between row stitches 3 dc, in next gap 1 sc*, repeat pattern evenly around and join in first sc, finish off.
- Weave in ends
Personalization Options
Options:
~ I added little woolie flowers to my pair [ch 4, join, *ch 5, sl stitch in center* repeat 4 more times, finish off and use ends to attach to mitt], but you can embellish anyway you choose.
~ Use a larger hook for fewer rows and a faster finish.