How to Crochet an Adorable Submarine

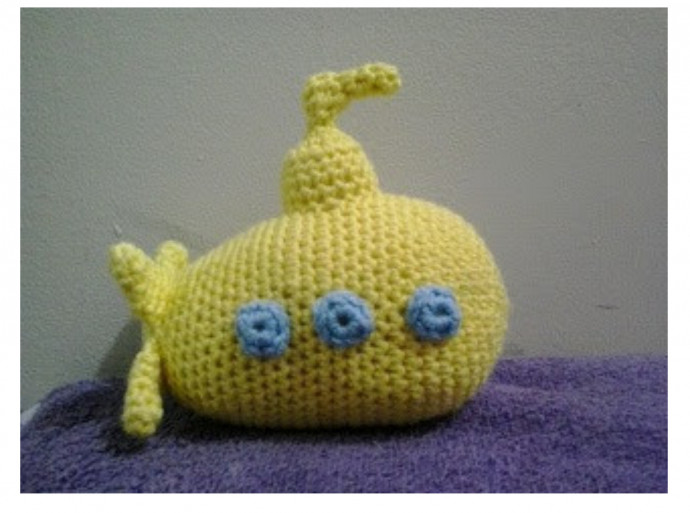
Crocheting an adorable submarine can be such a fun and rewarding project! From choosing colorful yarns to adding cute detailing like portholes and periscopes, it's a great way to let your creativity shine. Imagine the joy on a child's face when they receive this unique handmade toy - it's sure to become a treasured keepsake. Plus, the soothing rhythm of crochet stitches can be a calming way to unwind and destress. So grab your crochet hook, some soft yarn, and dive into creating your very own charming submarine - your crafting adventure awaits!
Materials
Worsted Weight Yarn: main color and light blue
B crochet hook
Polyester fiberfill
Yarn Needle
Optional: chenille stem
Propeller Blades
(Make 4)
RND 1: With main color, 6 sc in magic ring. (6)
RND 2-3: sc in each sc around. (6)
RND 4: (sc in next 2 sc, 2 sc in next sc) around. (8)
RND 5-6: sc in each sc around. (8)
Finish off. Weave in ends.
Hull
RND 1: With main color, 6 sc in magic ring. (6)
RND 2: 2 sc in each sc around. (12)
RND 3: (sc in next sc, 2 sc in next sc) around. (18)
RND 4: (sc in next 2 sc, 2 sc in next sc) around. (24)
RND 5: (sc in next 3 sc, 2 sc in next sc) around. (30)
RND 6: (sc in next 4 sc, 2 sc in next sc) around. (36)
RND 7: (sc in next 5 sc, 2 sc in next sc) around. (42)
RND 8: (sc in next 13 sc, 2 sc in next sc) around. (45)
RND 9-23: sc in each sc around. (45)
RND 24: (sc in next 13 sc, sc2tog) around. (42)
RND 25: (sc in next 5 sc, sc2tog) around. (36)
RND 26: sc in each sc around. (36)
RND 27: (sc in next 4 sc, sc2tog) around. (30)
RND 28: (sc in next 8 sc, sc2tog) around. (27)
RND 29: sc in each sc around. (27)
RND 30: (sc in next 7 sc, sc2tog) around. (24)
RND 31: (sc in next sc, sc2tog) around. (16)
RND 32: (holding next sc on HULL and flattened PROPELLER BLADE together and working through all thicknesses, sc in next 4 sc) 4 times. (16)
RND 33: (sc in next 2 sc, sc2tog) around. (12)
Stuff Hull Firmly.
RND 34: sc2tog around. (6)
Finish off leaving a long tail. Weave tail through sc of RND 34, pull tightly and secure. Weave in ends.
Windows
(Make 6)
RND 1: With light blue, 9 sc in magic ring. (9)
Finish off leaving a long tail. Sew WINDOWS to HULL. Weave in ends.
Periscope and Conning Tower
RND 1: With main color, ch 1, 4 sc in second ch from hook working around ch. (4)
RND 2-4: sc in each sc around. (4)
Now Working in Rows.
RW 5: sc in next 2 sc, leaving remaining sc unworked. (2)
RW 6: Ch 1, turn; sc in next 2 sc. (2)
Now Working in Rounds Again.
RND 7: Ch 1, turn; sc in next 2 sc, working in the side of RWs, sc in next 2 RWs, slip st in next 2 unworked sc of RND 4, working in the side of RWs, sc in next 2 RWs.
RND 8: (sc in next 2 sc, sc2tog) around. (6)
RND 9: (sc in next sc, sc2tog) around. (4)
Optional: Insert Chenille Stem
Begin Stuffing Periscope and Conning Tower Firmly. Continue Stuffing Periscope and Conning Tower as You Go Along.
RND 10: sc in each sc around. (4)
RND 11: 2 sc in each sc around. (8)
RND 12: (sc in next sc, 2 sc in next sc) around. (12)
RND 13: (sc in next sc, 2 sc in next sc) around. (18)
RND 14: Working in back loops only, sc in each sc around. (18)
RND 15-16: sc in each sc around. (18)
Finish off leaving a long tail. Sew PERISCOPE AND CONNING TOWER to HULL adding any stuffing needed to achieve shape. Weave in ends.