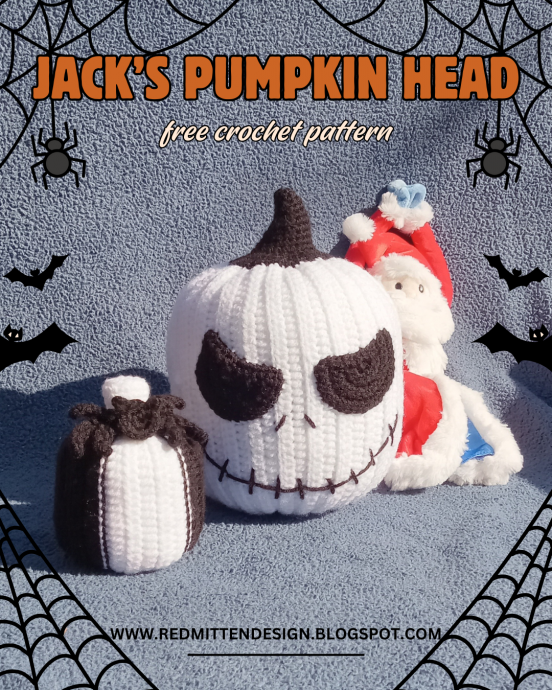
Crochet Jack's Pumpkin Head Pattern

Introduction
Crochet Jack's Pumpkin Head is a delightful and charming addition to any fall decor. With its vibrant color and intricately woven details, this cute crochet creation brings a touch of whimsy to your home. Whether you place it on your mantel, use it as a table centerpiece, or hang it on your front door, Crochet Jack's Pumpkin Head is sure to bring a smile to your face. This handmade piece showcases the talent and creativity of crochet artisans, making it a unique and special decoration for the harvest season. So, why not add a bit of cozy charm to your home with Crochet Jack's Pumpkin Head and let its friendly aesthetic brighten up your autumn days!
Skill Level
Advanced Beginner
Size
Approx. 9.5 inches tall
Needles & Notions
- 3.5mm crochet hook
- Tapestry needle
Yarn
- Craftsmart Value, white
- Bernat Premium, black
Notes
Ch1 at beginning of rows does not count as a stitch throughout the pattern.
Unless otherwise stated, work in both loops of a row.
Pattern
With white yarn, Ch. 51
Row 1: (Right Side of fabric) in 2nd ch from hook sc. sc in each of the next 2 sts. HDC in next 44 sts. sc in each of next 3 sts. Turn (50 sts)
Row 2: Ch1 (does not count as a st!) sc in same st as ch1. sc in each of the next 2 sts. HDC in next 44 sts. sc in next 3 sts. Turn (50 sts)
Row 3: Ch1. (work in BLO across row) sc in same st as ch1. sc in each of the next 2 sts. HDC in next 44 sts. sc in next 3 sts. Turn (50 sts)
Repeat Rows 2 & 3 one MORE time
Row 6: Ch1. sc in same st as ch1. sc in each of the next 2 sts. HDC in next 44 sts. sc in next 3 sts. Turn (50 sts)
Row 7: Ch1. sc in same st as ch1. sc in each of the next 2 sts. HDC in each of the next 13 sts. BOBBLE STITCH in next st. HDC in each of the next 30 sts. sc in next 3 sts. Turn (50 sts)
Row 8: Ch1. sc in same st as ch1. sc in each of the next 2 sts. HDC in next 44 sts. sc in next 3 sts. Turn (50 sts)
Row 9: Ch1. (work in BLO across row) sc in same st as ch1. sc in each of the next 2 sts. HDC in next 44 sts. sc in next 3 sts. Turn (50 sts)
Row 10: Ch1. sc in same st as ch1. sc in each of the next 2 sts. HDC in next 44 sts. sc in next 3 sts. Turn (50 sts)
Repeat Rows 9 & 10 two MORE times
Row 15 & 16: Ch1. sc in same st as ch1. sc in each of the next 2 sts. HDC in next 44 sts. sc in next 3 sts. Turn (50 sts)
Repeat Rows 9 - 16 two MORE times
Row 33: Ch1. (work in BLO across row) sc in same st as ch1. sc in each of the next 2 sts. HDC in next 44 sts. sc in next 3 sts. Turn (50 sts)
Row 34: Ch1. sc in same st as ch1. sc in each of the next 2 sts. HDC in next 44 sts. sc in next 3 sts. Turn (50 sts)
Repeat Rows 33 & 34 one MORE time
Shaping the Pumpkin
Row 37: Ch1. (work in BLO across row). sc in same st as ch1. sc in each of the next 2 sts. HDC in next 20 sts. BOBBLE STITCH in next st. HDC in next 23 sts. sc in next 3 sts. Turn (50 sts)
Row 38: Ch1. sc in same st as ch1. sc in each of the next 2 sts. HDC in next 44 sts. sc in next 3 sts. Turn (50 sts)
Row 39: Ch1. sc in same st as ch1. sc in each of the next 2 sts. HDC in next 24 sts. BOBBLE STITCH in next st. HDC in next 19 sts. sc in next 3 sts. Turn (50 sts)
Row 40: Ch1. sc in same st as ch1. sc in each of the next 2 sts. HDC in next 44 sts. sc in next 3 sts. Turn (50 sts)
Repeat Rows 9 through 16 one MORE time
48 total rows should be completed. DO NOT bind off yet!
Fold the completed piece in half so right sides are facing. The cast on edge should be laying on top of the working edge.
Ch1. Sl st. through cast on stitch and BLO of working edge stitch at the same time. Work sl sts in this manner across the row. Bind off and cut yarn leaving a long tail.
Use yarn tail and thread a running stitch through the bottom of the pumpkin. Draw up and fasten bottom securely. Turn pumpkin right side out and stuff to desired plumpness. Using another length of the same color yarn, thread a running stitch around the top of the pumpkin to close the top (don’t worry if it is a little “messy” as it will be covered by the stem).
Creating the Stem
With black yarn, in a Magic Loop, Ch1. Place 4 sc into loop.
(Work in continuous rounds)
Rnd 1: 2 sc in each st around (8sts)
Rnd 2 AND ALL EVEN ROUNDS TIL RND 10: sc in each stitch around
Rnd 3: 2 sc in each of the next 4 sts. sc in next 4 sts (12sts)
Rnd 5: sc in each of the next 2 sts. 2sc in each of the next 4 sts. sc in each of the next 6 sts (16sts)
Rnd 7: sc in each of the next 4 sts. 2sc in each of the next 4 sts. sc in each of the next 8 sts (20sts)
Rnd 9: sc in each of the next 6 sts. 2sc in each of the next 4sts. sc in each of the next 10 sts (24sts)
Rnd 11: (work in FLO) *2sc in next st. sc in each of the next 2 sts. repeat from * around (32sts)
Rnd 12: *sc in each of the next 2 sts. 2 sc in the next st. sc in the next st. repeat from * around (40sts)
Rnd 13: *2sc in the next st. sc in each of the next 4 sts. repeat from * around (48sts)
Bind off and cut yarn, leaving a long tail to sew the stem to the pumpkin head. Lightly stuff the stem.
Creating the Eyes (Make 2)
With black yarn, in a Magic Loop, Ch1. Place 4 sc into loop but DO NOT join to work in the round. Turn!
Row 1: 2 sc in each st across. Turn (8sts)
Row 2: Ch1. In same st as ch1 place 2sc. sc in next st. *2sc in next st. sc in next st. repeat from * to end of row. Turn (12sts)
Row 3: Ch1. In same st as ch1 place 2 sc. sc in next 2 sts. *2sc in next st. sc in next 2 sts. repeat from * to end of row. Turn (16sts)
Row 4: Ch1. In same st as ch1 place 2sc. sc in next 3 st. *2sc in next st. sc in next 3 st. repeat from * to end of row. Turn (20sts)
Row 5: Ch1. In same st as ch1 place 2 sc. sc in next 4 sts. *2sc in next st. sc in next 4 sts. repeat from * to end of row. DO NOT TURN (24sts)
Ch1 and work 11 sc across the flat side of the eye. Sl st into last stitch at the corner of the eye.
Finishing Touches
Sew the stem to the "messy" top of the pumpkin, covering up any lumps and bumps.
Sew the eyes to your desired location and at the desired tilt, thereby making Jack's Pumpkin expression different depending upon the orientation of the eyes.
With a long piece of black yarn sew a mouth using an embroidery backstitch, once again, make the expression to your liking. Sew two slashes for nostrils.