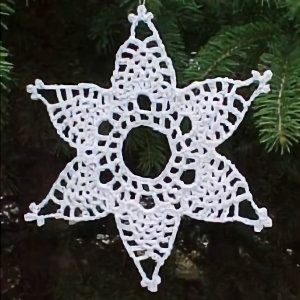
Crochet Pineapple Suncatcher: Step-by-Step Guide

The Crochet Pineapple Suncatcher is a delightful addition to any space, bringing a touch of tropical charm and sunny vibes. Handcrafted with love and intricate detail, this unique piece adds a pop of color and whimsy to your surroundings, creating a warm and inviting atmosphere. Whether hung in a sunny window or displayed outdoors, the crochet pineapple suncatcher is sure to put a smile on your face every time you see it. Its intricate design and playful nature make it a perfect gift for yourself or a loved one, spreading joy and sunshine wherever it goes. Embrace the cheerful energy of this charming pineapple creation and let it brighten up your day with its sunny disposition.
Materials Needed
Small amount size 10 crochet cotton in white. Southmaid was used in the example.
Size 8 steel crochet hook
Tapestry needle for weaving in ends
Mixture of 1 part white glue to 1 part water for stiffener. Or you can use a commercially prepared fabric stiffener.
Hanging thread. Nylon line is recommended.
Yarn Information
Yarn Thickness: 10 thread
Gauge: 10 sc = 1"
Finished Size: 6" diameter
Skill Level: Intermediate
Instructions
Round Instructions
RND 1: Ch36. Being careful not to twist chain, join with slst to first ch to form ring. Ch5. *Sk next ch. Dc in next ch, ch2. Rep from * around. Join with slst to 3rd ch of ch5.
RND 2: Ch5. Dc in next dc. Ch5. Dc in next dc. Ch2. *Dc, ch2, dc in next dc. Ch2. Dc in next dc. Ch5. Dc in next dc. Ch2. Rep from * around. Dc in same st as slst of prev rnd, ch2. Join with slst to 3rd ch of ch5.
RND 3: Ch1, counts as sc. Work the following in the next ch5 sp. ((Dc, ch1) six times, dc.) Sc in next dc. Ch4. *Sc in next dc. Work the following in the next ch5 sp. ((Dc, ch1) six times, dc). Sc in next dc, ch4. Rep from * around. Join with slst to ch1.
RND 4: *Dc in next dc ch3. ((Sc in next dc, ch3) five times). Dc in next dc. Sc in ch4 sp. Rep from * around. Join with slst to top of first dc.
Point Instructions
From here you will work each point separately in rows.
First Point, ROW 1: Ch6. Sk first ch3 sp. ((Sc in next ch3 sp. Ch3.) three times) Sk next ch3 sp. Dc in next dc. Ch6, turn.
ROW 2: Sk first ch3 sp. ((Sc in next ch3 sp. Ch3.) two times). Sk next ch3 sp. Dc in next dc. Ch6, turn.
ROW 3: Sk first ch3 sp. Sc in next ch3 sp. Ch3. Sk next ch3 sp. Dc in next dc. Turn.
ROW 4: Ch7, slst to 4th ch from hook, ch5, slst in 5th ch from hook, ch4, slst in 4th ch from hook. Ch3. Slst in next dc. Fasten off and weave end into work.
Now work the following for each of the next 5 points.
Working to the left, join thread in next dc of rnd 4.
Rep ROWs 1-4 of first point. When finished, weave all ends into back of work.
Finishing Touches
Stiffen by dipping the finished piece in stiffener and flatten, stretch, and pin onto foam board. Allow to dry overnight. Then attach hanger in one point and hang in window.
