Crochet Christmas Tree Garland: A Festive Holiday Project

Get ready to add a cozy and festive touch to your holiday decor with a Crochet Christmas Tree Garland! This charming garland is not only a fun and creative project to work on but also a delightful way to infuse your home with some seasonal cheer. With just a few skeins of yarn in your favorite Christmas colors and some crochet hooks, you can easily create a string of adorable little trees that will brighten up any room. Whether you hang it on your mantelpiece, wrap it around your Christmas tree, or use it to decorate your walls, this handmade garland is sure to bring a smile to your face and spread some holiday magic. So, gather your crochet supplies and get ready to craft a whimsical Christmas decoration that will be the envy of all your guests!
Materials Needed
Yarn = Any DK yarn can be substituted.
Lion Brand Coboo – DK, #3 lightweight (51% Cotton, 49% Rayon from Bamboo, 232 yards/212m per 3.5 oz/100g skein)
Estimated Yardage:
- Main Color = 25 yards
- Contrasting Color = 12 yards
- Hook = 4 mm Crochet Hook
Gauge
Gauge isn’t essential for this project.
Pattern Notes
- Please kindly read through the pattern before starting.
- Any 3 weight of yarns can be substituted.
Chains at the beginning of Rounds or Rows do not count as a stitch.
Difficulty Level
Easy
Terms Used
- Chain(s) – ch(s)
- Magic Ring – MR
- Single Crochet – sc
- Half Double Crochet – hdc
- Slip Stitch – sl st.
- Picot Stitch – Picot st
Special Stitch
Picot Stitch:
Ch 3 and make a Slip Stitch into the base of Ch 3.
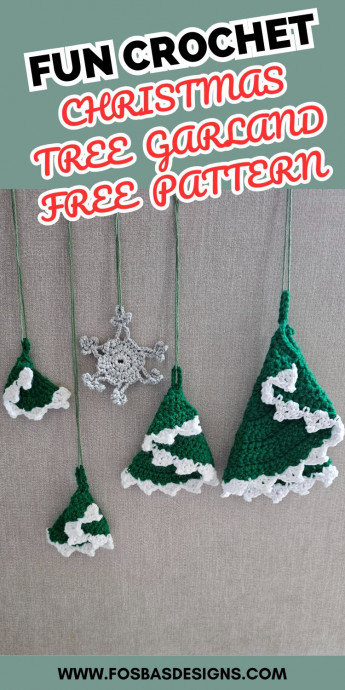
Finished Measurements
- Small: 4”
- Medium: 6”
- Large: 8”
- Extra Large: 10”
How to Make the Crochet Christmas Tree Garland
Row Instructions
Row 1: In a Magic Circle, ch 2, 6 dc in MC, turn. 6 dc
Row 2: Ch 2, 2 dc in each st across, turn. 12 dc
Row 3: Ch 2, *dc in next st, 2 dc in next st, repeat from * across, turn. 18 dc
For Small size, your piece should measure 3”; skip to edging
Row 4: Ch 2,*dc in next 2 sts, 2 dc in next st, repeat from * across, turn. 24 dc
Row 5: Ch 2,*dc in next 3 sts, 2 dc in next st, repeat from * across, turn. 30 dc
For Medium size, your piece should measure 4.5”; skip to edging
Row 6: Ch 2,*dc in next 4 sts, 2 dc in next st, repeat from * across, turn. 36 dc
Row 7: Ch 2,*dc in next 5 sts, 2 dc in next st, repeat from * across, turn. 42 dc
For Medium size, your piece should measure 6”; skip to edging
Row 8: Ch 2,*dc in next 6 sts, 2 dc in next st, repeat from * across, turn. 48 dc
Row 9: Ch 2,*dc in next 7 sts, 2 dc in next st, repeat from * across, turn. 54 dc
For Medium size, your piece should measure 6”; skip to edging
Edging for All Sizes
Fasten off Green, join White
Last Row: Ch 3 (counts as first st), dc in first st, 1 Picot st, 2 dc in same st, skip next st, sl st in next st, skip next st, *2 dc in next st, 1 Picot St, 2 dc in same st, skip next st, sl st in next st, skip next st, rep from * until the end.
Fasten off White.
Join green with a sl st to the long edge (wingspan).
Crocheting Across
Row 1: Ch 1, sc in each st across, turn.
Fold the piece as shown below.
Secure the tip with a stitch marker.
- Do not fasten off.
- Fold the piece as shown below.
- Secure with a stitch marker.
Row 2: Ch 1, sc in each st across until the stitch marker, chain 8, sl st to the 8th chain from the hook.
Leave a long tail of yarn and fasten off.
Using the tail of yarn, sew the sts left together to secure the fold.
Repeat for the remaining ornaments.