Crochet Peacock Fridgie: A Vibrant and Whimsical Addition to Your Kitchen

Adorned with vibrant colors and intricate details, the Crochet Peacock Fridgie is a charming addition to any kitchen decor. This delightful little crochet creation not only serves as a practical magnet for your fridge but also adds a touch of whimsy and elegance to your space. Its eye-catching design, featuring a mesmerizing peacock motif, makes it a unique conversation starter whenever guests spot it clinging to your refrigerator. The Crochet Peacock Fridgie brings joy and a pop of color to your daily routine, reminding you to find beauty in the little things. It's a wonderful way to infuse your home with artistic flair and personality, all while holding up your favorite recipes or notes with style and grace.
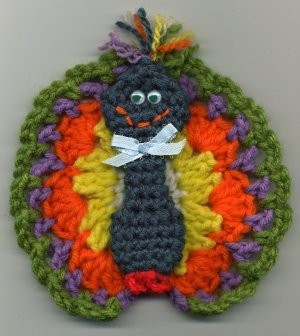
Materials
- Small amounts of worsted weight yarn:
- White (for the first round of feathers)
- Bright yellow (for the second row of feathers)
- Bright red (for the third row of feathers)
- Lavender (for the fourth row of feathers)
- Bright green (for the fifth row of feathers)
- Peacock greenish blue (for the body)
- 2 - 7mm wiggle eyes (I used pink ones)
- Tiny piece of 1/8” ribbon for bow
- Strip of magnet for back
- Crochet Hook Size H
- Approx size: 6” tall
Feathers
Row 1: Starting with white, ch 7, dc in 3rd ch from hook and in next 2 chs, 2 dc in next ch, 7 dc in last ch. Working around on opposite side of ch, 2 dc in next ch, dc in next 2 chs, sl st to beg to join. Fasten off. (16 dc)
Row 2: With yellow, join with sl st to the 5th dc of the 7 dc group at the bottom of the feathers, ch 4 (counts as first dc and ch 1), dc in same space, *dc, ch 1, dc in the next space. Repeat from * 13 more times leaving last stitch unworked. Fasten off. (15 V-Stitches made)
Row 3: With red, join with sc to first ch-1 space of last row. *5 dc in next ch-1 space, sc in next ch-1 space. Repeat from * 6 more times. Fasten off. (7 shells & 8 sc made)
Row 4: With lavender, join with sl st to beg sc of last row, *ch 3, sk next st, sc in next st. Repeat from * across. Fasten off. (21 ch-3 spaces made)
Row 5: With bright green, join with sl st to beg ch-3 space of last row. *ch 3, sc in next ch-3 space. Repeat from * across. Fasten off. (20 ch-3 spaces made)
Body & Head
Rnd 1: With peacock yarn, ch 2, 6 sc in 2nd ch from hook. Join to beg sc, turn. (6 sc)
Rnd 2: Ch 1, 2 sc in each stitch around. Join to beg sc with sl st. Turn. (12 sc)
Rnd 3-5: Ch 1, 1 sc in each stitch around. Join with sl st to beg sc. Turn. (12 sc)
Rnd 6: Ch 1, dec over next 2 sts. Repeat around. Join with sl st to beg sc. Turn. (6 sc)
Rnd 7-12: Ch 1, sc in each stitch around, join, DO NOT TURN. (6 sc)
Rnd 13: Ch 1, 2 sc in each stitch around, join. (12 sc)
Rnd 14: Ch 1, *2 sc in first stitch, 1 sc in next stitch. Repeat from * around, join. (18 sc)
Rnd 15: Ch 1, sc in each stitch around, join. (18 sc)
Rnd 16: Ch 1, dec over next 2 stitches around, join. (9 sc)
Rnd 17: Ch 1, dec over the next 2 stitches around, sc in last stitch, join. (5 sc)
Rnd 18: Ch 1, dec over next 2 stitches, twice. Sl st in last stitch. Fasten off. (3 sc)
Feet
Join orange yarn to the bottom of the body with sl st, ch 3, sl st in same place, sl st in next stitch, ch 3, sl st in same place. Fasten off.
Hair
Take a small strand of each color yarn used and separate them into 2 plies. Holding 2 plies of each color together, insert hook in stitch at the top of the head and pull all strands through. Tie each one in a separate knot.
Assembly
Glue body to feathers, glue on eyes, and make a small bow with ribbon to glue to the front at neck area. With 2 plies of red, backstitch a mouth on. Glue magnet to the back and you are all done!!! =)
Customization
You can change this peacock into a turkey simply by using brown for the body instead of peacock. Dress her up any way you like. Just remember to have fun!! =)