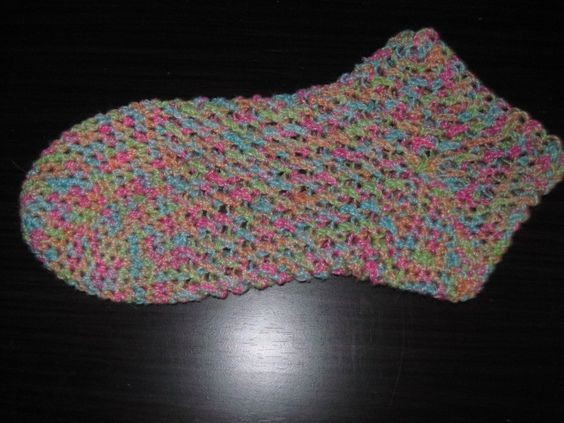
Crochet Star-Crossed Socks Guide

The Crochet Star-Crossed Socks are a charming addition to any wardrobe! These cozy, stylish socks feature a unique star-crossed design that adds a touch of whimsy to your everyday outfit. With their soft yarn and intricate crochet pattern, they are not only fashionable but also incredibly comfortable to wear. Whether you're lounging at home or out for a stroll, these socks are sure to keep your feet warm and your spirits high. Crocheted with love and care, the Star-Crossed Socks make a delightful gift for yourself or a dear friend. So, slip on a pair of these delightful socks and step into the day with style and comfort!
Materials Required
For your Crochet Star-Crossed Socks, you will need:
- Sock yarn
- C Hook
- Stitch Marker
- Yarn Needle
Make 2, unless you only need one.
Toe Instructions
Step 1: Ch 10.
Note: Each row is joined with a slip stitch; it is NOT worked in a spiral.
Step 2: Begin your sock with the following rows:
- R1: 2 sc in 2nd ch from hook. Sc in next 7 ch. 3 sc in last ch. Sc in next 8 ch (across bottom of foundation ch). Mark last stitch. (20)
- R2: 2 sc in top of first sc of Round 1. Sc in next 9 st. 2 sc in next st. Sc in next 9 st. (22)
- R3: Sc in next st. 2 sc in next st. Sc in next 10 st. 2 sc in next st. Sc in next 9 st. (24)
- R4: Sc in next 2 st. 2 sc in next st. Sc in next 11 st. 2 sc in next st. Sc in next 9 st. (26)
- R5: Sc in next 3 st. 2 sc in next st. Sc in next 12 st. 2 sc in next st. Sc in next 9 st. (28)
- R6: Sc in next 4 st. 2 sc in next st. Sc in next 13 st. 2 sc in next st. Sc in next 9 st. (30)
- R7: Sc in next 5 st. 2 sc in next st. Sc in next 14 st. 2 sc in next st. Sc in next 9 st. (32)
- R8: Sc in next 6 st. 2 sc in next st. Sc in next 15 st. 2 sc in next st. Sc in next 9 st. (34)
- R9: Sc in next 7 st. 2 sc in next st. Sc in next 16 st. 2 sc in next st. Sc in next 9 st. (36)
- R10: Sc in next 8 st. 2 sc in next st. Sc in next 17 st. 2 sc in next st. Sc in next 9 st. (38)
- R11: Sc in next 9 st. 2 sc in next st. Sc in next 18 st. 2 sc in next st. Sc in next 9 st. (40)
- R12 – 16: Sc in each of the next 40 stitches. End with a sl st in the last stitch of the last round. Move marker to last stitch in last round.
Foot Instructions
Note: Ch 2 does not count as a stitch now and throughout.
Step 1: Ch 2, dc in next st, working in front, dc in same st as joining, *sk next st, working in front, dc in same st as joining*. Repeat * to * around. Join with a sl st to 2nd chain of turning chain.
Continue until the sock is 2-1/2 inches from the back of the heel when tried on. (For my feet, that’s 6 inches and a total of 12 rows. Your results may vary.)
Heel Opening Instructions
- Ch 1, loosely sl st in next 11 st, Ch 2, dc in next st, working in front, dc in same st as joining, *sk next st, working in front, dc in same st as joining* 10 times. LOOSELY Ch 20, sk 20 st, join with sl st to 2nd chain of turning chain.
Leg Instructions
- Ch 2, dc in next st, working in front, dc in same st as joining, *sk next st, working in front, dc in same st as joining*. Repeat * to * around. Join with a sl st to 2nd chain of turning chain.
Repeat until 1 inch shorter than desired height.
Cuff Instructions
- Ch 2. Dc around.
- Ch 2. *FPDC around next dc, BPDC around next dc*, Repeat from * to * around.
Rep R2 once more or to desired height.
Fasten off and weave in ends.
Heel Instructions
Join yarn in the middle of the lower unworked stitches of the heel opening.
- Sc to last stitch on lower half of heel. Draw up a loop in the next st and a loop in the next unworked stitch on the upper half of heel (sc2tog), sc to last stitch on upper half of heel, sc2tog, sc to end of round. Join with sl st to first sc.
- Ch 1, Sc to last stitch on lower half of heel. Sc2tog (skipping the sc2tog from the row before), sc to last stitch on upper half of heel, sc2tog (skipping the sc2tog from the row before), sc to end of round. Join with sl st to first sc.
Repeat R2 until you have a total of 8 rows. Cut yarn leaving a 6” tail, turn the sock inside out, and slip stitch upper and lower heel sides together on the wrong side of the sock.
Fasten off and weave in ends.
