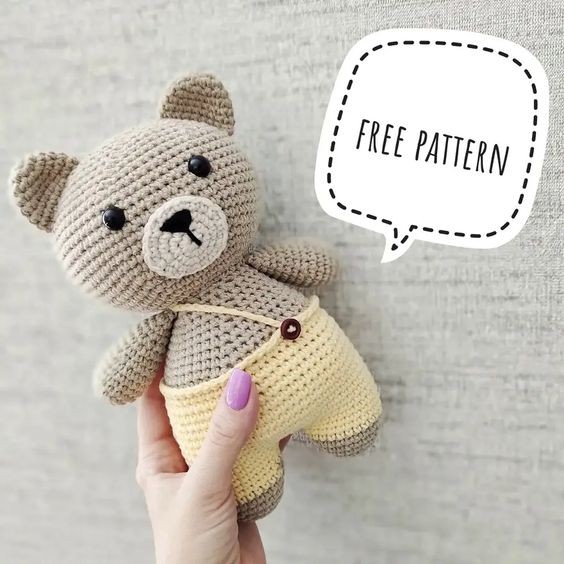
Crochet Amigurumi Teddy Bear in Pants

If you're looking for a delightful project to dive into, crochet amigurumi teddy bear in pants is a charming choice to try your hand at. Bringing together the timeless appeal of a teddy bear with the quirky flair of pants, this creation is a fun and heartwarming way to flex your crochet skills. Imagine crafting each tiny stitch with care, forming the cuddly bear's body and adding the adorable touch of pants, making it a wonderfully whimsical addition to any crocheter's collection. As you work on this project, let your creativity flow and revel in the joy of bringing a cuddly friend to life, one stitch at a time. So grab your yarn, hook, and a pinch of imagination, and get ready to craft your own crocheted teddy bear in pants that will surely bring a smile to your face and warmth to your heart.
Materials
- Yarn: YarnArt Jeans (55% cotton, 45% acrylic, 100 g/160 m)
- Hook size: 3.0 mm
- 9 mm safety eyes
- Tapestry needle and scissors
- Fiberfill
Abbreviations
R = row
mc = magic circle
ch = chain
sl st = slip stitch
sc = single crochet
inc = increase (2 sc in the next stitch)
dec = decrease (single crochet 2 stitches together)
(12) = number of stitches you should have at the end of the round/row
( ) * 6 = repeat whatever is between the brackets the number of times stated
Pattern
Arms (Make 2)
RND 1: 6 sc in mc (6)
RND 2: (inc) * 6 (12)
RND 3: (1 sc, inc) * 6 (18)
RND 4-7: 18 sc (4 rows)
RND 8: (4 sc, dec) * 3 (15)
RND 9-10: 15 sc (2 rows)
RND 11: (3 sc, dec) * 3 (12)
RND 12-13: 12 sc (2 rows)
RND 14: (4 sc, dec) * 2 (10)
Stuff ⅔ full.
Fold top of arm flat and sc through both sides across.
F.o.
Legs, Body, and Head (One Piece)
Legs (Make 2)
Start with main color:
RND 1: 6 sc in mc (6)
RND 2: (inc) * 6 (12)
RND 3: (1 sc, inc) * 6 (18)
RND 4: (5 sc, inc) * 3 (21)
RND 5: (6 sc, inc) * 3 (24)
RND 6: (7 sc, inc) * 3 (27)
Change to pants color yarn:
RND 7-9: 27 sc (3 rows)
F.o.
Don’t cut the yarn when you’ll finish the second leg!
From the second leg: 3 ch, join with the first leg.
Continue crocheting the body in the round:
Stuff as you go.
RND 10: 27 sc on the 1st leg, 3 sc in 3 ch, 27 sc on the 2nd leg, 3 sc in 3 ch (opposite side) (60)
RND 11: (27 sc, inc, 1 sc, inc) * 2 (64)
RND 12: 64 sc
RND 13: (31 sc, inc) * 2 (66)
RND 14-17: 66 sc (4 rows)
RND 18: (9 sc, dec) * 6 (60)
RND 19-20: 60 sc (2 rows)
RND 21: (8 sc, dec) * 6 (54)
Sl st, cut the yarn.
Attach the main color yarn to the back of the body.
RND 21: (7 sc, dec) * 6 (48)
RND 22: BLO: 48 sc
RND 23: 48 sc
RND 24: (6 sc, dec) * 6 (42)
RND 25: 42 sc
RND 26: (5 sc, dec) * 6 (36)
RND 27: 36 sc
RND 28: (4 sc, dec) * 6 (30)
RND 29: (3 sc, dec) * 6 (24)
RND 30-31: 24 sc (2 rows)
RND 32: Attach arms on the sides of the body (crochet sc of the body together with sc of the arm) – (2 sc, dec) * 6 (18)
RND 33: (inc) * 18 (36)
RND 34: (5 sc, inc) * 6 (42)
RND 35: (6 sc, inc) * 6 (48)
RND 36: (7 sc, inc) * 6 (54)
RND 37: (8 sc, inc) * 6 (60)
RND 38: (9 sc, inc) * 6 (66)
RND 39: (10 sc, inc) * 6 (72)
RND 40-47: 72 sc (8 rows)
Insert safety eyes between R 44 and R 45.
RND 48: (10 sc, dec) * 6 (66)
RND 49: (9 sc, dec) * 6 (60)
RND 50: (8 sc, dec) * 6 (54)
RND 51: (7 sc, dec) * 6 (48)
RND 52: (6 sc, dec) * 6 (42)
RND 53: (5 sc, dec) * 6 (36)
RND 54: (4 sc, dec) * 6 (30)
RND 55: (3 sc, dec) * 6 (24)
RND 56: (2 sc, dec) * 6 (18)
RND 57: (1 sc, dec) * 6 (12)
RND 58: (dec) * 6 (6)
F.o.
Ears (Make 2)
RND 1: 6 sc in mc (6)
RND 2: (inc) * 6 (12)
RND 3: (3 sc, inc) * 3 (15)
RND 4: (4 sc, inc) * 3 (18)
RND 5-7: 18 sc (3 rows)
F.o. and leave a long tail for sewing.
Muzzle
With white yarn:
RND 1: 6 sc in mc (6)
RND 2: (inc) * 6 (12)
RND 3: (1 sc, inc) * 6 (18)
RND 4: (2 sc, inc) * 6, 1 sc, sl st
F.o. and leave a long tail for sewing.
Embroider a nose on the muzzle using black yarn.
Sew the muzzle and ears on the head.
Pants
Attach the pants color yarn to the back of the body to the front loop of R 22 a little to the side of the center.
RND 1: FLO: 1 sc in every stitch to the end of the row, sl st
Don’t cut the yarn.
Make a Strap
29 ch (more/less)
Fix the strap to the front side of the pants with sl st.
F.o. and leave a long tail for sewing.
Use the yarn tail you fastened off with to sew a button to the pants.