How to Create a Crochet Crossbody Phone Holder

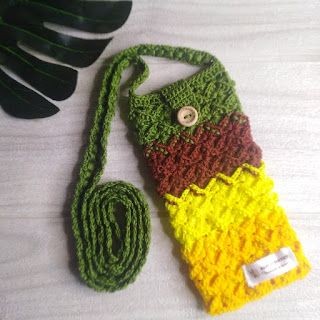
The crochet crossbody phone holder is not only a stylish accessory but also a practical solution for keeping your phone secure and easily accessible on the go. With its charming handmade design and customizable colors and patterns, this unique accessory adds a touch of creativity to your outfit while providing the convenience of hands-free phone carrying. Whether you're running errands, exploring the outdoors, or simply wanting to keep your essentials close, this versatile crossbody holder is a must-have. Say goodbye to fumbling through your bag or pockets for your phone – the crochet crossbody phone holder has got you covered in a fun and functional way!
Materials
- Monaco mercerized cotton thread (3ply) or #8 cotton thread
- 2mm hook
- Scissors
- Yarn needle
- Button (15mm)
- Stitch marker
- Label (optional)
Stitches and Abbreviations
- Ch - chain
- Sc - single crochet
- Hdc - half double crochet
- Dc - double crochet
- Sl.st - slip stitch
- Sts. - stitches
Special Stitches
- Fan stitch - 4 dc, ch 1, 4 dc
- Bpdc8tog - yo, insert the hook around the post of next st back from front and again front to back, yo, pull back a loop through the st, yo, pull back through two loops on the hook (4 times), sk next sc, [yo, insert the hook around the post of next st back from front and again front to back, yo, pull back through the st, yo, pull back through two loops on the hook] (4 times), yo, pull back through all the 9 loops on the hook. Ch 1 to secure the stitch.
- Puff stitch - yarn over, insert hook 5 times, pull through all loops, ch 1.
Round Instructions
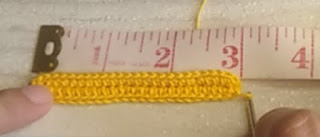
Round 1: Make a slip knot and ch 25. Make 2 hdc on the 3rd ch from hook, then hdc on the next 21 chains. On the last ch, make 3 hdc, then 21 hdc on the other side, 1 hdc on the last ch, sl.st on the 1st hdc. Your base should measure 3 inches.
Round 2: Working on the back loops only, sc on the same st. *Skip 2 sts, make a fan stitch on the next st. Skip 2 sts, and sc on the next st.* Repeat this (* *) 7 times, then sl.st on the 1st sc. You will make 8 fan stitches.
Round 3: Sl.st on each dc and on the ch 1 space, ch 1, sc on the same st. Ch 3 and make the bpdc8tog, ch 3, sc on the next ch space of the fan stitch. Repeat until you reach the last stitch. Total of 8 bpdc8tog.
Round 4: Ch 1, sc on the same st. *Make a fan stitch on top of the next bpdc8tog stitch, sc on the next sc stitch.* Repeat this (* *) around, and sl.st to the first sc. Repeat Rounds 3 and 4 every round. Stop when you reach a height of 6 inches or your preferred size. In this pattern, I made up to 24 rounds.
Now that you have reached your desired length, finish it with 47 hdc around, then make another round of 47 sc.
Button Strap Instructions
For the button strap, you don't have to cut the yarn if your end is almost in the center. Make 10 rounds of 6 sc. Ch 6, sc on the last stitch to make a hole for the button. Then turn, 6 sc all around the 6 chs, sl.st, cut and weave. Sew on the button.
Important Notes
You can leave it as is if you don't want to put a strap. For the strap, I put a stitch marker on both sides. Grab your yarn and make a slip knot, insert the hook beside the marker, ch 1, and sc on the same st. Sc on the next 2 stitches, for a total of 3 sc. Turn around, *ch 3, make a puff stitch on the 2nd sc. (Yarn over 5 times) close it with ch1, then ch 3, and sc on the 3rd st.* Repeat this (* *) several times until you reach your desired length. Then sew the strap on the other side with the stitch marker.
Final Note: Make sure the strap is not twisted when you attach it on the other side.