Crochet Contemporary Granny-Square Pillowcase

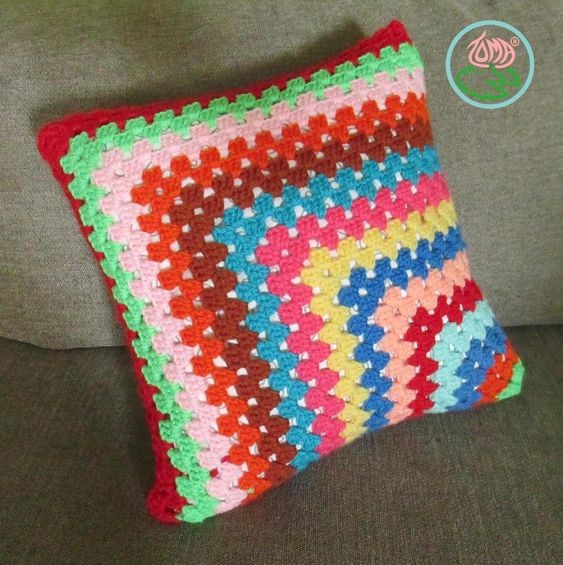
If you're looking to add a touch of cozy charm to your space, a Crochet Contemporary Granny-Square Pillowcase might just be the perfect project for you! This delightful pillowcase combines the time-honored granny-square motif with a modern twist, resulting in a unique and stylish addition to your home decor. With its vibrant colors and intricate designs, crocheting this pillowcase can be a relaxing and fulfilling experience. Whether you're a seasoned crocheter or a beginner looking to try something new, this project is sure to bring a smile to your face every time you cozy up with it. So grab your crochet hook, pick out your favorite yarn, and get ready to create a one-of-a-kind piece that will brighten up any room in your home!
Materials and Tools Needed
To embark on your crochet project, gather the following materials:
- Acrylic, Cotton or Bamboo yarn in several colours e.g. Lane Cervinia Caprice / King Cole Bamboo cotton / King Cole Smooth DK. I’ve used Lane Cervinia Caprice.
- Hook 2.5mm
- Square Pillow. I’ve used Ikea’s KRÅKRIS pillow.
- Embroidery needle
- Scissors
- Finished Size: approximately 36×36cm (14×14in) but can be smaller or larger depending on the chosen pillow size.
- All instructions and abbreviations are given in American (US) terms.
- Work without turning unless otherwise specified in the pattern.
Crochet Instructions
Beginning Rounds
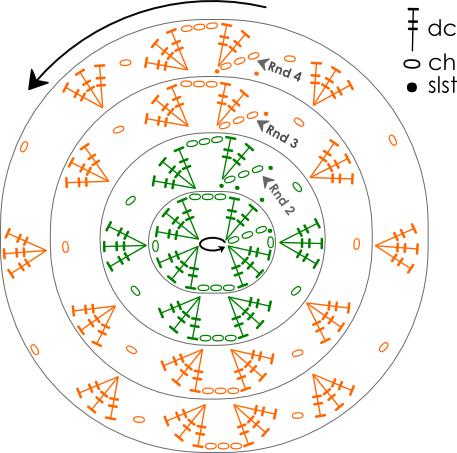
Graph of Rnds 1-4.
Rnd 1: into adjustable ring, ch3, 2dc, ch3, 3dc, ch1, 3dc, ch3, 3dc, ch1, slst on top of the 3rd ch made at the beginning.
Rnd 2: slst into next 2 dc of previous Rnd, (slst, ch3, 2dc, ch3, 3dc) into 3ch-space, ch1, 3dc into next 1ch-space, ch1, (3dc, ch3, 3dc) into 3ch-space, ch1, 3dc into next 1ch-space, ch1, slst on top of the 3rd ch made at the beginning. Fasten off secure and hide the tail.
Rnd 3: introduce new colour yarn into 3ch-space of the previous Rnd, (ch3, 2dc, ch3, 3dc) into 3ch-space, ch1, (3dc into next 1ch-space, ch1) × 2, (3dc, ch3, 3dc) into 3ch space, (ch1, 3dc into next 1ch-space, ch1) × 2, slst on top of the 3rd ch made at the beginning.
Rnd 4: slst into next 2 dc of previous Rnd, (slst, ch3, 2dc, ch3, 3dc) into 3ch-space, ch1, (3dc into next 1ch-space, ch1) × 3, (3dc, ch3, 3dc) into 3ch space, ch1, (3dc into next 1ch-space, ch1) × 3, slst on top of the 3rd ch made at the beginning. Fasten off secure and hide the tail.
Continuing the Rounds
Rnd 5-29: worked in the same manner as Rnds 3-4 i.e. (3dc, ch3, 3dc) into 3ch-space & 3dc into 1ch-space, all separated by 1ch in between; in addition, change colour every two Rnds.
Final Round
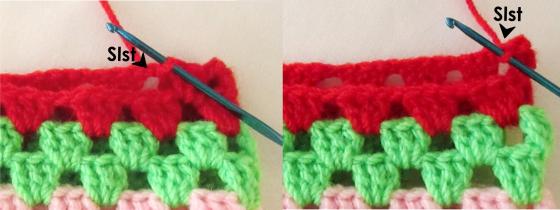
Rnd 30 (Final round): slst into next 2 dc of previous Rnd, (slst, ch3, 2dc, ch3, 3dc) into 3ch-space, ch1, (3dc into next 1ch-space, ch1) × 14, 3dc into next 1ch-space, (here starts the connection by slsts into opposite side, refer to the below photo) slst into last 1ch-space made of the same Rnd, (3dc into next 1ch-space, slst into opposite side’s 1ch-space) × 14, (slst, ch3, 2dc, ch3, 3dc) into 3ch-space, ch1, (3dc into next 1ch-space, ch1) × 29, slst on top of the 3rd ch made at the beginning. With the same yarn ch enough chains to make a cord of 40cm (16in) long, fasten off.
Connecting the Sides
Attachment Steps
Connecting the two opposite sides with slsts (part of Rnd 30 – Final round).
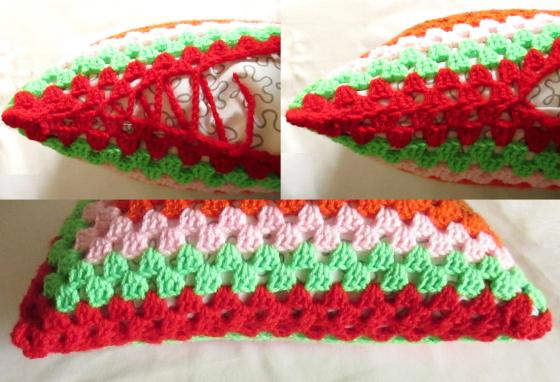
Connecting the open side with the crochet cord: Start passing the 40cm cord into each ch-space altering between opposite sides, similar to shoe lacing (refer to the below photos). Pull the cord so that each ch-space of each side is almost on top of the opposite side and hide the cord within the pillow.
Additional Notes
Note 1: You can switch colour on every Rnd, every 3 Rnds, etc. experiment and have fun  .
.
Note 2: You can crochet a smaller pillowcase by doing fewer Rnds or you can continue crocheting beyond Rnd 29 in the same manner as described in Rnd 5-29. When you reach your ideal pillow size refer to the ‘Rnd 30 (Final round)’ on how to crochet the last round and for the connection of one side to the other using slsts; then move to ‘Connecting the open side with the crochet cord’ to finish off.