How to Crochet Your Adorable Easter Chick

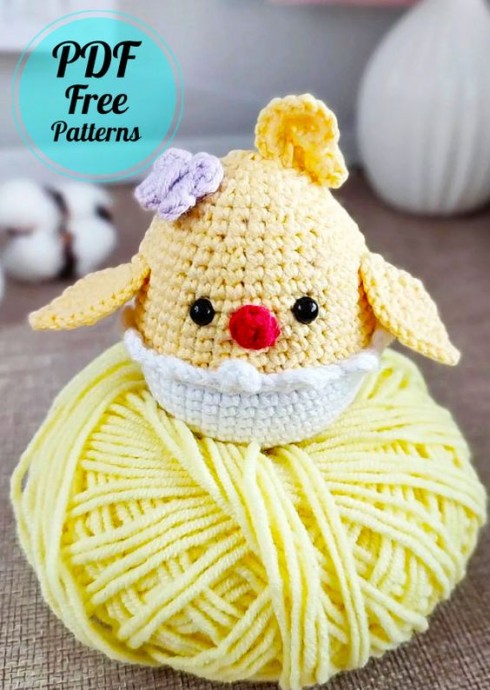
Create your very own adorable Easter chick with this fun and easy crochet amigurumi pattern. Using basic crochet stitches and soft yarn, you can bring this cute little chick to life in no time. The pattern includes step-by-step instructions and helpful tips to guide you through the process, making it perfect for beginners and experienced crocheters alike. Whether you're looking to add a festive touch to your Easter decorations or make a special handmade gift for a loved one, this crochet Easter chick amigurumi is sure to bring joy and smiles to all who see it. Once you've finished crocheting your Easter chick, you can display it as part of a seasonal centerpiece, attach it to a keychain, or use it as a cute decoration for your home or office. Get creative and have fun bringing this charming crochet Easter chick amigurumi to life!
Materials
To create your Easter chick, you will need the following materials:
- Yarn
- Hook (2.25 mm)
The size of my chicken turned out to be 6.5 cm.
Abbreviations
The following abbreviations will be used throughout the pattern:
- AR – Amigurumi Magic ring
- MR – Amigurumi Magic ring
- sc – Single Crochet
- inc – Increase
- dec – Decrease
- tr – Triple Crochet / Treble Crochet
- st – Stitch
- dc – Double Crochet
- hdc – Half Double Crochet
- sl-st or Slst – Slip Stitch
- ch – Chain
- tch – Turn in chain crochet
- ..in – Make increase into the same stitch as many as the number given in front of the "inc" abbreviation (e.g., 3inc, 4inc).
- FLO – Crochet into front loops only
- BLO – Crochet into back loops only
Body Instructions
SHELL AND CHICKEN:
- 6sc in MR
- 6 inc (12)
- (1 sc, inc) * 6 (18)
- (2 sc, inc) * 6 (24)
- (3 sc, inc) * 6 (30)
- (4 sc, inc) * 6 (36)
- (5 sc, inc) * 6 (42)
- Rows 8-13: 42 sc (6 rows)
- Change the color of the thread to yellow for the chicken.
- 14: BLO 42 sc
- Rows 15-20: 42 sc (6 rows)
- Between the 18th and 19th rows, we insert the eyes.
- (5 sc, dec) * 6 (36)
- 36 sc
- (4 sc, dec) * 6 (30)
- 30 sc
- (3 sc, dec) * 6 (24)
- 24 sc
- (2 sc, dec) * 6 (18)
- (1 sc, dec) * 6 (12)
- 6 dec
We tie the shell: in the 14th row, FLO 3 ch, slst; 3 sc, and in 3 sc we crochet 3 ch, slst. We repeat until the end of the row.
Wings
Instructions for the wings:
- 5 sc in MR
- 5 inc (10)
- (4 sc, inc) * 2 (12)
- (5 sc, inc) * 2 (14)
We fold the part in half and tie it with 2 sc in one loop. Finish crocheting, leaving a long end of the thread for sewing. We sew the wings between the 19th and 20th rows.
Beak
Instructions for the beak:
- 5 sc, slst
We finish crocheting, leaving a long end of the thread for sewing. We sew the beak between the 16th and 19th rows.
Tuft
Instructions for the tuft:
- 4 ch, from 2 loops crochet 3 sc in each loop * 3 (9).
- Without interrupting crocheting, we collect 5 ch, from 2 loops crochet 3 sc in each loop * 4 (12).
We finish crocheting, leaving a long end of the thread for sewing.
Butterfly
Instructions to create the butterfly:
- In MR (2 ch, 1 sc, 2 ch, slst) * 4
Leave a long end of the thread and form a butterfly. Sew it to the head of the chicken.