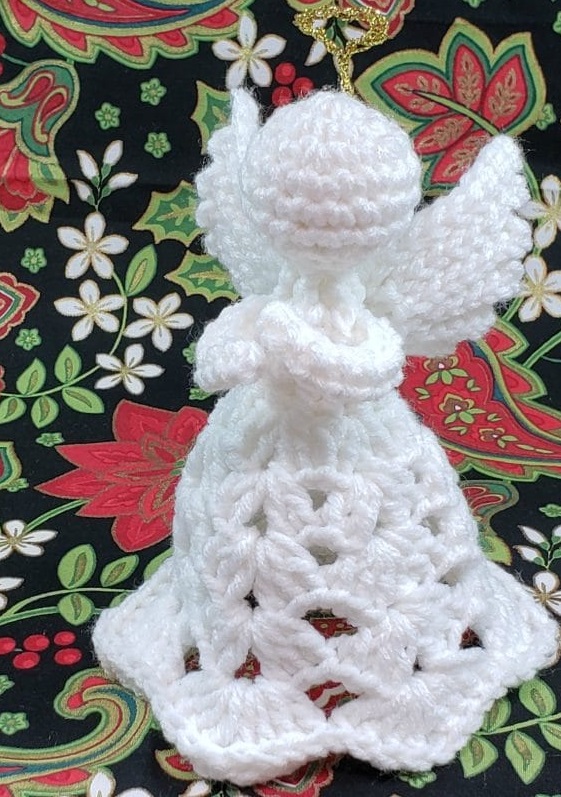
Crochet Angel Tutorial


As many of you asked me to find the tutorial for crochet angel, I finally find it!
You'll Need:
- Red Heart Super Saver yarn – (198 g/333 m), 100% acrylic. Medium [4] Weight of white colour (70-80 yards);
- Crochet hook 4 mm (G)
- Scissors;
- Yarn Needle;
- Stitch Marker;
- Poly-Fil;
- Golden puff wire for halo.
Size:
Approximately 7" tall and 5" wide (skirt diameter).
Abbreviations
- beg – beginning
- bl – back loop
- ch – chain
- ch1sp – chain 1 space
- ch2sp – chain 2 space
- dc – double crochet
- DMR – double magic ring
- FPdc – Front Post double crochet
- FPhdc – Front Post half double crochet
- FPsc – Front Post single crochet
- R – row/round
- rem – remaining
- rep – repeat
- sc – single crochet
- sc2tog – single crochet 2 together
- sc7tog – single crochet 7 together
- sk – skip
- sl st – slip stitch
- st/sts – stitch/stitches
- * – Repeat the instructions between the asterisks the number of times indicated. This repeat will contain multiple instructions.
- () – Repeat the instructions between the parentheses the number of times indicated.
- [] – at the end of the row – the total number of stitches
Instructions
R1: Work 6 sc in a DMR. [6]
R2: 2 sc in each sc around. [12]
R3: *2 sc in the next st, 1 sc in the next st**. Rep from * to ** around. [18]
R4: 1 sc in each st around. [18]
R5-R6: Rep R4
R7: *Sc2tog over the next 2 sts, 1 sc in the next st**. Rep from * to ** around. [12]
R8: Sc2tog around. [6]
R9: 1 FPsc in each st around. [6]
R10: 1 sc and 1 FPsc in each st around. Sl st to the first sc to join. [12]
R11: Ch 3 (counts as 1 dc), 1 FPdc in the next FPsc, ch 2, sk the next sc and the next FPsc. *1 dc in the next sc, 1 FPdc in the next FPsc**. Rep from * to ** one more time. Ch 2, sk the next sc and the next FPsc, 1 dc in the next sc, 1 FPdc in the next FPsc. Sl st in the top of the initial ch 3 to join. [4 dc, 4 FPdc, 2 ch2sp]
R12: Ch 3 (counts as 1 dc), 1 dc in the next st (the FPdc), 1 dc in the bl of each of the next 2 chs, 1 dc in each of the next 4 sts, 1 dc in the bl of each of the next 2 chs, 1 dc in each of the next 2 sts. [12]
R13: 1 FPhdc in each st around. Sl st to the first FPhdc to join. [12]
R14: (Ch 3 (counts as 1 dc), 1 dc, ch 1, 2 dc) all in the same st. Sk 1 FPhdc, (2 dc, ch 1, 2 dc) in the next FPhdc**. Rep from * to ** around to the last FPhdc. Sk the last FPhdc. Sl st to the first dc to join. [24 dc, 6 ch1sp]
R15: Sl st into the first ch1sp. (Ch 3 (counts as 1 dc), 1 dc, ch 2, 2 dc) in the ch1sp. *Sk 4 dc, (2 dc, ch 2, 2 dc) in the next ch1sp**. Rep from * to ** around to the last 2 dc. Sk the last 2 dc. Sl st to the first dc to join. [24 dc, 6 ch2sp]
R16: Sl st into the first ch2sp. (Ch 3, 2 dc, ch 2, 3 dc) in the ch2sp. *Sk 4 dc, (3 dc, ch 2, 3 dc) in the next ch2sp**. Rep from * to ** around to the last 2 dc. Sk the last 2 dc. Sl st to the first dc to join. [36 dc, 6 ch2sp]
R17: Sl st in the next dc, sl st into the first ch2sp. (Ch 3, 2 dc, ch 2, 3 dc) in the ch2sp. *Sk 6 dc, (3 dc, ch 2, 3 dc) in the next ch2sp**. Rep from * to ** around to the last 3 dc. Sk the last 3 dc. Sl st to the first dc to join. [36 dc, 6 ch2sp]
R18: Sl st in the next dc, sl st into the first ch2sp. (Ch 3, 3 dc, ch 2, 4 dc) in the ch2sp. *Sk 6 dc, (4 dc, ch 2, 4 dc) in the next ch2sp**. Rep from * to ** around to the last 3 dc. Sk the last 3 dc. [48 dc, 6 ch2sp]
R19: *FPsc in each of the next 4 dc, 1 sc in the ch2sp, FPsc in each of the next 4 dc**. Rep from * to ** around. Finish off with an invisible join and weave in ends. [48 FPsc, 6 sc]
Arms
Make 1.
The arm is created in one piece; worked flat and then seamed on the long edges with a slip stitch seam. Once the arm is complete you thread it through the openings on either side of the angel’s body, being sure to keep an equal amount of “arm” on each side. You can whipstitch these in place if you wish – I did not. I simply used 2 small stitches to attach the hands together in a “prayer” pose.
R1: Ch 21, beg in 2nd ch from hook and work 1 sc in each across, ch 1, turn [20]
R2: 1 sc in each st across, ch 1, turn [20]
R3: Rep R2, ch 1, turn [20]
Fold the rectangle in half (along row 2) and seam the long edges using a slip stitch seam. Finish off and weave in any remaining ends.
Wings
Make 2
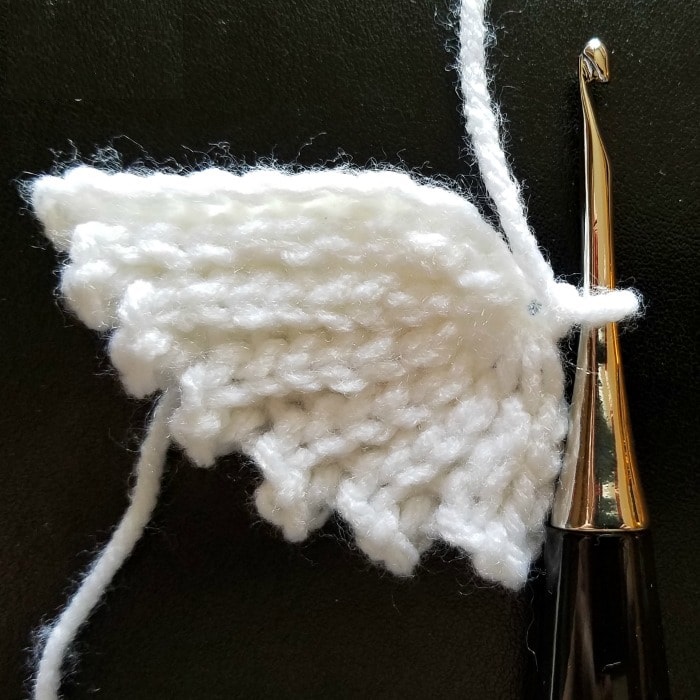
R1: Ch 10, beg in the 2nd ch from the hook and work 1 sl st in the bl of each ch across, ch 1, turn [9]
R2: 1 sl st in the bl of each of the next 8 sts, sk the last st, ch 2, turn [8]
R3: 1 sl st in the bl of each st across, ch 1, turn [8]
R4: 1 sl st in the bl of each of the next 7 sts, sk the last st, ch 2, turn [7]
R5: 1 sl st in the bl of each st across, ch 1, turn [7]
R6: 1 sl st in the bl of each of the next 6 sts, sk the last st, ch 2, turn [6]
R7: 1 sl st in the bl of each st across, ch 1, turn [6]
R8: 1 sl st in the bl of each of the next 5 sts, sk the last st, ch 2, turn [5]
R9: 1 sl st in the bl of each st across, ch 1, turn [5]
R10: 1 sl st in the bl of each of the next 4 sts, sk the last st, ch 2, turn [4]
R11: 1 sl st in the bl of each st across, ch 1, turn [4]
R12: 1 sl st in the bl of each of the next 3 sts, sk the last st, ch 2, turn [3]
R13: 1 sl st in the bl of each st across, ch 1, turn to work along the row ends. [3]
You will be making a sc7tog. Insert hook in every other row end (there is a small space you will see) and pull up 1 loop in each. You will have 8 loops on your hook. Yarn over and pull through all 8 loops. Ch 1 and finish off leaving a long yarn tail to sew the wings in place.
Halo
The halo is the only part of this project to use a different hook and thread. Please use the 2.25 mm (B) hook and the Gold Bowdabra Bow Wire. This is a thin piece of wire wrapped in gold metallic thread. I found mine at Michael’s in the ribbon section. It can stand on its own which is why I like it – and it is much thinner than pipecleaner.
Ch 20, finish off leaving a tail of the bow wire. Now take the tail and thread it through the 7th chain from the opposite end. This will create the halo loop. Now twist (like a twist-tie) the two remaining ends together to make it straight and stiff. Take that one end (since you twisted them together you have one wire now) and thread it through the back of the angel’s head and down to the base of the neck before cutting off any of the excess wire.
