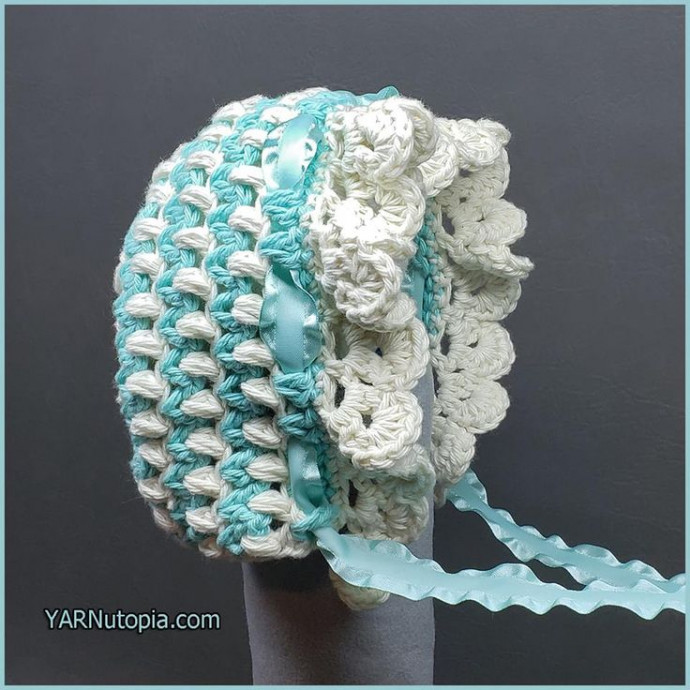
Crochet Vintage Style Baby Bonnet Pattern

Crochet vintage style baby bonnets are a delightful addition to any little one's wardrobe! These charming pieces infuse a touch of nostalgia with their intricate stitches and timeless design. Crafted with care and attention to detail, these bonnets invoke a sense of warmth and coziness, perfect for keeping your precious baby snug and stylish.
Whether paired with a sweet dress or a cozy romper, a crochet vintage style baby bonnet is sure to be a cherished keepsake for years to come.Materials You Will Need
- Red Heart Scrubby Smoothie Cotton yarn in Aqua and Loofah
- H-5.00mm Crochet Hook
- Yarn Needle
- Ribbon
- Scissors
Notes
- Use a smaller hook to make these smaller
- Use a bigger hook to make these bigger
- I used 2 colors but you can use as many colors as you want
- I used a size 4 medium yarn; you can use any worsted weight, DK, or Aran yarn for this project
Special Stitches
- Ch(s): chain(s)
- YO: Yarn Over
- BLO: Back Loop Only
- St(s): Stitch(es)
- Sl st: slip stitch
- SK: Skip
- SC: Single Crochet
- HDC: Half Double Crochet
- DC: Double Crochet
- Puff: [YO, Insert Hook, YO, Pull through] 3 times, YO pull through all 7 loops on the hook, Ch 1 to close the st.
- Cluster: [YO, Insert Hook, YO, Pull through, YO pull through 2 loops] 3 times, YO pull through all loops on hook.
Pattern
Bonnet
Ch 4, Sl st to 1st ch to form a ring.
Rnd 1: Ch 2, Beg. Cluster in ring, [Ch 2, Cluster in ring] 3 times, Ch 2, Sl st to beg. cluster. (4 clusters)
Rnd 2: Sl st into Ch 2 sp, Ch 3 (counts as DC), [DC, ch 2, 2 DC] in same sp, *Ch 2, [2DC, ch 2, 2 DC] in next ch 2 sp, repeat from * around, ending with ch 2, Sl st to ch 3 st.
Rnd 3: Sl st in sp between DC sts, Ch 1, Puff st in same sp, *Ch 1, Puff st in Ch 2 sp, Ch 1, Puff st in sp between next 2 DC sts, Repeat from * around, ending with Puff st in last Ch 2 sp, ch 1, sl st to 1st puff st.
Rnd 4: Ch 3 (counts as DC), DC in same st, *2 DC in next ch 1 sp, 2 DC in next puff st, repeat from * around, sl st to beg. ch 3 st. (64 sts)
Work in rows now
Continuing the Rows
Row 5: Work in between posts, sl st in sp between DC’s, Ch 1, Puff in same sp, * sk 2 sts, Puff in sp between next 2 DC’s, ch 1, repeat from * 24 more times, leave the rest of the sts unworked. Fasten off, change color. (25 puff sts)
Row 6: With new color, attach yarn to last st on row with RIGHT SIDE facing you, Ch 3 (counts as DC), DC in same st, Sk ch 1 sps across, put 2 DC in each puff st, Fasten off, change color. (50 sts)
Row 7: Turn your work so you are looking at the WRONG SIDE, Sl st in sp between 2 DC grouping, Ch 1, Puff st in same sp, *Ch 1, Puff between next 2 DC grouping, repeat from * across, Fasten off, Turn your work, Change color.
Row 8: Repeat Row 6
Row 9: Repeat Row 7
Row 10: Repeat Row 6
Row 11: Repeat Row 7
Row 12: Repeat Row 6
Round 13: Starting in corner of front of bonnet, SC around entire bonnet with Loofah
Do not fasten off, continue working along the front of the bonnet
Finishing Touches
Row 14: Ch 1, SC in same st, * Ch 3, Sk 1 st, SC in next st, repeat from * 24 more times. Turn.
Row 15: Sl st into 1st ch 3 sp, Ch 2, *[2HDC, ch 2, 2 HDC] in NEXT ch 3 sp, repeat from * across. Turn.
Row 16: 6 HDC in 1st ch sp, *SC in gap between the HDC st groupings, 6 HDC in next ch 2 sp, repeat from * across, ending with SC in last ch 2 st. Fasten off.
Weave in all ends.
Assembly Step
Weave ribbon across Row 12 of the bonnet.
Enjoy!!
