CrochetKnittingMenScarvesHatsGlovesSweatersCardigansSocksOther clothingWomenScarvesHatsGlovesShawls and cover upSweatersCardigansSocksSlippersBagsOther clothingChildrenScarvesHatsGlovesSweatersCardigansSocksSlippersBagsOther clothingHomeBlankets and plaidsRugsHome decorationsPetsSchemesOther hand-madeChat
Creating a Relief Knit Pattern: Step-By-Step Guide

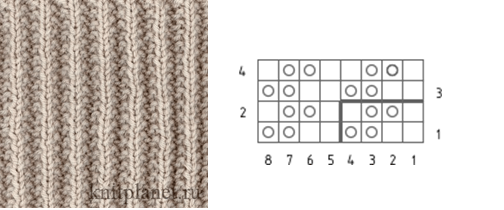
A blank square means a knit stitch, while a square with a circle indicates a purl stitch. The relief of this pattern is formed by rotating 2 knit stitches and 2 purl stitches, along with the displacement of the pattern in each row. This technique is what gives the ornament its pronounced relief. Please note that all stitches in the pattern are knitted in a classical way.
The total number of stitches should be a multiple of 4 stitches plus 2 selvedge stitches.Row Instructions
1st Row
* 2 knit stitches and 2 purl stitches *; repeat from * to * until the end.
2nd Row
* 1 purl stitch, 2 knit stitches, 1 purl stitch *; repeat from * to * until the end.
3rd Row Onwards
Starting with the 3rd row, repeat the pattern from the 1st row until you achieve the desired length.
No comments
Write a comment
