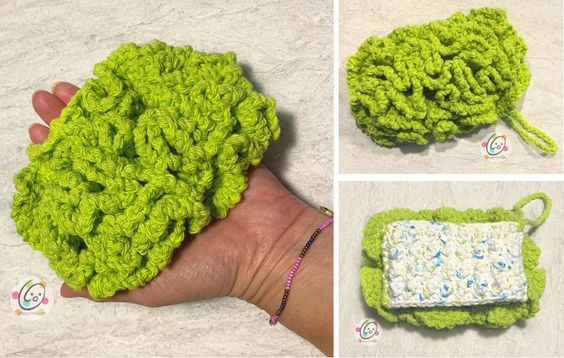
How to Make Adorable Crochet Scrubs

Are you tired of using plain, boring scrubs? Why not add a touch of creativity and make your own adorable scrub with the art of crochet? Crocheting allows you to unleash your imagination and create unique designs that will make your scrub stand out from the rest. Whether you're a beginner or an experienced crocheter, this project is perfect for anyone looking to add a personal touch to their skincare routine.
Not only will crocheting your own scrub allow you to express your creativity, but it also offers practical benefits. Crocheted scrubs are soft, gentle on the skin, and can be easily washed and reused. You can customize the size to fit your needs, ensuring a comfortable and snug fit. Plus, they make fantastic gifts for friends and loved ones who appreciate handmade treasures.Materials
- Yarn: 150 yards 100% cotton (120 yards of one color and 30 yards of a contrasting color)
- Crochet Hook: I (5.5mm)
- Notions: Yarn needle for weaving in ends
Measurements
- Finished Measurements: nubby side (white variegated in sample) – 5” x 3”; “lettuce” side (green in sample) – 6.5” x 4”
- Gauge: not needed for this project.
Tips
- First stitch of each row is worked into the same stitch as the turning chain.
- Numbers at the beginning of each line may refer to steps and not indicate number of rows.
- Stitch count remains the same unless noted at end of row/round.
Nubby Side Instructions
1. With an I hook and cotton yarn, ch 18, sc in the 2nd ch from hook and in each ch across. (17sts)
2. Ch 1, turn, sc in the same st, tr in the next st, *sc in the next st, tr in the next st*, repeat until 1 st remains, sc in the last st.
3. Ch 1, turn, sc in the same st and in each st to end of row.
4. Repeat steps 2-3 three more times (6 rows).
5. Finish off and weave in ends.
“Lettuce” Side Instructions
First, a flat rectangle is created and then the leafy part is added.
Reminder: FLO refers to the front loop as the piece is facing you. When you turn the piece, that side would then be the BLO.
1. With an I hook and cotton yarn, ch 18, sc in the 2nd ch from hook and in each ch across. (17sts)
2. Ch 1, turn, hdc in the same st, hdc in the BLO of the next 15 sts, hdc in the last st.
3. Ch 1, turn, hdc in the same st, hdc in the FLO of the next 15 sts, hdc in the last st.
4. Ch 1, turn, hdc in the same st, hdc in the BLO of the next 15 sts, hdc in the last st.
5. Ch 1, turn, hdc in the same st, hdc in the FLO of the next 15 sts, hdc in the last st.
6. Ch 1, turn, hdc in the same st, hdc in the BLO of the next 15 sts, hdc in the last st.
7. Ch 1, turn, sc in the same st and in each st to end of row. Finish off and weave in the end.
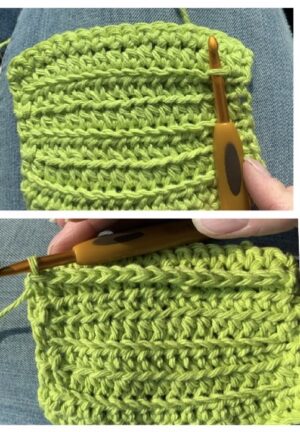
8. This step starts the foundation for the leafy part. With an I hook, attach matching yarn to the first loop at the top right (see top photo). Ch 1, sc in the same loop and in each loop across. (15sts)

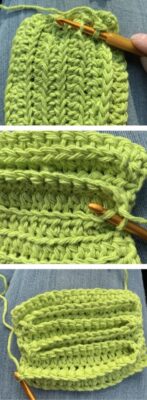
9. Insert hook in the first loop of the next row (see first photo below). Sc in each loop across.
10. Pivot piece to work into the first loop of the next row (see second photo below). Sc in each loop across.
11. Continue repeating this process until you have reached the bottom corner (see last photo).

12. This step creates the long leafy part of the scrubbie. The “row” is the zig zag pattern you just created in steps 8-11. Ch 2, turn, 2dc in the same st, 3dc in each st to the end of the row.
13. Ch 3, turn, sl st in the next st, *ch 3, sl st in the next st*, repeat to end of row. Finish off and weave in ends.
Assembly Instructions
Place the two pieces wrong sides together. With a yarn needle, use a long piece of matching yarn to sew the short edges together at both ends. Leave the long edges unsewn so a hand can be slipped between the two layers.
“Fit”: Please note this is a little loose on my hand when I slide it between the layers. It is a good fit for my husband’s hand. If you want a snug fit and it is loose, sew the top and bottom edges together at each edge approximately 1” or until you get the fit you prefer.
Hanger (Optional)
If you would like a hanger, attach matching yarn to one corner of the nubby side with an I hook. Ch 40, sl st in the same st on the cloth. Finish off and securely weave in the ends.
