Crochet Amigurumi Pikachu

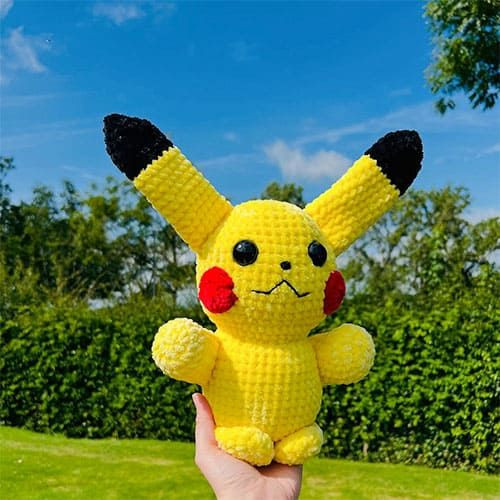
Crochet Amigurumi Pikachu is a delightful and charming craft project that is sure to bring a smile to your face. With its bright yellow color and cute, chubby cheeks, this little Pikachu is perfect for both Pokemon fans and crochet enthusiasts alike. The intricate and detailed design of the Amigurumi Pikachu allows you to showcase your crochet skills while creating a lovable character that can be cherished for years to come. Whether you're a beginner or a seasoned crocheter, this project is a fun and rewarding way to spend your time, bringing a touch of whimsy and nostalgia into your life. Grab your yarn, hook, and a dash of creativity to crochet your very own Pikachu that will surely spark joy wherever it goes!
Terms
- MR - magic ring
- st(s) - stitch(es)
- slst - slip stitch
- sc - single crochet
- ch - chain
- scinc - single crochet increase
- scdec - invisible decrease
- rnd - round
- FO - fasten off
- cc - color change
- clr - colour
- *–*- repeat the determined number of times
Materials
- Chenille yarn (6 chunky) 150g in 1 colour – yellow (colour A), 50g in 3 colours - black (colour B), brown (colour C), red (colour D).
- 5mm crochet hook.
- Toy stuffing.
- 25mm safety eyes.
- Craft wire/pipe cleaners (for tail stability).
- Small amount of black embroidery thread/dk.
- Sewing needle.
- Ami sticks.
Body and Head
Using Color A:
R1. 8 sc in MR (8)
R2: *scinc* x8 (16)
R3: *sc, scinc* x8 (24)
R4: *2sc, scinc* x8 (32)
R5: 6sc, 4scinc, 12sc, 4scinc, 6sc (40)
R6-15: sc around (40) [10 rounds]
R16: 6sc, 4scdec, 12sc, 4scdec, 6sc (32)
R17: *2sc, scdec* x8 (24)
Begin stuffing the body firmly.
R18: *2sc, scinc* x8 (32)
R19: 6sc, 4scinc, 12sc, 4scinc, 6sc (40)
R20: 6sc, *sc, scinc* x4, 12sc, *sc, scinc* x4, 6sc (48)
R21: 18sc, 2scinc, 4scdec, 2scinc, 18sc (48)
Pause stuffing at this point (leaving room to insert the eyes).
R22-29: sc around (48) [8 rounds]
R30: 6sc, *sc, scdec* x4, 12sc, *sc, scdec* x4, 6sc (40)
R31: sc around (40)
R32: 6sc, *scdec* x4, 12sc, *scdec* x4, 6sc (32)
Now place your safety eyes between R28-29, approximately 6 sts apart, and continue stuffing until you FO.
R33: sc around (32)
R34: *2sc, scdec* x8 (24)
R35: sc around (24)
R36: *sc, scdec* x8 (16)
R37: *scdec* x8 (8)
Slst into the next st and FO. Ensure you have finished stuffing, then leave a tail long enough to thread through FLO of R37’s sts, and pull gently to close the hole (weave in end).
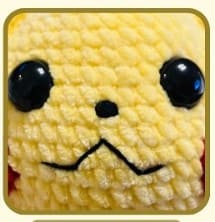
Face Details
- Using black embroidery thread/dk, stitch a small nose between R27-28 (1 st wide).
- With the same black thread/dk, stitch a smile between R25-R26 (7 st wide). See image for reference.
Arms (Make 2 Using Colour A)
R1: 8sc in mr (8)
R2: *scinc* x8 (16)
R3: *sc, scinc* x4, 8sc (20)
R4: sc around (20)
R5: *sc, scdec* x4, 8sc (16)
Start stuffing firmly and continue to stuff until you FO.
R6-11: sc around (16) [6 rounds]
R12: *scdec* x8 (8)
Slst into the next st and FO. Leave a long tail for sewing the arms to the body, and thread through FLO of R12’s sts and gently pull to close the hole. Arm placement: position the arms using ami sticks (paws pointing forwards and upwards) on the sides of the body, between R11-17.
Optional note - when sewing the arms to the body, only sew the top few rounds of the arms to the body - this gives the arms a bit of room for movement.

Feet (Make 2 Using Colour A)
Don't stuff the feet.
R1: 8 sc in mr (8)
R2: *scinc* x8 (16)
R3-7: sc around (16) [5 rounds]
Now make 8 sc across the bottom of the foot to close, FO and leave a long tail for sewing the feet to the body.
Foot placement: position the feet on the bottom of the body, using ami sticks between R1-6 (the straight edge of the feet will be used to sew them to the body).
Cheeks (Make 2 Using Colour D)
R1: 8 sc in mr (8)
R2: *scinc* x8 (16)
Slst into the next st and FO. Leave a long tail for sewing the cheeks to the face.
Cheek placement: position the cheeks with ami sticks and sew on between R21-25 (10 sts apart).
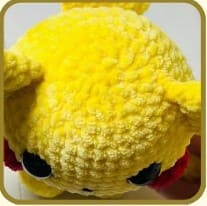
Ears (Make 2 and Start With Colour B)
R1: 4sc in mr (4)
R2: *scinc* x4 (8)
R3: *scinc* x8 (16) R4-6: sc around (16) [3 rounds] in the last st of R6 cc to clr A.
Optional – begin stuffing the ears firmly here. You can leave the ears unstuffed.
R7: sc around (16) – work your cc in this rnd.
R8-17: sc around (16) [10 rounds]
Now make 8 sc across the bottom of the ear to close,
FO and leave a long tail for sewing the ears to the body.
Ear placement: position the ears with ami sticks on top of the head, between R29-34 (I recommend 8 sts apart and 4 sts between each eye and ear).
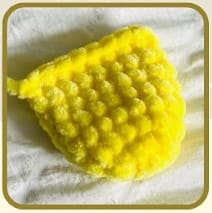
Back Stripes (Make 2 Using Colour C)
Starting with a ch10, turn, in the 2nd ch from hook sc across (9)
FO and leave a long tail to sew the stripes to the back of the body.
Stripes placement: sew a back stripe on R6 and another on R9, ensure that they are sewn on straight and aligned with the centre of the back.
Important Note
You will be crocheting in rows when making the tail, so at the end of each row remember to turn your work.
Tail (Make 2 Pieces, and Start Using Colour A)
Starting with a ch8
R1: in the 2nd ch from hook, sc across (7)
Now when you reach the end of a row, don’t ch1, sc into the very first st (this creates a straighter edge).
R2-6: sc across (7) [5 rows]
R7: 4sc (4) – this is an incomplete row.
R8-10: sc across (4) [3 rounds]
R11: ch4, starting in the 2nd ch from the hook, make 7sc back across the row (7)
R12-14: sc across (7) [3 rows] – in the last st of R14 cc to clr D.
R15: 3sc (3) this is an incomplete row.
R16-18: sc across (3) [3 rows]
R19: ch4, starting in the 2nd ch from the hook, make 6sc back across the row (6)
R20-22: sc across (6) [3 rows]
FO the first piece and leave a short tail. Do not FO the second piece (we will be crocheting the layers together).
Important Note
Make sure when you crochet around the tail, you use the correct colours to match that section, hence, you will use colour A for the most part, and colour D for the bottom.

Improving Tail Stability
If you choose to make your tail stable, I suggest taking a couple of pipe cleaners, twist them together, then thread them around the edges of the tail. For additional support, you can wrap some craft wire around the pipe cleaners to improve sturdiness. Ensure that the structure remains in place when you crochet the tail layers together.
Joining the Tail Layers
Layer the wrong sides of the tail pieces together (remember you should still be connected to the second piece), and make a sc in each st around the two layers. When you reach a ‘corner’ make a scinc. Once you are back to your starting point, slst into the starting st and FO. Leave a long strand to sew the tail to the body.
Tail placement: position the tail central to the back, and sew securely onto R3. I suggest adding a few sts up the tail to secure it to the body – improving stability.
- Funny Pictures
-
 Pics to Get the Excitement Today
-
 Funny Christmas Meme Dump
-
 Funniest Relatable Felines in the Form of Memes
- Recipes
-
 Cinnamon Sugar Swirl Cupcakes
-
 Cheesy Bacon Ranch Roasted Potatoes
-
 Blooming Onion Bites with Dipping Sauce
- Lifehacks
-
 7 Toilet and Bathroom Cleaning Hacks
-
 Tips & Hacks for Clean Carpets
-
 7 Kitchen Hacks & Simple Solutions
- Crochet Ideas
-
 Crochet Watermelon Amigurumi
-
 Crochet Shark Applique
-
 Crochet Pineapple Amigurumi
- DIY
-
 Yarn Wrapped Christmas Wreath Ornaments
-
 Egg Carton Snowman Ornament
-
 Stick Peppermint Candy Ornament
- Knitting Ideas
-
 Knitted Star Square Dishcloth
-
 Knitted Free 2025 Year Dishcloth
-
 Knitted Belle Finger Puppet