Crochet V Stitch Waffle Pot Holders

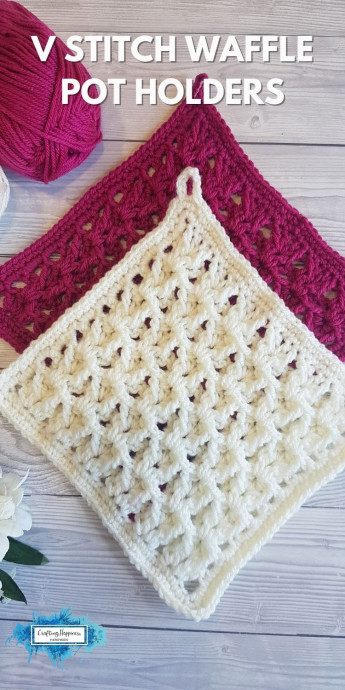
Crochet V stitch waffle pot holders are a delightful and practical addition to any kitchen. This unique stitch pattern creates a lovely texture that not only looks appealing but also provides extra thickness and heat resistance for handling hot pots and pans. The V stitch adds a touch of elegance to the traditional waffle design, making these pot holders both functional and stylish. Whether you're a seasoned crocheter or just starting out, crafting these pot holders can be a fun and rewarding project. They make wonderful gifts for friends and family or a lovely treat for yourself to add a handmade touch to your cooking routine. Enjoy creating these charming pot holders and bring a touch of homemade warmth to your kitchen!
Supplies
- Gardenia or watermelon (for the single color one)
- 5mm crochet hook
- Sewing needle with an eye big enough to fit your yarn
Abbreviations
Pattern written in US terms using Craft Yarn Council abbreviations.
- st(s) – stitch(es)
- ch – chain
- sk – skip
- dc – double crochet
- fpdc – front post double crochet
V Stitch Waffle Pot Holder Crochet Pattern
Ch3 at the beginning of the row counts as a dc. The stitches contained within the ** are the repeat section. The number at the end of each row is the number of stitches you should have.
The V Stitch Square
Starting Chain: ch35
Row 1: 2dc in the 6th ch from hook, ch1, 2dc in the next ch, sk3, *2dc in the next ch, ch1, 2dc in the next ch*, repeat until you have 3ch left, sk2, dc in the last ch, turn = 33
Row 2: ch3, sk1, fpdc around the dc below, (dc, ch2, dc) in the ch1 space below, fpdc around the dc below, *sk2, fpdc around the dc below, (dc, ch2, dc) in the ch1 space below, fpdc around the dc below*, repeat in every ch1 space you have in the row below and until you have 2sts left, sk1, dc in the last st, turn = 33
Repeat row 2 until the potholder is 18cm tall (in my case 10 more rows), don’t fasten off.
Single Crochet Border
Continue from the corner where you finished your last row going down the side.
Round 1: *2sc around each dc row*, repeat until you reach the next corner, 3sc in the corner, sc in each st across the bottom of the piece until you reach the next corner, 3sc in the corner, *2sc around each dc row*, repeat until you reach the next corner, 3sc in that corner, sc in each st along the top part of the piece until you reach the corner, 3sc in that corner, sl st in the first sc you made in this round, ch1, don’t turn.
Round 2: *sc in each st along the side until you reach the corner st (the 2nd sc of the 3sc you previously made in the corner), 3sc in the corner st*, repeat on each side of the piece (4 times in total), sl st in the first sc you made in this round, ch8, sl st in the next st, fasten off, weave in the ends.
- Funny Pictures
-
 Hilarious Memes for Those Bored to Tears
-
 Weekly Treat of Funniest Parenting Memes for Good Laugh out Loud Right Now
-
 Really Funny Pics to End These Weekend Perfectly
- Recipes
-
 Crispy Baked Avocado Fries
-
 Scrambled Chickpea and Spinach Pitas
-
 Cinnamon Pancakes
- Lifehacks
-
 Crochet Basics: Aligned Cobble Stitch
-
 Brick Stitch Crochet Tutorial
-
 Crochet Basics: Wattle Stitch
- Crochet Ideas
-
 Crochet Snorlax Plushie Doll
-
 Crochet Beautiful Penguin Toy
-
 Crochet Tiny Snowman
- DIY
-
 DIY Santa Craft For Kids
-
 Paper Plate Angel Craft
-
 Upcycled Mason Jar Chicken Vase
- Knitting Ideas
-
 Knitted Bridger Cowl
-
 Knitted Keepsake Bag
-
 Knitted Cutie Cupcake Dolls