Crochet Kid Lids Hats


Looking for a fun and cozy way to keep your little ones warm this winter? Look no further than Crochet Kid Lids Hats! These adorable hats are not only stylish but also perfect for warding off the chilly weather with a touch of charm. With a variety of colors and designs to choose from, your kiddo can stay warm and trendy all season long. So, why settle for a plain old hat when your child can rock a Crochet Kid Lids creation and stand out in the best way possible? Ready to add some flair to their winter wardrobe? Grab a Crochet Kid Lids Hat today and watch your little one shine!
Materials
- 1 Skein Lion Brand Wool Ease Thick & Quick (colors shown are “Flamingo” and “Blue Jay”)
- N (9.0 mm) Crochet Hook
- Tapestry Needle
- Scissors
- Ruler/Tape Measure (optional)
Note: If you need to substitute yarn, just select a yarn that recommends a 9.0 mm hook on the yarn label
Sizing As Shown
- 7.5 inches tall (not including pom pom)
- 19 inch circumference
Note: Hat is very stretchy and will fit lots of heads, but if you need to change the size, just make your starting chain in any even number to begin.
Instructions
Ch 30 (Note: If you desire a different size, just make your starting chain any even number). Join with a sl st in the furthest ch from the hook.
Round Instructions
- Round 1: Ch 3 and work a dc in each chain around. Join with a sl st to close round.
- Round 2: Ch 3 and work a dc in each st around. Join with a sl st to close round.
- Round 3: Ch 3, then in the first space (not stitch this time), work a puff st (see below for photo tutorial), then ch 2. *Skip the next space, then in the next space (puff st, ch 2). Repeat from * to the end of the round, then join with a sl st to close round.
- Round 4: Ch 3, then work a dc in the top stitch of the first puff stitch from the previous round. *dc in the next space (ch 2 space from previous round), then a dc in the top st of the puff st from the previous round. Repeat from * to the end of the round, then join with a sl st to close round.
- Round 5: Ch 3 and work a dc in each st around. Join with a sl st to close round.
- Round 6-8: Repeat round 5.
Fasten off leaving a long tail (12-18 inches) for cinching the top.
Check out the photo and explanation below for a step-by-step tutorial of the puff stitch:
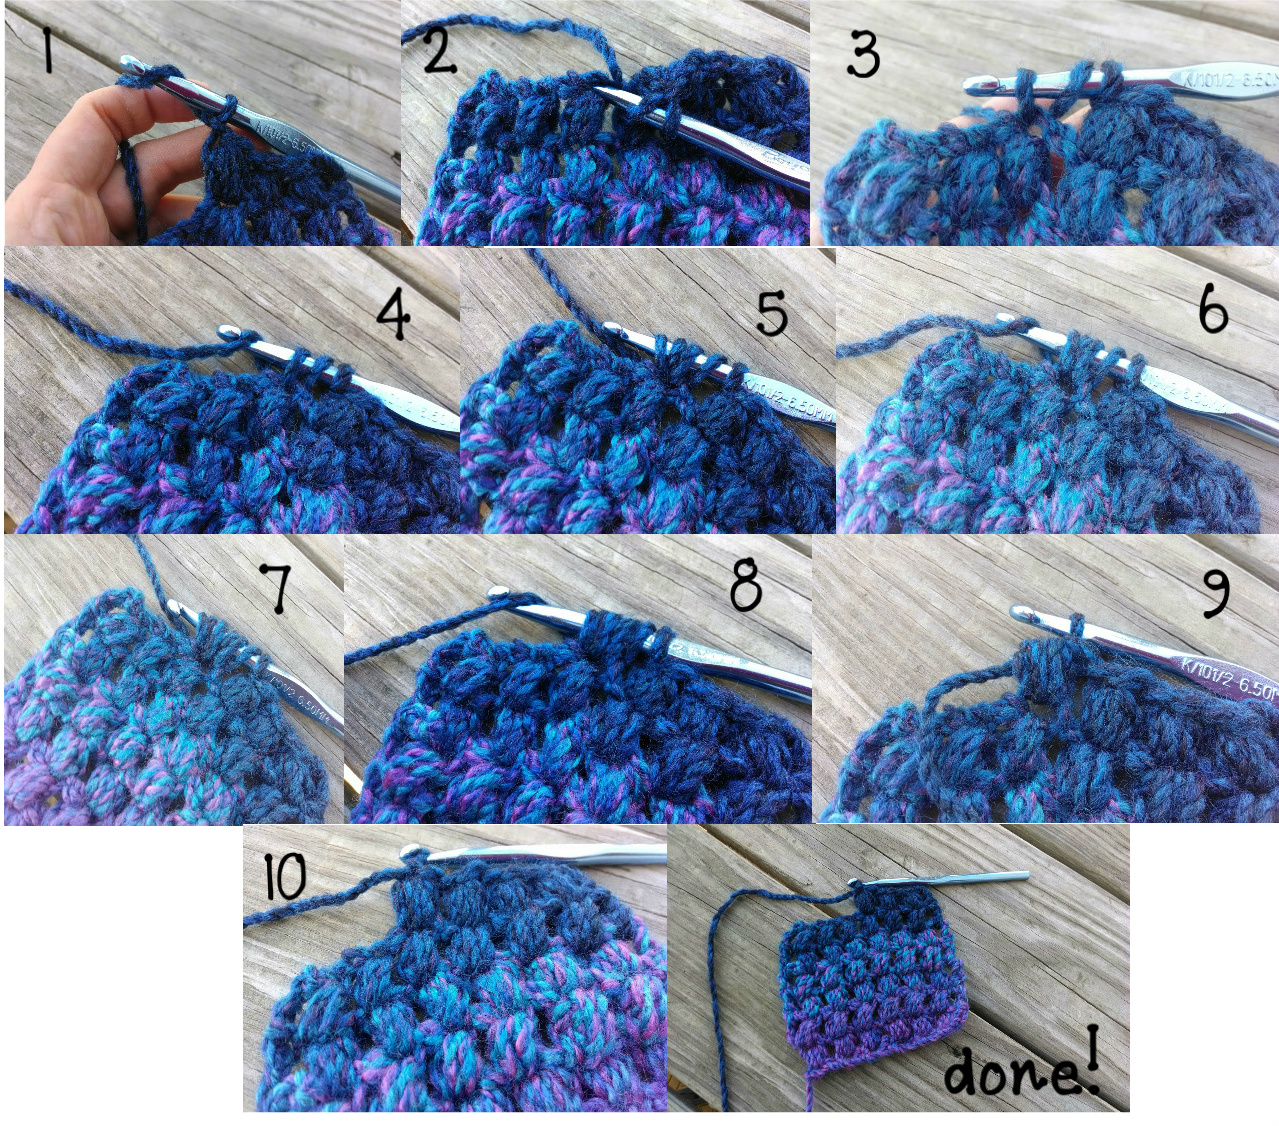
Wrap yarn around hook. Insert into the chain (if working the foundation row) or top of the stitch from puff of previous row (if working row 1) and draw up a loop.
You’ll now have 3 loops on your hook. Wrap yarn around hook and draw up a loop. You’ll now have 5 loops on your hook.
Wrap yarn around hook and draw up a loop. You’ll now have 7 loops on your hook.
Wrap yarn around hook one more time and pull through all 7 loops on your hook. Work the number of chains per the pattern (in this case 2) and you’re finished!
To finish and assemble, see below.
Finishing & Assembly
When you are finished crocheting your hat, you’ll have a tube. Turn the hat inside out, thread the remaining tail with a tapestry needle and whip stitch the top leaving an inch or so in between stitches. Slide the top of the hat together by pulling on the tail and sliding the hat to cinch the top and then tie a knot (or two) to secure. Weave in ends. Make a pom pom for the top with remaining yarn and tie to the top.

- Funny Pictures
-
 Pics to Get the Excitement Today
-
 Funny Christmas Meme Dump
-
 Funniest Relatable Felines in the Form of Memes
- Recipes
-
 Cappuccino Brownies
-
 Chicken Mushroom Tortellini Bake
-
 Spinach Pie
- Lifehacks
-
 8 Necessary Tips for Baking Bread
-
 Tips & Hacks for Clean Carpets
-
 10 Uses For Old TV Armoires
- Crochet Ideas
-
 Crochet Watermelon Amigurumi
-
 Crochet Shark Applique
-
 Crochet Pineapple Amigurumi
- DIY
-
 Yarn Wrapped Christmas Wreath Ornaments
-
 Egg Carton Snowman Ornament
-
 Stick Peppermint Candy Ornament
- Knitting Ideas
-
 Knitted Star Square Dishcloth
-
 Knitted Free 2025 Year Dishcloth
-
 Knitted Belle Finger Puppet