Crochet Parchment Flower Square

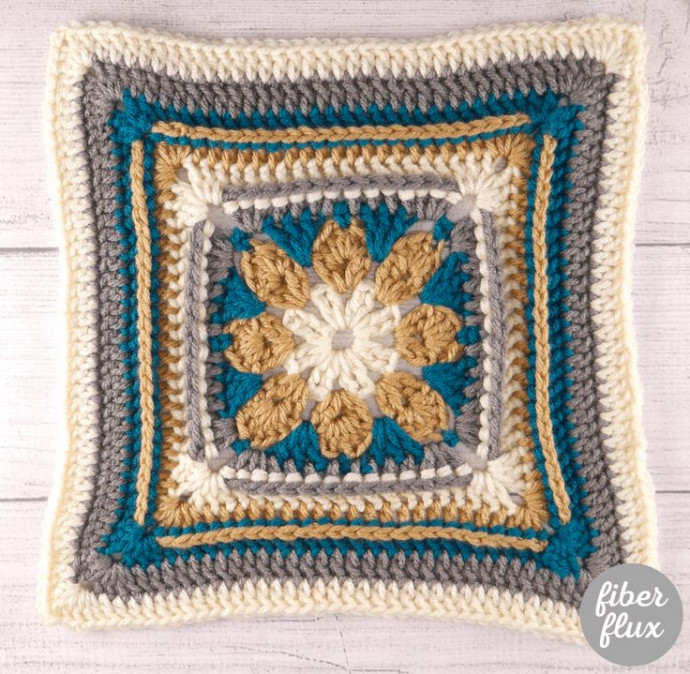
The Crochet Parchment Flower Square pattern is a delightful and charming design that is perfect for adding a touch of elegance to your crochet projects. With its intricate floral motif and classic square shape, this pattern is sure to impress both beginners and experienced crocheters alike. The soft parchment color gives it a timeless and cozy feel, making it versatile for a variety of projects such as blankets, scarves, or even home decor items. So grab your crochet hook and some yarn, and enjoy creating this beautiful and inviting Crochet Parchment Flower Square!
Materials
- J (6.0 mm) crochet hook
- #4 Medium weight yarn (I used Red Heart With Love in “Pewter,” “Mallard,” “Aran,” and “Tan”)
- Yarn/tapestry needle
- Scissors
- Measuring Tape
Sizing
- 12 inches wide
- 12 inches tall
Pattern Notes
- Easily make your square bigger by repeating the last two rounds.
- Connect lots of squares to make a blanket of many of them. Or try a blanket with the flower in the center and just keep repeating outer rounds.
- You could also try making the square in cotton yarn for a beautiful dishcloth too!
Parchment Flower Crochet Square Pattern:
Instructions
Ch 5, then join into the furthest ch to make a ring (note: if you prefer the magic ring, feel free to do this technique instead).
Round 1
Ch 3 (counts as a dc) then work 15 dc into the center of the ring. Join in the top chain (where you began) with a slip stitch to close the round.
For rounds 2 and 3, use the same color for both rounds to get the best petal effect.
Round 2
Tie a new color in between any of the double crochet posts, then chain 3 (counts as a dc). In the same space work (dc, ch 2, 2 dc). *Skip the next space, then work (2 dc, ch 2, 2 dc) into the next space. Repeat from * around. Join in the top chain (where you began) with a slip stitch to close the round.
Round 3
Stick with the same yarn color as the previous round and slip stitch over to the first ch 2 space. Next, ch 3 (counts as a dc). Work 4 dc into the same space. *Work a sc in the space between the “V” clusters, then work 5 dc into the ch 2 space. Repeat from * around. Join in the top chain (where you began) with a slip stitch to close the round.
Round 4
Tie on new yarn color into the center stitch of any petal (the group of 5 dc from the previous round). Ch 1, work a sc into the same st, then ch 1. Next, work 3 dc in between the petals in the space that is under the sc from the previous round. *Next ch 1, then sc into the centermost stitch of the next petal (group of 5 dc), then ch 1, then work 3 dc in the space below the sc in between the petals. Repeat from * around. Join in the sc from the beginning of the round with a slip stitch to close.
As we begin round 5, this is where the flower begins to turn into a square.
Round 5
Tie a new yarn color into a space to the right of any of the sc from the previous round. Ch 3 (counts as a dc). In the same space work 2 dc. Ch 2, then work 3 dc into the next space. Work a dc into each of the next three stitches. Next work a dc into the next space, then a dc into the next space. Work a dc into each of the next three stitches. *In the next space work 3 dc, then ch 2, then 3 dc into the next space. Work a dc into each of the next 3 stitches. Work a dc into each of the next 3 stitches, dc into the next space, dc into the next space, work a dc into each of the next 3 stitches. Repeat from * twice more, then join in the top chain (where you began) with a slip stitch to close the round.
Round 6
Tie new yarn color into any corner space and ch 3 (counts as a dc). In the same space, work (2 dc, ch 2, 3 dc). Work a bpdc into each stitch across until you get to the ch 2 corner space. *Work (3 dc, ch 2, 3 dc) into the ch 2 corner space, then bpdc in each stitch until you get to the next ch 2 corner space. Repeat from * twice more then join in the top chain (where you began) with a slip stitch to close the round.
After completing this round, the back post double crochet stitch may cause it to curl back a bit. This is normal and the next round will flatten it back out!
Round 7
Tie new yarn color into any corner space and ch 3 (counts as a dc). In the same space, work (2 dc, ch 2, 3 dc). Work a dc into each stitch across until you get to the ch 2 corner space. *Work (3 dc, ch 2, 3 dc) into the ch 2 corner space, then dc in each stitch until you get to the next ch 2 corner space. Repeat from * twice more then join in the top chain (where you began) with a slip stitch to close the round.
Round 8
Repeat round 6.
Round 9
Repeat round 7.
Round 10
Repeat round 7.
If you need your square to be a little bigger, you can continue working round 7 until it is as big as you want!
Finishing & Assembly
Weave in any ends and your square is done!

- Funny Pictures
-
 Cute Cat Memes That Will Make Your Day Brighter
-
 Spot-on and Funny Memes About Introverts Struggles
-
 Top Wonderful Cat Memes on Their Way to Better Your Day
- Recipes
-
 Creamy Old Fashioned Rice Pudding
-
 Russian Tea Cakes (Snowball Cookies)
-
 Rigatoni with Sausage, Tomatoes, and Zucchini
- Lifehacks
-
 How to Crochet a Harlequin Stitch
-
 Removing The Toughest Stains
-
 Crochet Basics: Crumpled Griddle Stitch
- Crochet Ideas
-
 Crochet Christmas Tree
-
 Crochet Goblet of Fire
-
 Crochet Adorable Ammonite
- DIY
-
 DIY Snowman Wreath
-
 Mini Santa Sleigh Ornament
-
 Crochet Gingerbread House Blanket
- Knitting Ideas
-
 Knitted Easter Bunny
-
 Knitted Mobile Phone/Glasses Case
-
 Knitted Cabled Wallet