Crochet Mitered Heart Granny Square

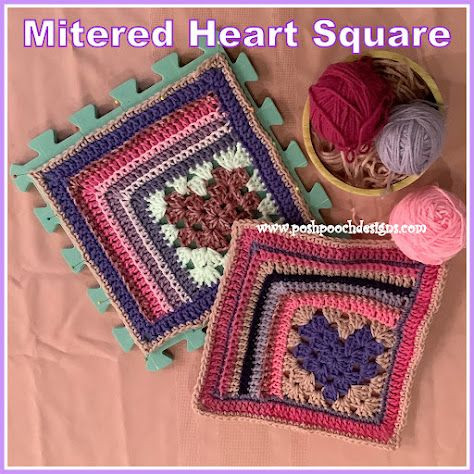
The Crochet Mitered Heart Granny Square is a delightful pattern that adds charm and love to any project. With its intricate design and unique shape, this granny square is perfect for adding a touch of warmth to blankets, bags, or even coasters. The mitered heart detail is both adorable and eye-catching, making it a wonderful choice for gift-giving or simply brightening up your home decor. Whether you're a crochet novice or a seasoned pro, this pattern is sure to bring a smile to your face as you stitch away on this lovely project. Happy crocheting!
Skill Level
Easy
Materials
- Crochet Hook – H / 5 mm
- Yarn - Med (4) Acrylic – 2 oz. assort scrap yarn of your choosing
- (C1 and C2 of your choice for the heart square)
- Yarn needle
Stitches
- Chain (ch)
- Slip Stitch (slst)
- Single Crochet (sc)
- Double Crochet (dc)
- Back Loop Only (blo)
- Skip (sk)
- Space (sp)
Size
10 X 10
Notes
- Ch1 Does not count as a st
- Ch3 Counts as a dc
- Color Changes are not indicated in the pattern except for the heart square portion
Pattern Instructions
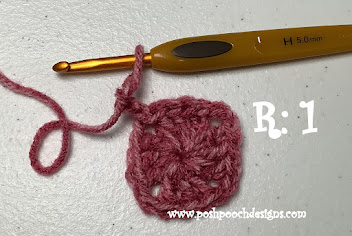
RND 1: With C1, Ch 5, join in a circle, ch 3, 2 dc, ch2 in the circle, 3 dc, ch2 in the circle. Repeat from * to * 2 more times, join to the ch3 with a slst. Slst in the next 2 dc, slst in the ch1 sp (4 sets of 3 dc, ch 2).
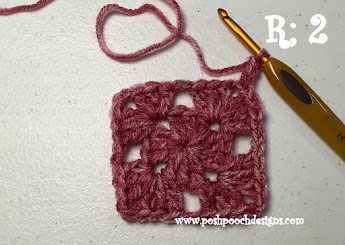
RND 2: Ch3, 2 dc, ch2 3 dc in the ch2 sp, ch2. *3dc, ch 2, 3dc, ch2 in the next ch 2 sp*. Repeat from * to * 2 more times, join to the ch3 with a slst. Slst in the next 2 dc, slst in the ch1 sp (4 sets of 3 dc, ch 2, 3 dc, ch2).
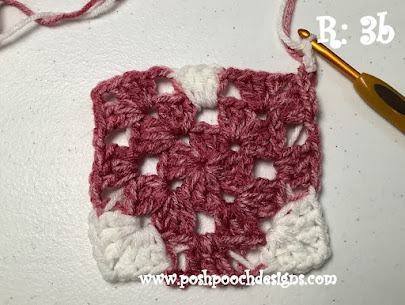
RND 3: Ch3, 2 dc, ch2 3 dc in the ch2 sp, ch2. Change to C2, leave C1 attached, 3dc in the next ch2 sp, ch2.
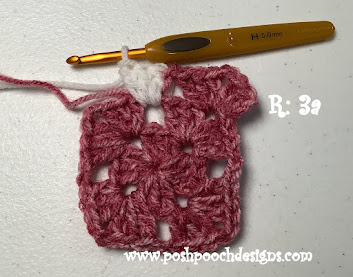
Change to C1, leave C2 attached, 3dc, ch2, 3dc, ch2, 3 dc in the next ch2 sp, ch2. Change to C2, leave C1 attached, 3dc, ch2, 3dc, ch2. Change to C1, leave C2 attached, 3dc, ch2. Change to C2, leave C1 attached, 3dc, ch2, 3dc, ch2. Change to C1, leave C2 attached, 3dc, ch2. Change to C2, leave C1 attached, 3dc, ch2, 3dc, ch2. 3 dc in the next ch2 sp, ch2. Join to the ch3 with a slst. Slst in the next 2 dc, slst in the ch1 sp. Tie off C1, leave C2 attached (4 corners, ch2, 3 dc, ch2).
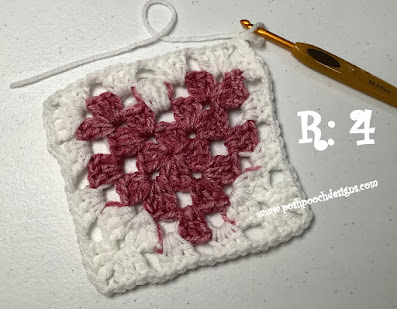
RND 4: Ch3, 2 dc, ch2 3 dc in the ch2 sp, ch2. 3dc in the next ch2 sp, ch2. 3dc in the next ch2 sp, ch2. *3dc, ch2, 3dc, ch2, 3dc in the next ch2 sp, ch2, 3dc in the next ch2 sp, ch2*. Repeat from * to * 2 more times. Join to the ch3 with a slst. Slst in the next 2 dc, slst in the ch1 sp (4 corners, ch2, 3 dc, ch2, 3dc, ch2).
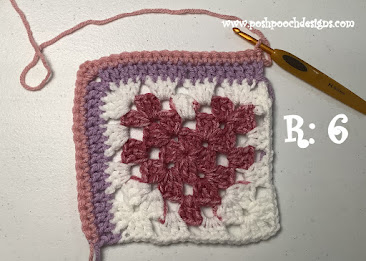
Change as often as you desire.
RND 5: ch3, 1 dc in each dc and ch2 sp across to the corner, dc, ch2, dc in the corner, 1 dc in each dc and ch2 sp across to the next corner, 1 dc in the ch2 sp in the corner, turn, ch1 (34 dc, ch2).
RND 6: sc in each dc across, sc, ch2, sc in the ch2 sp, sc in each dc, turn, ch 3.
RND 7: BLO, 1 dc in each sc across, dc, ch2, dc in the ch2 sp, 1 dc in each sc across, turn, ch 1.
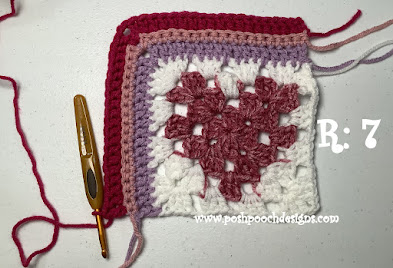
RND 8: Repeat RND 6.
RND 9: Repeat RND 7.
RND 10: Repeat RND 6.
RND 11: Repeat RND 7, ch1 after RND 11.
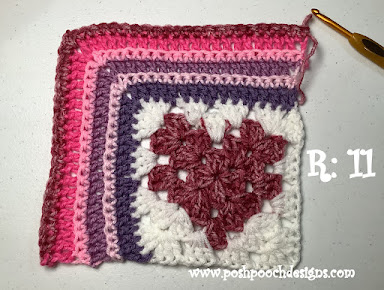
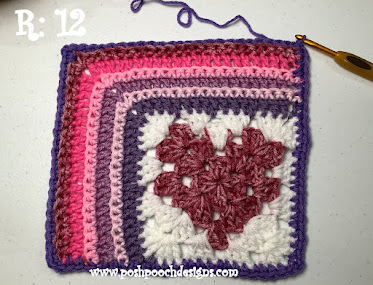
RND 12: BLO sc in each sc, sc, ch1, sc in the corner, sc in each sc across. Evenly sc across the bottom of the 3rd side of square, sc, ch2, sc in the next ch2 sp. Evenly sc up the 4th side of the square, sc, ch1, sc in the last corner, join to the 1st sc, ch 3.
RND 13: dc in each sc working around all 4 sides of the square. Place a dc, ch2, dc in each of the 4 corners, join to the ch3 with a slst, ch1.
RND 14: sc in each dc working around all 4 sides of the square. Place a sc, ch2, sc in each of the 4 corners, join to the 1st sc with a slst. Tie Off and weave in the ends.

- Funny Pictures
-
 Hilarious Memes for Those Bored to Tears
-
 Weekly Treat of Funniest Parenting Memes for Good Laugh out Loud Right Now
-
 Really Funny Pics to End These Weekend Perfectly
- Recipes
-
 Crispy Baked Avocado Fries
-
 Scrambled Chickpea and Spinach Pitas
-
 Cinnamon Pancakes
- Lifehacks
-
 Crochet Basics: Aligned Cobble Stitch
-
 Brick Stitch Crochet Tutorial
-
 Crochet Basics: Wattle Stitch
- Crochet Ideas
-
 Crochet Snorlax Plushie Doll
-
 Crochet Beautiful Penguin Toy
-
 Crochet Tiny Snowman
- DIY
-
 DIY Santa Craft For Kids
-
 Paper Plate Angel Craft
-
 Upcycled Mason Jar Chicken Vase
- Knitting Ideas
-
 Knitted Bridger Cowl
-
 Knitted Keepsake Bag
-
 Knitted Cutie Cupcake Dolls