Crochet Pineapple Plush

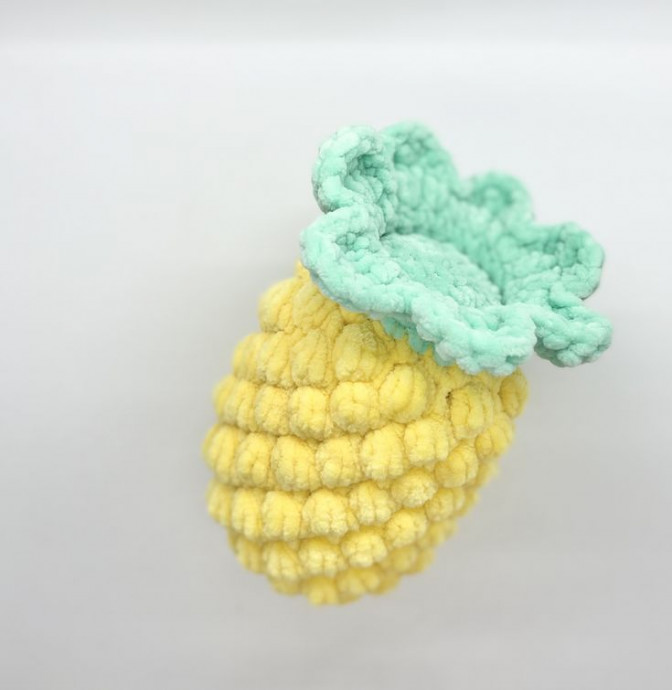
If you're looking for a fun and cozy DIY project, why not try making a Crochet Pineapple Plush? With its cute design and soft texture, this adorable creation is sure to bring a smile to anyone's face. Whether you're a beginner or an experienced crocheter, this project is both enjoyable and rewarding. So grab your crochet hook and yarn, and get ready to create a charming Crochet Pineapple Plush that will brighten up any room!
Materials Needed
HOOK(S): 5.0 mm • US size H
Hook size will vary if you wish to use different yarn sizes for your project. Using an H hook and Parfait Chunky yarn, our project ended about 6 inches tall. If you want to create a smaller project, you can try worsted weight and a G hook or blanket yarn and an L hook. Try it out in all different types of sizes!
YARN: Parfait Chunky; this is labeled a weight 6 ‘super bulky’ yarn, but I consider it to work up more similarly to a weight 5 ‘bulky’ yarn.
75 yds in Sunshine (used for sample)
15 yds in Seaglass (used for sample)
NOTIONS: Darning Needle / Embroidery Thread / Measuring Tape / Polyfill Stuffing / Scissors / Stitch Marker
FINAL SIZE: ~6 inches from top to bottom
Stitch Abbreviations

Special Stitches
Back Loop Only (BLO)
Insert hook into the back loop only of the stitch. When looking at the “v” of the stitch, you will place your stitch only in the side of the “v” farthest from you (the back). Draw up a loop. Yarn over and pull through two loops on hook. This will create a “ridge” on the round of your pineapple.
Bobble Stitch (bobble)

Pattern
Making the Pineapple
To begin, make a magic ring.
Round 1: Place 6 sc in the magic circle. Do not join. You will continue to work in the round.
Round 2: [inc] in each st around.
Round 3: [inc, sc] x 6 around.
Round 4: [inc, sc x 2] x 6 around.
Round 5: [inc, sc x 3] x 6 around.
Round 6: sc x 30 around.
Round 7: [sc x 2, bobble] x 10.
Round 8: sc, [bobble, sc x 2] x 9, bobble, sc.
Round 9: [bobble, sc x 2] x 9, bobble, sc, bobble.
Round 10: [sc x 2, bobble] x 9, sc, bobble, sc.
Round 11: sc, [bobble, sc x 2] x 8, bobble, sc, bobble, sc x 2.
Round 12: [bobble, sc x 2] x 8, bobble, sc, bobble, sc x 2, bobble.
Round 13: [sc x 2, bobble] x 8 followed by [sc, bobble, sc] x 2.
Round 14: sc, [bobble, sc x 2] x 7, bobble, sc, followed by [bobble, sc x 2] x 2.
Round 15: [bobble, sc x 2] x 7, bobble, sc, bobble followed by [sc x 2, bobble] x 2.
Round 16: [sc x 2, bobble] x 7, sc [bobble, sc x 2] x 2, bobble, sc.
Round 17: sc, bobble, [dec, bobble] x 6, sc, bobble, [dec, bobble] x 2, dec.
Round 18: sc x 21 around. Switch to desired color for the top of the pineapple.
Round 19: sc x 21 in the BLO. Begin stuffing and stuff firmly as you close.
Round 20: [sc, dec] x 7.
Round 21: [dec] x 7. Leaving a bit of a tail, cut and tie off your yarn.
Thread a needle and sew under the front loop of each remaining stitch. Cinch tightly together to close the pineapple. Tie off and weave in your ends. You will now make the leaves of the pineapple.
Adding the Leaves
You will now add the leaves to the top of your pineapple. To do this, you will need to join your desired pineapple leaf color to the FLO left by round 19 above. Slip stitch to a loop to join and continue as below.
Rounds 1-3: sc x 21 around. At the end of round 3, sl st ch 1 and turn.
In the next rounds, you will be placing multiple stitches into the same spot to increase and create the leaf shape.
Round 4: [sc and hdc into the same st, 3 dc into the next st, hdc and sc in the following st] x 7.
The instructions above should be read as: in the first stitch, place 1 sc and 1 hdc. In the next stitch, place 3 dc. In the following stitch, place 1 hdc and 1 sc. You will repeat this set for a total of 7 times.
Round 5: [sl st, sc, hdc, 3 dc in the same st, hdc, sc, sl st] x 7.
Tie off and weave in ends. And that’s it! Enjoy your fun little pineapple.
- Funny Pictures
-
 Cute Cat Memes That Will Make Your Day Brighter
-
 Spot-on and Funny Memes About Introverts Struggles
-
 Top Wonderful Cat Memes on Their Way to Better Your Day
- Recipes
-
 Creamy Old Fashioned Rice Pudding
-
 Russian Tea Cakes (Snowball Cookies)
-
 Rigatoni with Sausage, Tomatoes, and Zucchini
- Lifehacks
-
 How to Crochet a Harlequin Stitch
-
 Removing The Toughest Stains
-
 Crochet Basics: Crumpled Griddle Stitch
- Crochet Ideas
-
 Crochet Christmas Tree
-
 Crochet Goblet of Fire
-
 Crochet Adorable Ammonite
- DIY
-
 DIY Snowman Wreath
-
 Mini Santa Sleigh Ornament
-
 Crochet Gingerbread House Blanket
- Knitting Ideas
-
 Knitted Easter Bunny
-
 Knitted Mobile Phone/Glasses Case
-
 Knitted Cabled Wallet