Crochet Ruffle Hat: A Step-by-Step Guide

Crochet Ruffle Hat Overview
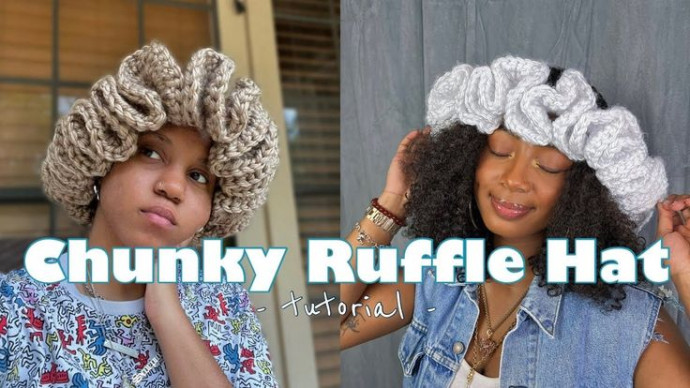
Crochet ruffle hats are such a delightful accessory to add a touch of charm and whimsy to any outfit. The combination of soft yarn and intricate crochet work creates a wonderfully cozy and stylish hat that is perfect for colder days or simply adding an extra flair to your look. The playful ruffles give it a fun and unique twist that is sure to make you stand out in the best way possible. Plus, the joy of creating these hats yourself or gifting them to loved ones adds an extra layer of warmth and love to this already adorable accessory. Get ready to rock your crochet ruffle hat with a smile on your face and a skip in your step!
Materials You’ll Need
- Super bulky or plush yarn (any color of your choice)
- Crochet hook (recommended size: 6.5 mm – 8 mm, depending on your tension)
- Yarn needle (for weaving in ends)
- Scissors

Step 1: Creating the Hat Base
Make a Magic Ring or Slip Knot
Start by making a slip knot, leaving a bit of a longer tail (since we’re working with thick yarn). If you prefer, you can use a magic ring instead for a tighter center.
Chain 4 and Form a Ring
Chain 4.
Slip stitch into the first chain to form a small loop.
Round 1: Double Crochet Increases
Chain 3 (this will count as your first double crochet).
Work 9 double crochets (DC) into the ring.
Pull the starting tail tight to close the hole.
Slip stitch into the top of the starting chain 3 to join. (Total: 10 stitches including chain 3).
Step 2: Expanding the Hat
Round 2: Increasing in Each Stitch
Chain 3 (counts as first DC).
Work 1 more DC into the same stitch.
Work 2 DC in each stitch around.
Slip stitch into the top of the chain 3 to join. (Total: 20 stitches).
Round 3: Gradual Increase
Chain 3 (counts as first DC).
Pattern: [1 DC in next stitch, 2 DC in next stitch] – repeat around.
Slip stitch to join. (Total: 30 stitches).
Round 4-8: Building the Hat Height
Chain 3 (counts as first DC).
Work 1 DC in each stitch around.
Slip stitch to join.
Repeat this round until your hat reaches about 8 rows total. (Adjust by adding/removing rows to fit your head.)
Tip: Try the hat on as you work! The yarn stretches, so it should fit snugly without being too tight.
Step 3: Creating the Ruffle Effect
Round 9: First Layer of Ruffles
Chain 3 (counts as first DC).
Work 3 more DC into the same stitch.
Work 4 DC into each stitch around.
Slip stitch to join.
Round 10: Second Layer of Ruffles
Chain 3 (counts as first DC).
Work 2 more DC into the same stitch.
Work 3 DC into each stitch around.
Slip stitch to join.
That’s it! Your winter ruffle hat is complete!
Finishing Touches
Fasten off: Chain 1, cut the yarn, and pull the tail through.
Weave in ends: Use your yarn needle to tuck in any loose ends on the inside of the hat.
Try it on! Fluff out the ruffles and admire your work.
Customization Ideas
- Play with Colors – Use variegated or pastel yarn for a unique look.
- Add a Pom-Pom – A fluffy pom-pom on top adds a fun touch!
- Experiment with Ruffles – Try different stitch counts to make the ruffles fuller or looser.
Final Thoughts
This Winter Ruffle Hat is as stylish as it is warm, making it a must-have for chilly days. Plus, it’s a quick and satisfying project—even for beginners! So, grab your hook and yarn, and start stitching.
- Funny Pictures
-
 Relatable and Funny Memes to Distract You From the Routine
-
 Hilarious Cat Snapchats That Will Leave You With the Biggest Smile
-
 Today’s Top Funny Tweets to Scroll Before Bed
- Recipes
-
 Cappuccino Brownies
-
 Chicken Mushroom Tortellini Bake
-
 Spinach Pie
- Lifehacks
-
 8 Necessary Tips for Baking Bread
-
 Tips & Hacks for Clean Carpets
-
 10 Uses For Old TV Armoires
- Crochet Ideas
-
 Crochet Watermelon Amigurumi
-
 Crochet Flower Hat for your Pet
-
 Crochet Shark Applique
- DIY
-
 Yarn Wrapped Christmas Wreath Ornaments
-
 Egg Carton Snowman Ornament
-
 Stick Peppermint Candy Ornament
- Knitting Ideas
-
 Knitted Star Square Dishcloth
-
 Knitted Free 2025 Year Dishcloth
-
 Knitted Ribbed Adult Hat