Crochet Posh Planter

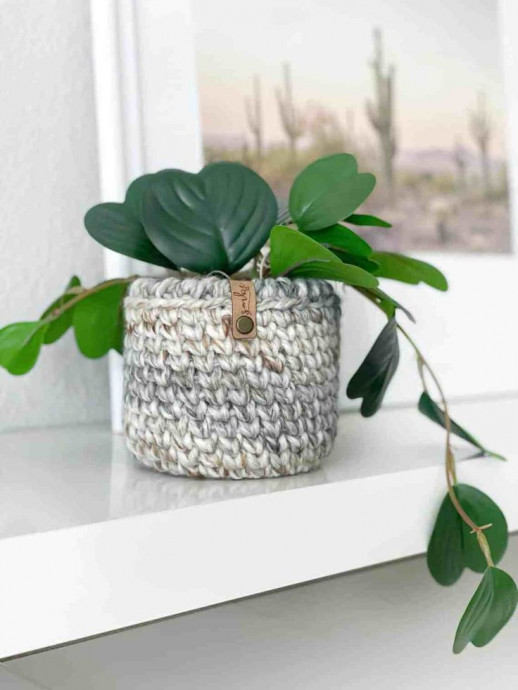
The Crochet Posh Planter is the perfect way to add a touch of charm and elegance to your home decor! This stylish creation combines the timeless art of crochet with a modern twist, resulting in a unique and trendy piece that will surely catch the eye of your guests. With its intricate design and cozy vibe, the Crochet Posh Planter is not just a plant holder, but a conversation starter! Add a pop of color and a sprinkle of warmth to your living space with this delightful accessory that brings a cozy touch to any room.
Skill Level
Advanced Beginner
Stitch Key | US Terms
beg – beginning
blo – back loop only
ch(s) – chain/chains
hdc – half double crochet
rnd(s) – round/rounds
rsc – reverse single crochet
sl st – slip stitch
st(s) – stitch/stitches
wc – waistcoat stitch
Materials
Size 6, super bulky yarn (6oz./170g (106yd/97m)
Approximately 25 yards size mini & 50 yards size regular
I prefer Lion Brand Wool Ease Thick & Quick, (results will vary depending on yarn used)
Size L11/8mm Crochet Hook (or size to obtain gauge).
Tapestry Needle
Flexible or Standard Measuring Tape
Scissors
Optional Materials
Hot Glue Gun (to attach optional heart)
Leather Tags from Savlabot, Angie & Britt, or Grain Deep
Chicago Screws to attach leather tags.
Faux Plants & Spanish Moss
Gauge
First 2 Rounds in Pattern = 3 Inches
Special Stitches
Reverse Single Crochet (rsc) aka Crab Stitch
Working from front to back insert hook in next stitch to the right and complete a single crochet.
The Waistcoat Stitch (wc)
The Waistcoat stitch is also known as center post stitch, center single crochet, or knit stitch.
It’s basically a single crochet, but you insert your hook in between the middle of the post, rather than the usual top two loops. Then, complete the stitch just as you would a single crochet.
You’ll want to crochet a bit loosely to make it easier to work into.
Written Instructions
– Beginning ch/chs of each rnd do not count as st, work 1st st of each rnd in same st as beg ch and join each rnd in 1st st, not beginning ch/chs.
– If you’d like your waistcoat joins to be seamless, watch full video instructions above, for an optional join method.
Size Mini
– Approximately 3 ½” diameter and 3 ¼” tall
Instructions for Size Mini
Rnd 1. Create a magic circle, ch1, work 10 hdc in circle, join with sl st. (10hdc)
Alternate Method: Ch4, join with sl st in 4th ch from hook, ch1, work 10 hdc in circle, join with sl st. (10hdc)
Rnd 2. Ch1, work 2 hdc in each st around, join with sl st. (20hdc) (diameter should measure about 3” across)
Note: Work the following sc & wc rnds loosely, if you’re having trouble working into the sts try working looser.
Rnd 3. Starting sides, ch1, sc in each st around, join with sl st. (20sc)
Rnd 4-9. Wc in each st around, join with sl st. (20wc) (height should measure about 2 ¾” tall, repeat rnd 4 as many times as necessary to get desired height)
Note: Work the final rnd using regular tension. The final rnd should curve in slightly creating a slightly rounded look to the cover.
Rnd 10. ch1, working in blo, rsc in each st around, add an extra rsc in the joining sl st from previous rnd. (21rsc)
Fasten off and weave in loose ends. Fill with flowers or plant of your choice, enjoy!! Optional heart instructions below.
Size Regular
– Approximately 4 ½” diameter and 4 ½” tall
Instructions for Size Regular
Rnd 1. Create a magic circle, ch1, work 10 hdc in circle, join with sl st. (10hdc)
Alternate Method: Ch4, join with sl st in 4th ch from hook, ch1, work 10 hdc in circle, join with sl st. (10hdc)
Rnd 2. Ch1, work 2 hdc in each st around, join with sl st. (20hdc) (diameter should measure about 3” across)
Rnd 3. Ch1, *1 hdc in next st, 2 hdc in next st, repeat from * around, join with sl st. (30hdc) (diameter should measure about 4 ¼” across)
Note: Work the following sc & wc rnds loosely, if you’re having trouble working into the sts try working looser.
Rnd 4. Starting sides, ch1, sc in each st around, join with sl st. (30sc)
Rnd 5-14. Wc in each st around, join with sl st. (30wc) (height should measure about 4” tall, repeat rnd 5 as many times as necessary to get desired height)
Note: Work the final rnd using regular tension. The final rnd should curve in slightly creating a slightly rounded look to the cover.
Rnd 15. ch1, working in blo, rsc in each st around, add an extra rsc in the joining sl st from previous rnd. (31rsc)
Fasten off and weave in loose ends. Fill with flowers or plant of your choice, enjoy!!
- Funny Pictures
-
 Relatable and Funny Memes to Distract You From the Routine
-
 Hilarious Cat Snapchats That Will Leave You With the Biggest Smile
-
 Today’s Top Funny Tweets to Scroll Before Bed
- Recipes
-
 Cappuccino Brownies
-
 Chicken Mushroom Tortellini Bake
-
 Spinach Pie
- Lifehacks
-
 8 Necessary Tips for Baking Bread
-
 Tips & Hacks for Clean Carpets
-
 10 Uses For Old TV Armoires
- Crochet Ideas
-
 Crochet Watermelon Amigurumi
-
 Crochet Flower Hat for your Pet
-
 Crochet Shark Applique
- DIY
-
 Crochet Titus the Barn Owl
-
 Crochet Rainbow Bunny
-
 DIY Washer Ornaments
- Knitting Ideas
-
 Knitted Star Square Dishcloth
-
 Knitted Free 2025 Year Dishcloth
-
 Knitted Ribbed Adult Hat