Crochet Cordyline Terminalis Leaf Tutorial

Penelope
Feb 07, 2025 04:34 AM
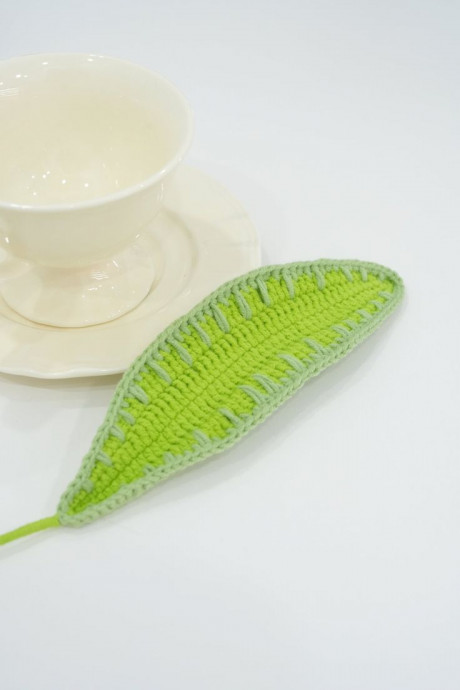
The Crochet Cordyline Terminalis Leaf
The Crochet Cordyline Terminalis Leaf is a delightful addition to any crocheting project, adding a touch of charm and elegance. This leaf pattern captures the intricate beauty of nature in a soft and cozy yarn form. Whether you're a seasoned crochet enthusiast or just starting out, incorporating the Crochet Cordyline Terminalis Leaf into your creations is sure to bring a whimsical and playful flair. So grab your hooks and yarn, and let your creativity blossom with this lovely leaf pattern!
Materials Needed
- Yarn – Loopara 4ply combed cotton (Green 10 and Green 16)
- Hook – 2.5mm
- Flower Rod – 30cm long (No.2)
- Iron wire – 0.6mm diameter
- Hot Melt Adhesive
- Scissors
Step By Step Tutorial
How to Crochet a Cordyline Terminalis Leaf
- R1: Ch 50, 3 sc in 2nd ch from hook, 3 hdc, 3 dc, 30 tr, 3 dc, 3 hdc, 3 sc, 3 sc in next st (tip), 3 sc, 3 hdc, 3 dc, 30 tr, 3 dc, 3 hdc, 3 sc, sl.
- R2: Add wire, ch, 6 sc, 6 hdc, 3 dc, 20 tr, 3 dc, 6 hdc, 5 sc, 3 sc in next st (tip), 5 sc, 6 hdc, 3 dc, 20 tr, 3 dc, 6 hdc, 6 sc, sl, change color.
- R3: ch, 10 sc, 30 hdc, 21 sc, 30 hdc, 10 sc (stitch placement can be adjusted for varied lengths).
Crochet Cordyline Terminalis Leaf Assembly
- Take a #2 flower rod, wrap the yarn around it, and secure with hot glue.
Notes
Crochet Tips:
- Maintain consistent tension throughout for a uniform leaf shape.
- The wire added in Round 2 allows you to shape the leaf.
- Bend it gently for a natural curve. In Round 3, feel free to adjust stitch placement for varied leaf lengths.
Assembly Tips:
To attach the leaf, begin by aligning the wire stem with the center vein of your crocheted leaf. Carefully wrap the base of the leaf around the stem, ensuring it's snug but not too tight.
No comments
Write a comment
- Funny Pictures
-
 Cute Cat Memes That Will Make Your Day Brighter
-
 Spot-on and Funny Memes About Introverts Struggles
-
 Top Wonderful Cat Memes on Their Way to Better Your Day
- Recipes
-
 Creamy Old Fashioned Rice Pudding
-
 Russian Tea Cakes (Snowball Cookies)
-
 Rigatoni with Sausage, Tomatoes, and Zucchini
- Lifehacks
-
 How to Crochet a Harlequin Stitch
-
 Removing The Toughest Stains
-
 Crochet Basics: Crumpled Griddle Stitch
- Crochet Ideas
-
 Crochet Christmas Tree
-
 Crochet Goblet of Fire
-
 Crochet Adorable Ammonite
- DIY
-
 DIY Snowman Wreath
-
 Mini Santa Sleigh Ornament
-
 Crochet Gingerbread House Blanket
- Knitting Ideas
-
 Knitted Easter Bunny
-
 Knitted Mobile Phone/Glasses Case
-
 Knitted Cabled Wallet