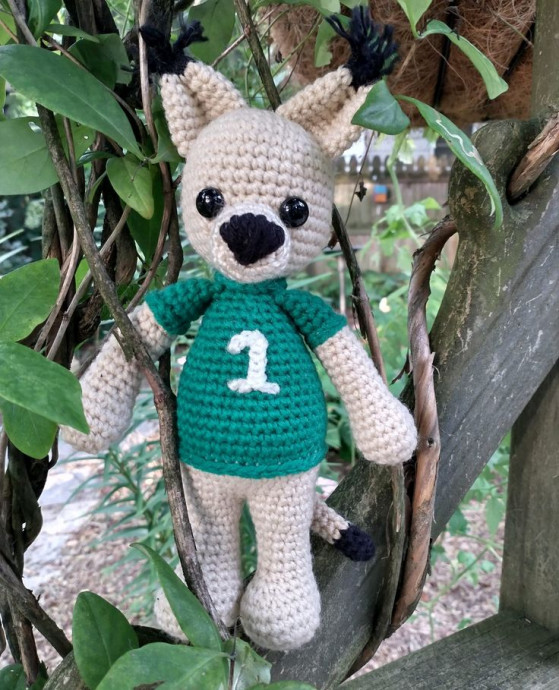
Create Your Own Adorable Crochet Cat Mascots

Introduction
Crochet cat mascots are absolutely adorable and bring a whimsical charm to any setting. Crafted with love and attention to detail, these charming creations often make people smile and feel a sense of joy. Whether displayed as a cute decoration or given as a thoughtful gift, crochet cat mascots have a way of warming hearts and spreading happiness. The soft yarn and intricate stitches create a unique and lovable character that can brighten up any space. Who can resist the charm of a handmade crochet cat mascot? It's impossible not to fall in love with these delightful creations!
Materials Needed
- Worsted weight yarn in chosen colors
- Size 12 mm safety eyes
- 3.5mm hook or a hook to make it where you don’t see stuffing showing out
Instructions
Head (in Primary Body Color)
Rnd 1: 6 sc in magic circle
Rnd 2: Inc around
Rnd 3: *Inc, sc* around
Rnd 4: *Inc, sc next 2* around
Rnd 5: *Inc, sc next 3* around
Rnd 6: *Inc, sc next 4* around
Rnd 7-11: Sc around
Rnd 12: *Inc, sc next 5* around
Rnd 13-14: Sc around
Rnd 15: *Dec, sc in next 5* around
Go ahead and insert your safety eyes between rounds 12-13 with 6 st apart.
Rnd 16: *Dec, sc next 4* around
Rnd 17: *Dec, sc next 3* around
Rnd 18: *Dec, sc next 2* around, make sure to stuff the head
Rnd 19: *Inc, sc* around, bind off and set aside.
Arms (Make 2)
Start with primary body color, making sure to stuff as you go, primarily stuff in just the hands and very lightly stuff in the actual arms.
Rnd 1: 6 sc in magic circle
Rnd 2: Inc around
Rnd 3: *Inc, sc next 1* around
Rnd 4-5: Sc around
Rnd 6: *Dec, sc in next 1* around
Rnd 7: Dec x1, sc around
Rnd 8-15: Sc around, change to jersey color
Rnd 16-20: Sc around, no need to leave a long tail for sewing.
Legs (Make 2)
Use primary body color, no need to leave tail for sewing for the first one and do not bind off on the second one. Make sure to stuff as you go.
Rnd 1: 6 sc in magic circle
Rnd 2: Inc around
Rnd 3: *Inc, sc* around
Rnd 4: *Inc, sc next 2* around
Rnd 5-6: Sc around
Rnd 7: Dec x2, sc in next 6 st, dec x4, sc in next 6 st
Rnd 8: Dec, sc in next 5, dec x3, sc in next 5 st
Rnd 9: Sc in next 5 st, dec x2, sc in next 5 st
Rnd 10-13: Sc around
Rnd 14: *Inc, sc in next 5* around
Rnd 15: *Inc, sc in next 6* around
Rnd 16: Sc around, bind off leg #1, but not leg 2, continue to body with leg two.
Body
Starting with leg 2:
Rnd 17: Sc in next 4, dec using next sc and the 3rd from the end sc of rnd 16 on leg 1, sc around leg 1, dec using last sc in leg 1 and leg 2, sc around. (The dec across keeps the gap from happening)
Rnd 18: Sc around
Rnd 19: *Inc, sc in next 9* around
Rnd 20: *Inc, sc in next 10* around
Rnd 21: *Inc, sc in next 5* around, change to jersey color
Rnd 22-28: Sc around
Rnd 29: *Dec, sc in next 5* around
Rnd 30-31: Sc around
Rnd 32: *Dec, sc in next 4* around
Rnd 33: Sc around
Rnd 34: *Dec, sc in next 3* around
Rnd 35: Sc around
Rnd 36: *Dec, sc in next 2* around
Rnd 37: Now, here is how I attach the arms. You can always choose to just sew them on. If you do, just sc this row. I look and see about where the arms should go. Now, crochet around the back, for me it was 5 st, but don’t get hung up on that. Just where it looks right. Now, flatten the arm hole, sc through both sc on the arm and the next one on the body. Do this for the next 4 st. Yes, technically the arm has 11, but it will be fine. Now, sc to where the next arm should go. For me it was 4 sc. Repeat the process for the next arm. This moves your start over a bit, but it’s fine.
Rnd 38: Sc and bind off.
Sew head to body.
Finishing Touches
OK, so a couple things here. I currently like to chain however many I need and then sew that chain over the color changes and around the neck. I like the look, so that’s what I did. Conversely, you don’t have to at all. To make the head sew on look better, you can change to the body color on the last SC round to make it easier.
Tail
Start in black (only because the mascot I was making had a black tail. Adjust as necessary. Also, I didn’t stuff my tail, but just left the tails inside. You can stuff as you go or even add a pipe cleaner if you want.)
Rnd 1: 6 sc in magic circle
Rnd 2-4: Sc around, change to body color
Rnd 5-16: Sc around, bind off, sew to butt.
Ears (Make 2)
Start in black (because of the mascot I was making that has black ear tufts).
Rnd 1: 6 sc in magic circle, change to body color
Rnd 2: Inc around
Rnd 3: *Inc, sc in next* around
Rnd 4-8: Sc around, bind off, and make flat and concave, sewing onto the head between rnds 2 and 7 roughly. For the ear tufts, I just added/latch hooked style 3 pieces of ‘hair’ and split the yarn. Trim as necessary.
Mouth
In slightly lighter color:
Rnd 1: 6 sc in magic circle, change to body color
Rnd 2: Inc around
Rnd 3: *Inc, sc in next* around
Rnd 4-6: Sc around, bind off, sew to mouth area, making sure to stuff before you close up. You can add a safety nose, or embroider one like I did… because I didn’t feel like trying to find them at this time honestly. The craft room needs some organizing currently.
Numbers
For the number, I chain to make the number and sewed it on. For the ‘1’ it was two chains sewed on, but that just made it easier for me.
- Funny Pictures
-
 Relatable and Funny Memes to Distract You From the Routine
-
 Hilarious Cat Snapchats That Will Leave You With the Biggest Smile
-
 Today’s Top Funny Tweets to Scroll Before Bed
- Recipes
-
 Cappuccino Brownies
-
 Chicken Mushroom Tortellini Bake
-
 Spinach Pie
- Lifehacks
-
 8 Necessary Tips for Baking Bread
-
 Tips & Hacks for Clean Carpets
-
 10 Uses For Old TV Armoires
- Crochet Ideas
-
 Crochet Watermelon Amigurumi
-
 Crochet Flower Hat for your Pet
-
 Crochet Sophia and Bennet Love Birds
- DIY
-
 DIY Beaded Christmas Tree
-
 Crochet Titus the Barn Owl
-
 DIY Washer Ornaments
- Knitting Ideas
-
 Knitted Star Square Dishcloth
-
 Knitted Free 2025 Year Dishcloth
-
 Knitted Ribbed Adult Hat