How to Create a Crochet Line Cony Amigurumi

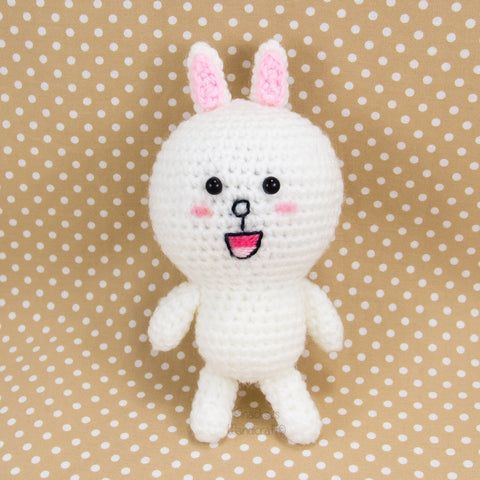
Crochet Line Cony Amigurumi is an adorable and delightful craft that brings joy to both makers and receivers. Creating a Cony Amigurumi with crochet is a wonderful way to express creativity and spread happiness through handmade gifts. The intricate details and vibrant colors of these cute characters make them a perfect addition to anyone's collection. Whether you are a seasoned crocheter or just starting out, crafting your own Cony Amigurumi is a rewarding and heartwarming experience that will bring a smile to anyone's face.
Materials
Using fingering yarn with a 2.5mm hook will produce a Cony of about 12.5cm/4.9in tall (including ears).
- All yarn threads are assumed to be of the same thickness.
- White yarn
- Pink yarn
- Black embroidery thread
- Dark Pink embroidery thread
- Light Pink embroidery thread
- Safety Eyes 5mm x2 (based on fingering yarn, use a bigger size if using a thicker yarn)
- Felting needle + pink felting wool OR pink felt and glue
- Stuffing
Abbreviations
- sc - single crochet
- sc inc - single crochet increase
- sc dec - single crochet decrease
- ch - chain
- sc3tog - single crochet 3 together
Head & Body
With white yarn,
RND 1: 6sc into magic ring (6)
RND 2: sc inc x 6 times (12)
RND 3: (sc, sc inc) x 6 times (18)
RND 4: (2 sc, sc inc) x 6 times (24)
RND 5: (3 sc, sc inc) x 6 times (30)
RND 6: (4 sc, sc inc) x 6 times (36)
RND 7: (5 sc, sc inc) x 6 times (42)
RND 8: (6 sc, sc inc) x 6 times (48)
RND 9 - RND 10 (2 rnds): sc all around (48)
RND 11: (7 sc, sc inc) x 6 times (54)
RND 12: (8 sc, sc inc) x 6 times (60)
RND 13: (8 sc, sc dec) x 6 times (54)
RND 14: (7 sc, sc dec) x 6 times (48)
RND 15 - RND 16 (2 rnds): sc all around (48)
RND 17: (6 sc, sc dec) x 6 times (42)
RND 18: (5 sc, sc dec) x 6 times (36)
RND 19: (4 sc, sc dec) x 6 times (30)
RND 20: (3 sc, sc dec) x 6 times (24)
RND 21: (4 sc, sc dec) x 4 times (20)
RND 22: 4 sc, (sc, sc inc) x 3 times, 4 sc, (sc, sc inc) x 3 times (26)
RND 23 - RND 24 (2 rnds): sc all around (26)
RND 25: 13 sc, (sc, sc inc) x 3 times, 7 sc (29)
RND 26 - RND 28 (3 rnds): sc all around (29)
RND 29: 13 sc, (sc, sc dec) x 3 times, 7 sc (26)
RND 30: 4 sc, (sc, sc dec) x 3 times, 4 sc, (sc, sc dec) x 3 times (20)
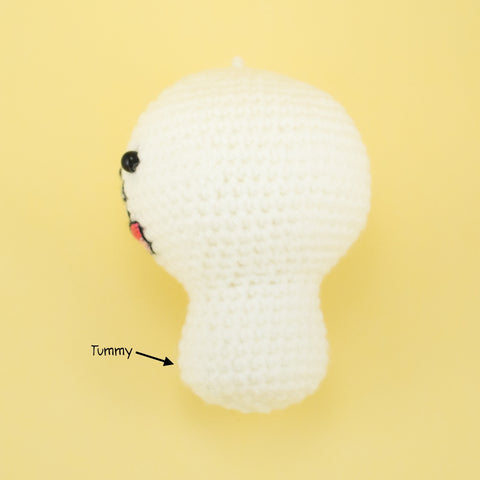
*Locate the front of Cony by turning the crocheted piece around and finding a slight protruding point on the body. This protruding point is the tummy.
*Insert the eyes on the face between Rnd 11 - Rnd 12, about 3 stitches apart.
*With black embroidery thread, sew the nose on Rnd 13.
*With black, dark pink and light pink embroidery thread, sew the mouth between Rnd 15-17.
*Put in the stuffing
RND 31: sc dec x 10 times (10)
RND 32: sc dec x 5 times (5)
Fasten off and sew the hole closed.
Hands
(Make 2)
With white yarn,
RND 1: 4sc into magic ring (4)
RND 2: (sc, sc inc) x 2 times (6)
RND 3 - RND 7 (5 rnds): sc all around (6)
Fasten off, leaving a length of yarn for sewing.
*Put stuffing into hand.
Legs
(Make 2)
With white yarn,
RND 1: 6sc into magic ring (6)
RND 2: (sc, sc inc) x 3 times (9)
RND 3: sc all around (9)
RND 4: 3 sc, sc3tog, 3 sc (7)
RND 5: sc all around (7)
RND 6: (2 sc, sc inc) x 2 times, sc (9)
RND 7: sc all around (9)
Fasten off, leaving a length of yarn for sewing.
*Put stuffing into leg.
Tail
With white yarn,
RND 1: 5sc into magic ring (5)
RND 2: sc all around (5)
Fasten off, leaving a length of yarn for sewing.
Ears (White Portion)
(Make 2)
With white yarn,
RND 1: 4sc into magic ring (4)
RND 2: (sc, sc inc) x 2 times (6)
RND 3 - RND 6 (4 rnds): sc all around (6)
Fasten off, leaving a length of yarn for sewing.
Ears (Pink Portion)
(Make 2)
With pink yarn,
ROW 1: ch 5 (5)
ROW 2: sc from 2nd stitch until the end (4)
Fasten off, leaving a length of yarn for sewing.
Assembly
- Sew the pink portion of the ear to the white portion
- Flatten the ears and sew to the head
- Sew the hands to the body
- Sew the legs to the body
- Sew the tail to the back of the body
- Felt the felting wool or glue the felt at around rnd 13 to make the cheeks.
- Funny Pictures
-
 Cute Cat Memes That Will Make Your Day Brighter
-
 Spot-on and Funny Memes About Introverts Struggles
-
 Top Wonderful Cat Memes on Their Way to Better Your Day
- Recipes
-
 Creamy Old Fashioned Rice Pudding
-
 Russian Tea Cakes (Snowball Cookies)
-
 Rigatoni with Sausage, Tomatoes, and Zucchini
- Lifehacks
-
 How to Crochet a Harlequin Stitch
-
 Removing The Toughest Stains
-
 Crochet Basics: Crumpled Griddle Stitch
- Crochet Ideas
-
 Crochet Christmas Tree
-
 Crochet Goblet of Fire
-
 Crochet Adorable Ammonite
- DIY
-
 DIY Snowman Wreath
-
 Mini Santa Sleigh Ornament
-
 Crochet Gingerbread House Blanket
- Knitting Ideas
-
 Knitted Easter Bunny
-
 Knitted Mobile Phone/Glasses Case
-
 Knitted Cabled Wallet