Create a Cozy Crochet Gingerbread Amigurumi

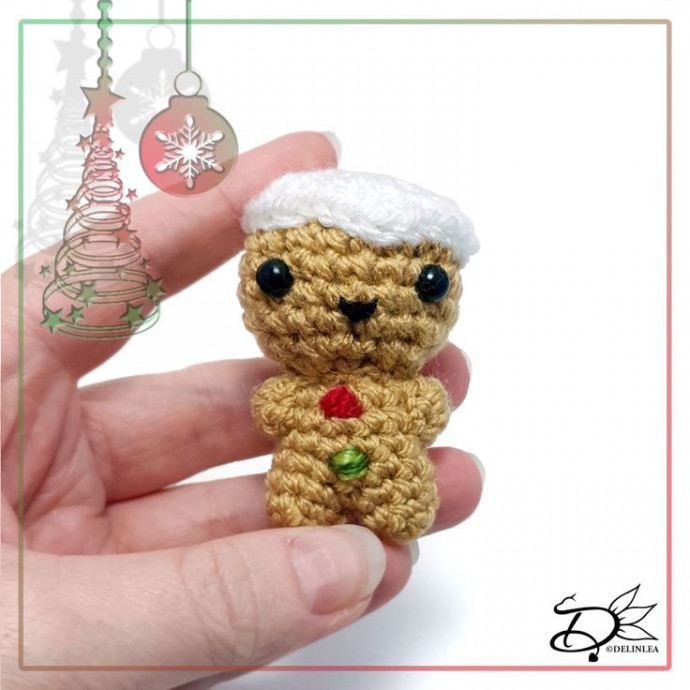
Creating a Crochet Gingerbread Amigurumi is a delightful and heartwarming project that brings a touch of coziness and charm to any space. With its adorable design and festive appeal, this amigurumi is sure to put a smile on anyone's face. The intricate details and sweet colors make it a perfect addition to your holiday decor or a thoughtful handmade gift for loved ones. So grab your crochet hook, some yarn, and let's spread some handmade cheer with these irresistible little gingerbread friends!
Materials Needed
For this pattern you’ll need:
- Yarn in the colors Light Brown and White. (I used Stylecraft Special DK)
- Tiny bit of Green and Red yarn for the ‘Candy’, and a bit of Black for his Mouth.
- Crochet hook. (I used 3mm)
- Stuffing.
- Yarn Needle.
- Sewing Pins.
- Stitch Marker.
- Safety Eyes, 6mm.
Stitches Used
(US Terms):
- Magic Ring.
- CH = Chain.
- SLST = Slip Stitch.
- SC = Single Crochet.
- HDC = Half Double Crochet.
- DC = Double Crochet.
- ST = Stitch.
- Inc = Increase.
- Dec = Decrease.
- (…) = Repeat the space in brackets the given number of times.
- […] = Total number of stitches.
This pattern is made with continuous rounds, unless stated otherwise. Use a stitch marker to mark your first/last stitch of your row.
Pattern for Gingerbread
Head
Use the color Light Brown.
- 1: 6SC in a Magic Ring. [6]
- 2: 2SC in each st around. [12]
- 3: (1SC, inc) 6 times. [18]
- 4: (5SC, inc) 3 times. [21]
- 5: 21SC. [21]
- 6: 21SC. [21]
- 7: 21SC. [21]
- 8: (5SC, dec) 3 times. [18]
- Place the eyes between row 6 & 7, about 5st apart.
- 9: (1SC, dec) 6 times. [12]
- Stuff the head.
- 10: Dec around. [6]
- Fasten off and weave in tail.
Body
Use the color Light Brown.
- 1: 6SC in a Magic Ring. [6]
- 2: 6SC. [6]
- Break the yarn and make another leg using row 1 & 2. Keep the yarn attached on the second leg.
- 3: 3SC, make the next SC in the other leg, 6SC, go back to the first leg, 3SC. [12]
- 4: 12SC. [12]
- 5: 12SC. [12]
- 6: 12SC. [12]
- 7: (2SC, dec) 3 times. [9]
- Fasten off and leave a long tail for sewing.
- Stuff the body as well.
Arms (Make 2)
Start with the color Beige.
- 1: 6SC in a Magic Ring. [6]
- Fasten off and leave a long tail for sewing.
Icing
Use the color White.
- 1: 6SC in a Magic Ring. [6]
- 2: 2SC in each st around. [12]
- 3: (1SC, inc) 6 times. [18]
- 4: (1HDC, 2DC in the next st, 1HDC + 1SC in the next st) 5 times. [25]
- Fasten off and leave a long tail for sewing.
Assembling the Gingerbread Amigurumi
Whenever I start assembling Amigurumi, I like to use sewing pins to position all parts first until I’m happy. Then I will sew them on. I recommend you do so as well.
Start with sewing the head to the body, then sew the arms on as well. Lastly, sew on the icing; you can play around a bit on how you want to add that.
With the extra bits of yarn, the red and green, make buttons on his belly. With the black yarn, you can create a cute mouth.
If you want to hang it, don’t forget to add a loop to the top.
- Funny Pictures
-
 Cute Cat Memes That Will Make Your Day Brighter
-
 Spot-on and Funny Memes About Introverts Struggles
-
 Top Wonderful Cat Memes on Their Way to Better Your Day
- Recipes
-
 Creamy Old Fashioned Rice Pudding
-
 Russian Tea Cakes (Snowball Cookies)
-
 Rigatoni with Sausage, Tomatoes, and Zucchini
- Lifehacks
-
 How to Crochet a Harlequin Stitch
-
 Removing The Toughest Stains
-
 Crochet Basics: Crumpled Griddle Stitch
- Crochet Ideas
-
 Crochet Christmas Tree
-
 Crochet Goblet of Fire
-
 Crochet Adorable Ammonite
- DIY
-
 DIY Snowman Wreath
-
 Mini Santa Sleigh Ornament
-
 Crochet Gingerbread House Blanket
- Knitting Ideas
-
 Knitted Easter Bunny
-
 Knitted Mobile Phone/Glasses Case
-
 Knitted Cabled Wallet