Crochet Amigurumi Troll: A Fun and Creative Craft Project

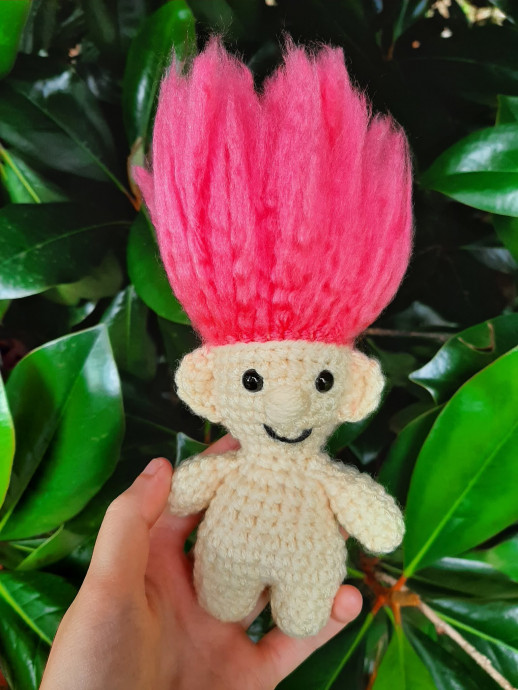
Crochet Amigurumi Troll is a fun and creative craft project that brings whimsical characters to life through colorful yarn and intricate stitching. These adorable trolls are perfect for adding a touch of magic and charm to your home decor or as a personalized gift for a loved one. With their big googly eyes, fuzzy hair, and quirky expressions, each amigurumi troll has a unique personality that is sure to bring a smile to anyone's face. Whether you're a seasoned crocheter looking for a new challenge or a beginner eager to try your hand at a fun and rewarding craft, creating your own crochet amigurumi troll is a delightful way to unleash your creativity and spread joy to those around you.
Materials
- Worsted weight yarn in the skin tone of your choice
- Worsted weight yarn in the hair color(s) of your choice
- Hook matching your yarn (I used a 4.0 mm hook)
- Safety eyes of your choice (I used 8 mm)
- Yarn needle
- Poly-fil/stuffing
- Scissors
- Wire pet brush
Abbreviations
- MR: Magic Ring
- SL ST: Slip Stitch
- CH: Chain
- SC: Single Crochet
- INC: Increase
- DEC: Decrease (Or invisible decrease, whichever you prefer works fine)
- FO: Fasten Off
Other Pattern Notes
- Gauge does not matter; you can use any yarn size and corresponding hook that you have on hand.
- I find that it helps to place a stitch marker at the end of each round and move it up as you go along.
- This pattern is written using US terminology.
- If you see __ in the pattern, repeat what is between the asterisks around.
- Stitch counts are listed at the end of each round's instructions.
Legs
Rnd 1: SC 6 in MR
Rnd 2: *SC, INC* around (9)
Rnds 3-4: SC around (9)
Rnd 5: *2 SC, INC* around (12)
FO first leg. Do not FO second leg and continue on to make the body.
Body
Rnd 6: Join the legs with a SC. Crochet around the first leg. Join again with a SC, and continue around that leg (24)
Rnds 7-8: SC around (24)
Stuff legs.
Rnd 9: *2 SC, DEC* around (18)
Rnds 10-12: SC around (18)
Begin to stuff the body.
Rnd 13: *SC, DEC* around (12)
Rnd 14: SC around (12)
Add more stuffing to the body. Don't FO. Keep going to make the head.
Head
Rnd 15: *SC, INC* around (18)
Rnd 16: *2 SC, INC* around (24)
Rnd 17: *3 SC, INC* around (30)
Rnds 18-22: SC around (30)
Place eyes between Rnds 20 and 21, 5 ST apart.
Begin stuffing the head.
Rnd 23: In BLO, *3 SC, DEC* around (24)
Rnd 24: In both loops now, *2 SC, DEC* around (18)
Add more stuffing to the head.
Rnd 25: *SC, DEC* around (12)
Rnd 26: DEC around (6)
Add more stuffing to the head if needed. FO and sew closed. Hide ends.
Arms
Rnd 1: SC 6 in MR (6)
Rnd 2: SC around (6)
Rnd 3: *SC, INC* around (9)
Rnds 4-6: SC around (9)
Stuff lightly and SC together. FO, leaving a long tail for sewing.
Hair
- Cut strands 10 inches in length. You will need a lot of these, so cut a bunch at first and if you need more later you can cut more.
- Go above the back loops left in round 23 of the head and insert your hook behind a stitch. Fold a strand in half and pull through with the hook. Grab the tails of the strand and pull through the loop to make a knot. Use the picture below as a guide.
- Continue doing this in the stitches around the circle, making sure to only place strands above the back loops in order to keep a clean hairline. When you finish the outer layer of the circle, it should look similar to the picture below.
- Go into the next round of stitches above the strands that you just placed. Continue adding strands the same way, moving around the head in a circle and then to the next round. Keep doing this until you reach the very top of the head. It should look similar to the picture below when you are done.
- Now that all the strands are attached, it's time to brush out the hair! This is what gives the troll the crazy, wild look that everyone is used to. Take your wire pet brush and brush out the hair until it's fluffy and there are no more visible strands of yarn. It will seem like a lot of the yarn fluff is coming out onto your brush, but just take the fluff off the brush and continue brushing out the hair.
Ears
Rnd 1: 5 SC in MR (5)
Rnd 2: CH 1, turn, and SC in each ST (5)
SL ST in MR and FO, leaving a long tail for sewing.
Assembly
- Sew arms onto body, using the pictures above as a guide.
- Take a long length of the yarn used for the skin color to sew on the nose, using the picture above as a guide. You can also use this yarn to sew up the hole in between the legs.
- Take a piece of black yarn and sew on the smile.
- Sew ears to side of head.
Your troll is now done! I hope you enjoyed making this pattern.
- Funny Pictures
-
 Memes for Doggos Having a Ruff Day
-
 Fluffy Memes to Make Fun of Your Furry Friends
-
 Too Relatable to be True
- Recipes
-
 Cappuccino Brownies
-
 Chicken Mushroom Tortellini Bake
-
 Spinach Pie
- Lifehacks
-
 8 Necessary Tips for Baking Bread
-
 Tips & Hacks for Clean Carpets
-
 10 Uses For Old TV Armoires
- Crochet Ideas
-
 Crochet Watermelon Amigurumi
-
 Crochet Flower Hat for your Pet
-
 Crochet Sophia and Bennet Love Birds
- DIY
-
 DIY Beaded Christmas Tree
-
 Crochet Titus the Barn Owl
-
 DIY Washer Ornaments
- Knitting Ideas
-
 Knitted Star Square Dishcloth
-
 Knitted Free 2025 Year Dishcloth
-
 Knitted Ribbed Adult Hat