Crochet the Adorable Rudder Potholder Pattern
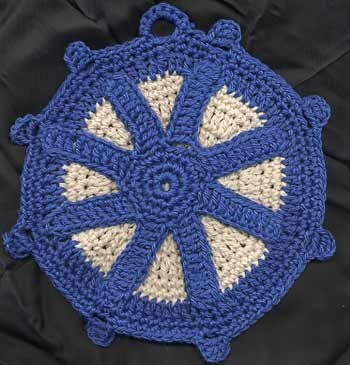
If you're looking to add a touch of charm to your kitchen, consider crocheting the Rudder Potholder! This adorable pattern combines practicality with a nautical theme, making it a fun and functional addition to your home. Whether you're a seasoned crocheter or just starting out, this project offers a great way to hone your skills while creating something useful. Imagine the satisfaction of using a potholder that you made yourself, every time you reach for a hot pan or dish. So grab your yarn and hook, and get ready to set sail on a crafting adventure with the delightful Rudder Potholder pattern!
Details
Size
18 cm (7 inches)
Materials
Worsted Weight Cotton Yarn (commonly referred to as "Poor Cotton"; however, yarn like "Sugar & Cream" will also work well), Color A: White, Color B: Blue, Hook No. 4 (US: G/6)
Stitches Used
- Chain (ch)
- Slip Stitch (sl st)
- Single Crochet (sc)
- Double Crochet (dc)
Difficulty Level
Medium
Directions
Base
Start with Color A, 3 ch, join.
- 8 dc in space; join with sl st to first stitch.
- *2 dc on next dc*; Repeat * to * 8 times, join with sl st to first stitch.
- *dc in next dc, 2 dc in next dc*; Repeat * to * 8 times, join with sl st to first stitch.
- *2 dc on next dc, (dc in next dc) 2 times*; Repeat * to * 8 times, join with sl st to first stitch.
- *sc in next dc, 2 sc in next dc*; Repeat * to * 16 times, join with sl st to first stitch.
- *sc in next dc, 2 sc in next dc*; Repeat * to * 24 times, join with sl st to first stitch. Join Color B.
- With Color B: *2 dc in next dc, (dc in next dc) 8 times*; Repeat * to * 8 times, join with sl st to first stitch.
- *sc in next dc*; Repeat * to * 80 times, join with sl st to first stitch.
- *sc in next dc 8 times, 5 ch, dc in 4th ch, dc in 5th ch, skip a sc, sc in next sc*; Repeat * to * 80 times, join with sl st to first stitch. Cut the thread.
Crosstrees
With Color B, 3 ch, join.
- 8 sc in loop, join with sl st to first stitch.
- *2 sc on next sc*; Repeat * to * 8 times, join with sl st to first stitch.
- *sc in next sc, 2 sc in next sc*; Repeat * to * 8 times, join with sl st to first stitch.
- *2 sc on next sc, (sc in next sc) 2 times*; Repeat * to * 8 times, join with sl st to first stitch.
- *sc in next sc, 13 ch, dc in 4th ch from hook, (dc in next ch) 9 times, skip 2 sc, sc in next sc*; Repeat * to * 8 times, join with sl st to first stitch. Cut the thread.
Sew crosstree to base as seen in photo. Weave in ends.
Important Notes
- Substitute the first stitch in a row as follows:
- First sc with 1 ch, sc;
- First hdc with 2 ch;
- First dc with 3 ch;
- First tr with 4 ch...and so on;
- When you see "sl st to
", where the location is not immediately next to the last stitch, it means to make "an appropriate number of sl stitches to reach ." - If not specified, when you finish the previous row on a stitch (say stitch 1), and need to start the next row on another stitch (say stitch 2), make an appropriate number of sl stitches to reach stitch 2.

