Crochet Rudolf Amigurumi Pattern for Holiday Cheer

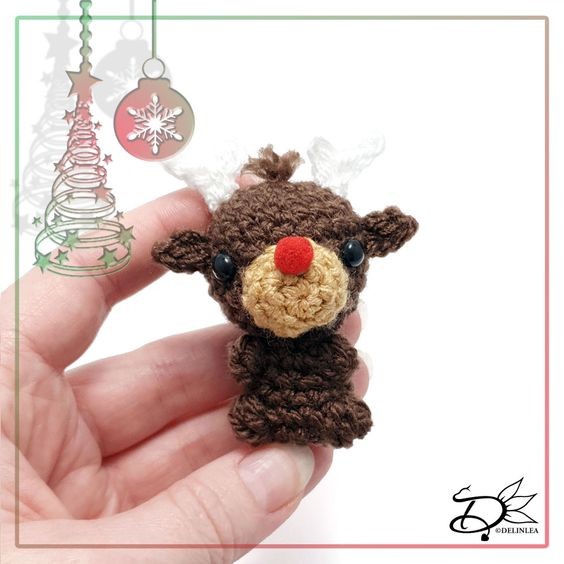
The Crochet Rudolf Amigurumi is a delightful and festive project for anyone looking to add some holiday charm to their decor. This cute amigurumi pattern allows you to create a whimsical Rudolf the Red-Nosed Reindeer with your own personal touch. With its adorable red nose and antlers, this crocheted Rudolf is sure to bring joy and smiles to anyone who sees it. Whether you're a seasoned crocheter or just starting out, making this little reindeer is a fun way to get into the holiday spirit. So grab your yarn and hook, and let's get crafting!
Materials Needed
For this pattern you’ll need:
- ♥ Yarn in the colors Brown, Light Brown and White. (I used Stylecraft Special DK)
- ♥ Crochet hook. (I used 3mm)
- ♥ Stuffing.
- ♥ Yarn Needle.
- ♥ Sewing Pins.
- ♥ Stitch Marker.
- ♥ Safety Eyes, 6mm.
- ♥ Small, Red Pom-Pom for his Nose and Glue.
Stitches Used (US Terms)
- Magic Ring.
- CH = Chain.
- SLST = Slip Stitch.
- SC = Single Crochet.
- BB = Bobble Stitch.
- ST = Stitch.
- FL = Front Loops.
- Inc = Increase.
- Dec = Decrease.
- (…) = Repeat the space in brackets the given number of times.
- […] = Total number of stitches.
This pattern is made with continuous rounds, unless stated otherwise. Use a stitch marker to mark your first/last stitch of your row.
Pattern Instructions for Rudolf
Body
Use the color Brown. Prepare 3 strings of Brown yarn of about 8cm, tie these together.
- 6SC in a Magic Ring. [6] Add the 3 strings of Brown yarn to the magic ring, then close it up.
- 2SC in each st around. [12]
- (1SC, inc) 6 times. [18]
- (5SC, inc) 3 times. [21]
- 21SC. [21]
- 21SC. [21]
- 21SC. [21]
- (5SC, dec) 3 times. [18]
- (1SC, dec) 6 times. [12]
- (2SC, dec) 3 times. [9]
- FL, 9SC. [9]
- (1SC, inc, BB) 2 times, 2SC, inc. [12]
Place the eyes now between row 6 & 7, about 5 stitches apart. It will be a bit fiddly, but this way you will know where the legs will be, and you can position the eyes correctly.
- 12SC. [12]
- 12SC. [12]
- BB, 3SC, (BB, 3SC) 2 times. [12]
Stuff the body.
- Dec around. [6]
Fasten off and weave in tail.
Snout
Use the color Light Brown.
- 6SC in a Magic Ring. [6]
- (inc) 2 times, 1SC, (inc) 2 times, 1SC. [10]
- 10SC. [10]
Fasten off and leave a long tail for sewing.
Ears (Make 2)
Use the color Brown.
- Ch3, insert in second ch from hook, 1SLSt, 1SC.
Fasten off and leave a long tail for sewing.
Antlers (Make 2)
Use the color White.
- Ch5, insert in second ch from hook, 2SLSt, Ch2, insert in second ch from hook, 1SLSt, continue on the chain you made first, 2SLSt.
Fasten off and leave a long tail for sewing.
Assembling Your Rudolf
Whenever I start assembling Amigurumi, I'd like to use sewing pins to position all parts first until I'm happy with their placement. Then I will sew them on. I recommend you do so as well.
Sew first his snout slightly in between his eyes, you might want to stuff it a bit while sewing it on. Then find the position of his antlers and sew those on. A bit lower, the ears will come. Cut his hair to the length you want and unraffle the strings with a needle or brush. Lastly, glue on the small red pompom as his nose.
If you want to be able to hang it, make sure you add a little loop to the top.
- Funny Pictures
-
 Memes for Doggos Having a Ruff Day
-
 Fluffy Memes to Make Fun of Your Furry Friends
-
 Too Relatable to be True
- Recipes
-
 Lemon Cheesecake Cookies (Soft-Baked)
-
 Instant Pot Cabbage Soup
-
 Eggnog White Chocolate Streusel Cake
- Lifehacks
-
 8 Necessary Tips for Baking Bread
-
 10 Uses For Old TV Armoires
-
 11 Organization Hacks for Clutter Control
- Crochet Ideas
-
 Crochet Flower Hat for your Pet
-
 Crochet Sophia and Bennet Love Birds
-
 Crochet Reversible Ghost
- DIY
-
 DIY Beaded Christmas Tree
-
 Dolls from Party Cups
-
 Rainbow Snow Globe Charms
- Knitting Ideas
-
 Knitted Star Square Dishcloth
-
 Knitted Free 2025 Year Dishcloth
-
 Knitted Ribbed Adult Hat