How to Make a Crochet Candy Cane Holder for Your Holiday Decor

If you’re looking to spruce up your holiday decor with a touch of handmade charm, consider creating a crochet candy cane holder! This delightful project not only adds a cozy and festive flair to your space but also doubles as a practical way to store and display your sweet treats. With just a few basic crochet stitches and some colorful yarn, you can whip up these adorable holders in no time. Whether you hang them on your Christmas tree, attach them to gift packages, or use them as festive table decor, these candy cane holders are sure to spread joy and cheer throughout the holiday season. So gather your crochet hooks, pick out your favorite yarn colors, and get ready to bring a sprinkle of handmade magic to your celebrations!
What You Will Need
- Size J (UK 4mm) Crochet Hook
- DK thickness yarn in your chosen colour
- Needle for sewing in your ends
- Scissors
- Standard size Candy Cane sweet
Stitches Used
- CH – Chain
- SC – Single Crochet
- DC – Double Crochet
- SK – Skip next stitch
Pattern – Worked in Rows
Row 1 – Start by creating a Chain of 25+1 (26 total).
Row 2 – The extra chain counts as the first single crochet on this row. Then you need to SC in each chain to the end, so an extra 24 to give 25 stitches in total.
Row 3 – CH3 and turn. DC in the same stitch. *Ch1, Sk1, DC in the next* Repeat once more. Ch1, Sk1, 2xDC in the next. Ch1, 2DC in the next repeat another 3 times. You’ll now have 4 sets of 2 DC in 1 stitch, which will create the curve for the top of the candy cane.
*Ch1, Sk1, DC in the next* Repeat another 6 times for a total of 7. DC in the last stitch.
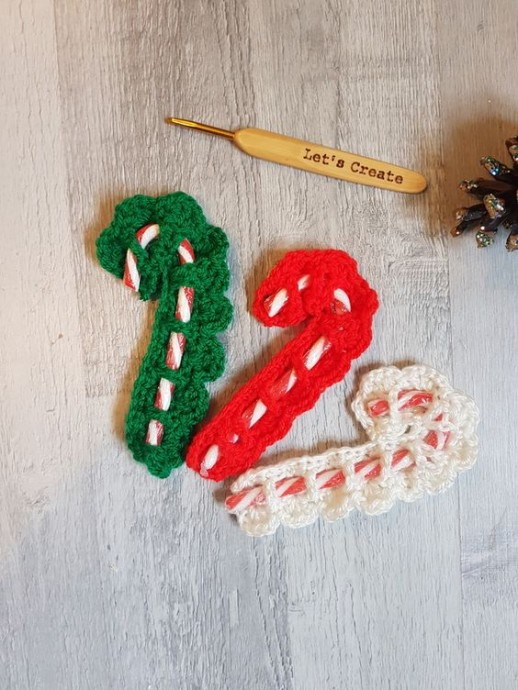
There are 2 options for row 4. The cream candy cover has a more ruffled edge whereas the red one is much more flat. Both options are written below so you can decide which you prefer.
Row 4 – Option 1 (Cream Candy Cover)
CH1 and turn (this counts as your first stitch) SC in the next stitch. *DC in the top of the DC from the previous round, Ch1, DC in the same stitch, Ch1, DC in the same stitch, SC in the top of the next DC from the previous round*. Repeat from * to * until you reach the end. Even when there are 2 DC’s together from the previous row, you still alternate between 3x DC and a SC.
You can either tie off here or you can slip stitch across the Ch3 from the previous row and tie off with your starting loose end and weave in together.
Row 4 – Option 2 (Red Candy Cover)
CH1 and turn (this counts as your first stitch) SC in the space from the previous row. *DC in the top of the DC from the previous round 3 times, SC in the top of the next DC from the previous round*. Repeat from * to * until you reach the end. Even when there are 2 DC’s together from the previous row, you still alternate between 3x DC and a SC.
You can either tie off here or you can slip stitch across the Ch3 from the previous row and tie off with your starting loose end and weave in together.
- Funny Pictures
-
 Hilarious Memes for Those Bored to Tears
-
 Weekly Treat of Funniest Parenting Memes for Good Laugh out Loud Right Now
-
 Really Funny Pics to End These Weekend Perfectly
- Recipes
-
 Crispy Baked Avocado Fries
-
 Baked Beans and Hot Dogs with Biscuit Topping
-
 Roasted Rosemary Lemon Chicken Breasts
- Lifehacks
-
 Crochet Basics: Twisted Fringe
-
 7 Crochet Tips And Tricks
-
 How To Work Crochet Into Denim
- Crochet Ideas
-
 Crochet Snorlax Plushie Doll
-
 Crochet Cat in 1 Row
-
 Crochet Beautiful Penguin Toy
- DIY
-
 DIY Santa Craft For Kids
-
 Paper Plate Angel Craft
-
 Upcycled Mason Jar Chicken Vase
- Knitting Ideas
-
 Knitted Bridger Cowl
-
 Knitted Keepsake Bag
-
 Knitted Cutie Cupcake Dolls