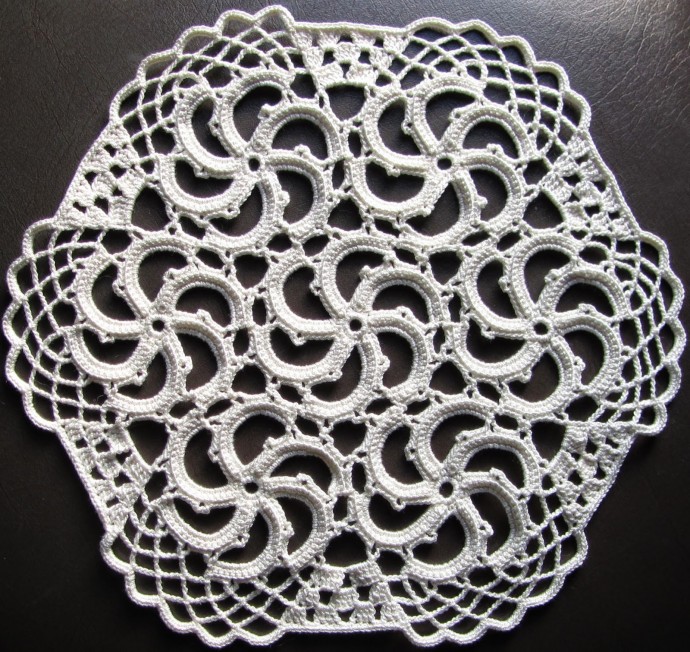
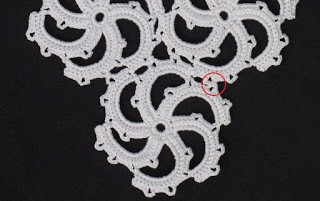
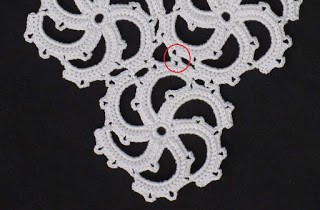
How to Make Crochet Medallions with DMC Cebelia Size 10


You’ll Need:
1 Ball, DMC Cebelia Size 10 Crochet Thread;
Crochet hook 1.25 mm;
Small darning needle.
Instructions
Medallions
Make 7.
Part 1: Create the Ring
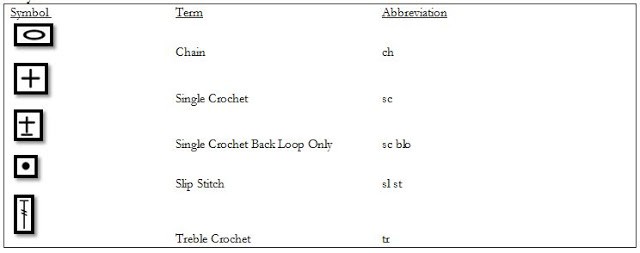
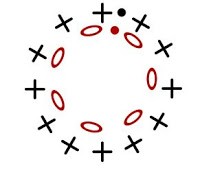
ch 7; join in a round with a sl st through the first chain to form a ring.
Part 2: Establish the Base
12 sc in the ring that was just made; sl st into the first sc.
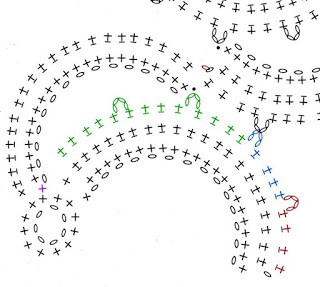
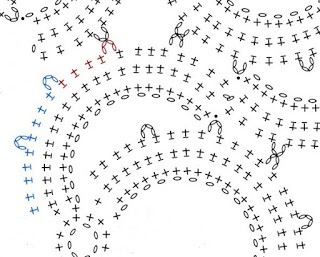
Part 3: First Arm
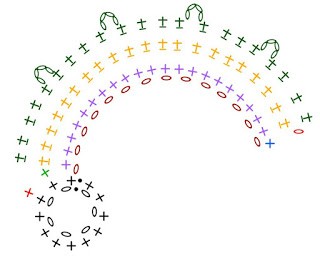
a. ch 14; turn work.
b. sc into the back bump of the last ch made.
c. sc 21 around the 13 chain just made.
d. sc into the next sc from Part 2; turn work.
e. sc into the back loop of the 21 sc just made in Row 3, part c.
f. ch 1; turn work.
g. [sc into the back loop of the next 4 sc from Part 3.d; ch 4] 4 times; sc into the back loop of the last sc on the arm.
h. sc into the next sc from Part 2.
Part 4: Second Through Fifth Arms
a. ch 14.
b. sl st into the third picot made on the previous leg.
c. sc 21 over the last ch 14.
d. sc into the next sc from Part 2; turn work.
e. sc into the back loop of the 21 sc made in Part 4.c.
f. ch 1; turn work.
g. [sc into the back loop of the next 4 sc from Part 4.e; ch 4] 4 times; sc into the back loop of the last sc on the arm.
h. sc into the next sc from Part 2.
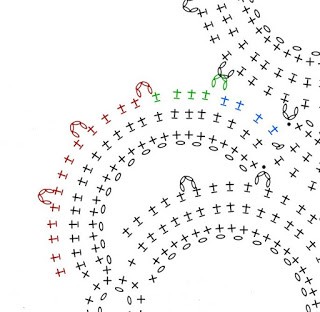
Part 5: Sixth Arm
a. ch 14.
b. sl st into the third picot made on the previous leg.
c. sc 21 over the last ch 14.
d. sc into the next sc from Part 2; turn work.
e. sc into the back loop of the 21 sc made in Part 5.c.
f. ch 1; turn work.
g. [sc into the back loop of the next 4 sc from Part 5.e; ch 4] 2 times; ch 2; sl st through the end of the first arm made (This can be tricky, try aiming for the stitch from Part 3.b); ch 1; sc into the back loop of the next 4 sc from Part 5.e; ch 4; sc into the back loop of the last 5 sc on the arm.
h. sl st into the last sc from Part 2.
Pull thread through and cut leaving a ~6” tail.
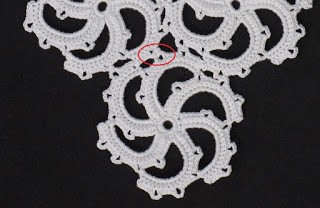
Assembly
Medallions can be joined after each one is made, or as each successive medallion is made. For joining to a single medallion:
i. Complete through Part 3.f of the second medallion.
ii. sc into the back loop of the closest 4 sc from the previous row starting with the one closest to the hook; ch 4;
- sc into the back loop of the next 4 sc on the arm; ch 2; ch 1 through the first loop of an arm of the first medallion; ch 1; (It doesn’t matter which arm as long as they line up correctly.)
Be sure that the medallions have the same face forward as you sew them together, because it will be obvious later on if one faces a different direction.
iii. [sc into the back loop of the next 4 sc on the arm; ch 4] twice; sc into the back loop of the last 5 sc on the arm; sc into the next sc from the initial ring (This completes the first arm of the second medallion.)
iv. Continue working through Part 4.e of the next arm.
v. sc into the outside tip of the arm on the first medallion that you have already attached to (Be careful not to add a twist to the medallions.)
vi. sc into the back loop of the closest 4 sc from the previous row starting with the one closest to the hook;
- 2; ch 1 through the second ch 4 space on the next leg on the first medallion; ch 1; sc into the back loop of the next 4 sc on the arm you are currently working on.
ii. [Ch 4; sc into the back loop of the next 4 sc] x 3; sc into the back loop of the last sc on the arm.
viii. Sc into the next sc from Part 2.
ix. Complete the rest of the medallion as before.
For Joining to Multiple Medallions
Start as if you are joining to a single medallion; instead of continuing with Step g,
ch 2; ch 1 through the first loop on the arm of the next medallion; ch 1; sc into the back loop of the next 4 sc on the medallion that you are building.
[ch 4; sc into the back loop of the next 4 sc] x 2, sc into the back loop of the last sc on the arm.
Continue from Part 4.h of the current arm through 4.e of the next arm.
Continue on as you did joining to the first medallion from Step v.
Continue like this until you have joined as many medallions as you wish.
After finishing attaching to as many medallions as you wish, complete the rest of the medallion starting with Part 4.g after the first picot.
After all medallions are finished, weave in and trim ends.
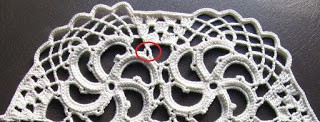
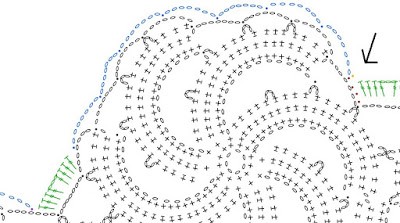
Edging
After all the medallions have been made and attached together, and after all ends have been woven in:
Round 1 – With the right side of the doily facing you, choose a space between two medallions and attach thread to the picot on the left side.
a. Working to the left, ch 7.
b. [sl st into the tip of the arm to the left; (ch 7; sl st into the picot on the left) twice; ch 7] twice.
c. sl st into the tip of the arm to the left; ch 7; sl st into the picot on the left; ch 7.
d. sl st into the picot on the next medallion; ch 7.
Repeat Steps b through d around the doily 5 more times.
Repeat Steps b through c once more.
sl st into where you joined the thread.
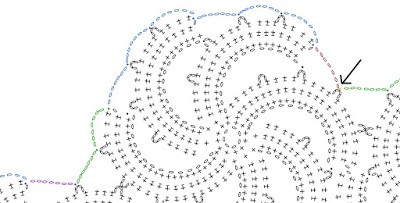
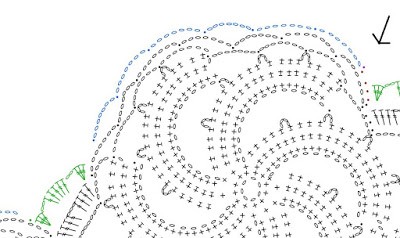
Round 2
e. sl st into the first 4 ch of the first round.
f. [ch 7; sl st into the center chain of the next ch 7 loop from round 1] 7 times.
g. tr 4 into the ch 7 joining the two medallions; ch 3; tr 4 into the same ch 7.
h. sl st into the center ch of the next ch 7 of the first row.
Repeat Steps f through h around the edge of the doily, ending with a sl st into the base of the first ch 7 of Row 2.
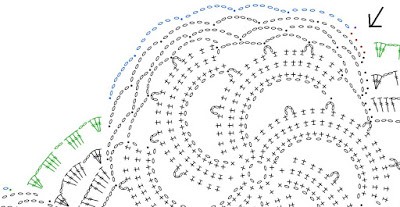
Round 3
i. sl st into the first 4 ch of the second round.
j. [ch 7; sl st into the center chain of the next ch 7 loop from round 2] 6 times.
k. tr 3 into the first tr made in the section; ch 2; tr 5 into the space between the tr in the second row; ch 2; tr 3 into the last tr made in the section in the previous row; sl st to the center chain of the next ch 7 loop.
Repeat Steps j through k around the edge of the doily, ending with a sl st into the base of the first ch 7 of Round 3.
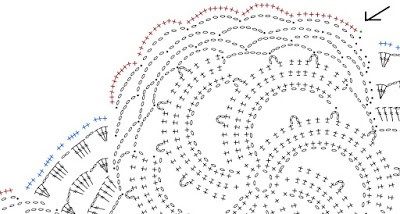
Round 4
l. sl st into the first 4 ch of the third round.
m. [ch 7; sl st into the center chain of the next ch 7 loop from round 3] 5 times.
n. tr 3 into the first tr made in the section; [ch 2; tr 4 into the next space] twice; ch 2; tr 3 into the last tr made in the section in the previous row; sl st to the center chain of the next ch 7 loop.
Repeat Steps m through n around the edge of the doily, ending with a sl st into the base of the first ch 7 of Round 4.
Round 5
o. [sc 11 over the next ch 7] 5 times.
p. sc into the top of the next 3 tr; [sc 2 over the ch 2 space; sc into the top of the next four tr] twice; sc 2 over the ch 2 space; sc into the top of the next 3 tr.
Repeat Steps o through p around the edge of the doily, ending with a sl st into the base of the first sc of Round 5.
Pull thread through and cut leaving a ~6” tail.
Weave in ends.
- Funny Pictures
-
 Pics to Get the Excitement Today
-
 Funny Christmas Meme Dump
-
 Funniest Relatable Felines in the Form of Memes
- Recipes
-
 Cinnamon Sugar Swirl Cupcakes
-
 Cheesy Bacon Ranch Roasted Potatoes
-
 Blooming Onion Bites with Dipping Sauce
- Lifehacks
-
 7 Toilet and Bathroom Cleaning Hacks
-
 Tips & Hacks for Clean Carpets
-
 7 Kitchen Hacks & Simple Solutions
- Crochet Ideas
-
 Crochet Watermelon Amigurumi
-
 Crochet Shark Applique
-
 Crochet Pineapple Amigurumi
- DIY
-
 Yarn Wrapped Christmas Wreath Ornaments
-
 Egg Carton Snowman Ornament
-
 Stick Peppermint Candy Ornament
- Knitting Ideas
-
 Knitted Star Square Dishcloth
-
 Knitted Free 2025 Year Dishcloth
-
 Knitted Belle Finger Puppet