Crochet Panda Zippered Wristlet: A Fun and Functional Accessory

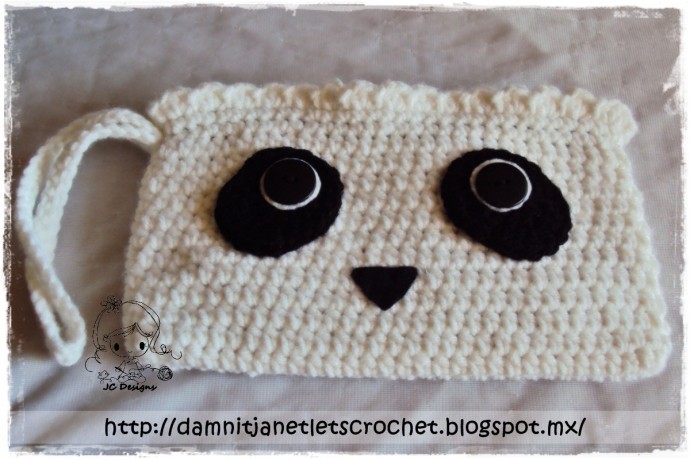
The Crochet Panda Zippered Wristlet is a delightful accessory that combines cuteness and functionality effortlessly. Crafted with love and skill, this wristlet is perfect for keeping your essentials secure while adding a touch of charm to your outfits. The adorable panda design is sure to bring a smile to your face every time you use it. It's not just a wristlet; it's a fashion statement bursting with personality! Whether you're running errands or enjoying a night out, the Crochet Panda Zippered Wristlet is a fun and practical addition to your accessory collection that will make you the envy of all your friends.
Size/Measurements
Horizontally 7.5" and 4.5" vertically but can vary based on yarn and hook size.
Materials
- Crochet hook size 3.5mm
- Worsted weight yarn: White & Black
- Zipper 18cm length
- 2 2cm black buttons
- Felt: White & Black
- Fabric of choice
- Stitch Marker to mark your rounds
- Tapestry Needle
- Thread
- Hot Glue
Pattern Notes
Numbers in ( ) at the end of each round or row indicate the total number of stitches for that round or row.
Wristlet Instructions
RND 1: ch 31, hdc in 2nd ch from hook, hdc in the next 28 chs, 3 hdc in next ch, hdc in next 28 chs, 2 hdc in last ch, sl st into the first st (62)
Rnd 2-12: ch 1, hdc in the same stitch you sl st, hdc around, sl st into the first st of previous rnd (62)
Rnd 13-14: ch 1, sc in the same stitch you sl st, sc around, sl st into the first st of previous rnd (62)
Rnd 15: ch 1, 3 hdc in the same stitch you sl st, *sl st in next sc, 3 hdc in next sc* repeat from * to * all the way around
Eyes Instructions
Make 2 with black
Rnd 1: 8 sc in magic ring (8)
Rnd 2: 2 hdc in each sc around (16)
Rnd 3: sc in next st, hdc in next st, 2 dc in the next 3 sts, sc in next 10 sts (19)
Rnd 4: sl st into the next 2 sts to give it an even look
Strap Instructions
With white
ch 53 (or chain to desired length), sc in 2nd ch from hook and across (52)
Assembly Instructions
I recommend pinning the pieces in place before sewing them to ensure you have them positioned as you like best before sewing.
The eyes should be sewn between rows 6 and 11, placed 1.5" apart from each other and slightly tilted, keeping the part with the dc's facing down.
With the white felt, cut a slightly bigger circle than the buttons. Glue it in place, then sew the buttons on top of the white circles.

With black felt, cut a small triangle and glue it in place between rows 4 and 5.
Now you can pin the zipper and fabric in place to begin sewing them. This took me a while because I'm a perfectionist, plus I had to sew it by hand since I don't own a sewing machine. But this would keep your items from falling out.
Sew the strap onto the wristlet.
- Funny Pictures
-
 Hilarious Memes for Those Bored to Tears
-
 Weekly Treat of Funniest Parenting Memes for Good Laugh out Loud Right Now
-
 Really Funny Pics to End These Weekend Perfectly
- Recipes
-
 Crispy Baked Avocado Fries
-
 Scrambled Chickpea and Spinach Pitas
-
 Cinnamon Pancakes
- Lifehacks
-
 Crochet Basics: Aligned Cobble Stitch
-
 Brick Stitch Crochet Tutorial
-
 Crochet Basics: Wattle Stitch
- Crochet Ideas
-
 Crochet Snorlax Plushie Doll
-
 Crochet Beautiful Penguin Toy
-
 Crochet Tiny Snowman
- DIY
-
 DIY Santa Craft For Kids
-
 Paper Plate Angel Craft
-
 Upcycled Mason Jar Chicken Vase
- Knitting Ideas
-
 Knitted Bridger Cowl
-
 Knitted Keepsake Bag
-
 Knitted Cutie Cupcake Dolls