Handmade Crochet Bee Market Bag Tutorial

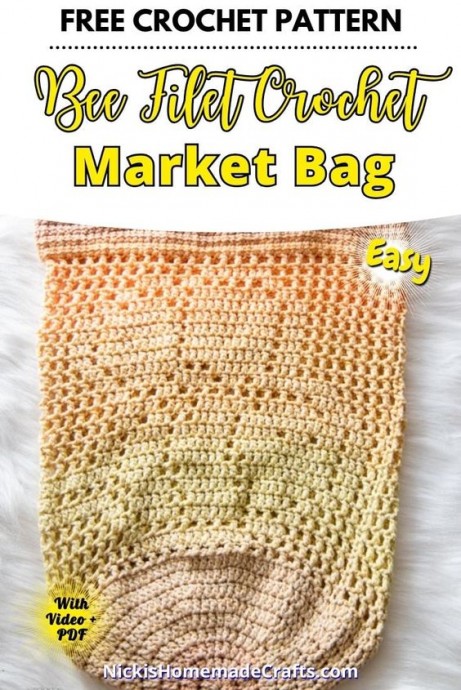
Create your very own handmade market bag with a charming crochet bee design using the filet crochet technique. This project is perfect for those who enjoy both crocheting and shopping sustainably. The intricate bee pattern adds a unique touch to the bag, making it a stylish and eco-friendly accessory for your trips to the farmer's market or grocery store. With its sturdy construction and ample size, this bag is not only practical but also a fun and creative way to reduce your environmental impact.
Materials You Will Need
The following materials will help you craft your crochet bee market bag:
- Premier Yarns Momenti (worsted acrylic)
- Meadow (1 skein)
- 5mm Crochet Hook - used Furls Crochet Hook
- Scissors
- Tapestry needle
Gauge
6 sts x 7 rows = 2 square inches
Size
12 x 18.5 inches (without measuring the straps)
Stitches Used in the Pattern
- st/sts = stitch/stitches
- ch = chain
- sk = skip
- sl st = slip stitch
- dc = double crochet
- ldc = linked double crochet
- ATC = Alternative Turning Chain
Pattern Notes
First, you’ll crochet the base of the bag as a circle and then add the filet crochet section as the main body before crocheting the top bag edge and straps.
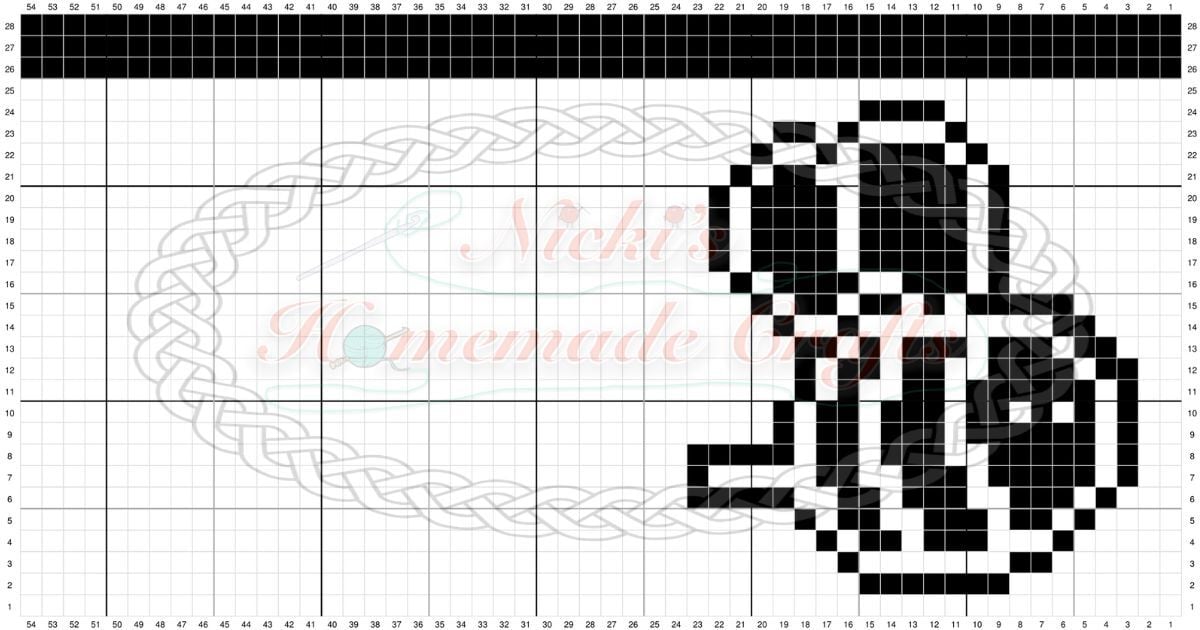
Bee Filet Crochet Market Bag Graph
Filet Crochet Written Pattern
ATC = Alternative Turning Chain
Bag Bottom
Make a Magic Ring and add 1 ATC and 11 dc stitches, close ring.
Round Instructions:
R1: [1 ATC, 1 dc] in the same stitch, then 2 dc in each stitch, sl st to the first stitch.
R2: 1 ATC, 2 dc in the same stitch, *1 dc in the next st, 2 dc in the same st, repeat from * until the end, sl st to the first stitch.
R3: 1 ATC, 1 dc in the next st, 2 dc in the same stitch, *1 dc in the next 2 sts, 2 dc in the same st, repeat from * until the end, sl st to the first stitch.
R4: 1 ATC, 1 dc in the next 2 sts, 2 dc in the same stitch, *1 dc in the next 3 sts, 2 dc in the same st, repeat from * until the end, sl st to the first stitch.
R5: 1 ATC, 1 dc in the next 3 sts, 2 dc in the same stitch, *1 dc in the next 4 sts, 2 dc in the same st, repeat from * until the end, sl st to the first stitch.
R6: 1 ATC, 1 dc in the next 4 sts, 2 dc in the same stitch, *1 dc in the next 5 sts, 2 dc in the same st, repeat from * until the end, sl st to the first stitch.
R7: 1 ATC, 1 dc in the next 5 sts, 2 dc in the same stitch, *1 dc in the next 6 sts, 2 dc in the same st, repeat from * until the end, sl st to the first stitch.
R8: 1 ATC, 1 dc in the next 6 sts, 2 dc in the same stitch, *1 dc in the next 7 sts, 2 dc in the same st, repeat from * until the end, sl st to the first stitch (108 sts).
Continue with the Market Bag Pattern
Now use 3DC Filet Crochet:
1 open mesh is (O): 1 dc, ch1, sk 1.
1 closed mesh is (X): 1 dc in 2 sts.
Follow the flat graph (but in ROUNDS), sl st at the end. Each first dc is an ATC.
Round Instructions:
R1: (O) x 54.
R2: (O) x 8, (X) x 7, (O) x 39.
R3: (O) x 6, (X) x 2, (O) x 7, (X) x 1, (O) x 38.
R4: (O) x 5, (X) x 1, (O) x 3, (X) x 3, (O) x 1, (X) x 2, (O) x 1, (X) x 1, (O) x 37.
R5: (O) x 4, (X) x 1, (O) x 1, (X) x 2, (O) x 1, (X) x 3, (O) x 2, (X) x 2, (O) x 1, (X) x 1, (O) x 36.
R6: (O) x 3, (X) x 1, (O) x 1, (X) x 3, (O) x 2, (X) x 3, (O) x 1, (X) x 2, (O) x 2, (X) x 5, (O) x 31.
R7: (O) x 2, (X) x 1, (O) x 1, (X) x 5, (O) x 1, (X) x 3, (O) x 2, (X) x 2, (O) x 5, (X) x 1, (O) x 31.
R8: (O) x 2, (X) x 1, (O) x 1, (X) x 5, (O) x 2, (X) x 3, (O) x 1, (X) x 2, (O) x 1, (X) x 5, (O) x 31.
R9: (O) x 2, (X) x 1, (O) x 1, (X) x 6, (O) x 1, (X) x 3, (O) x 1, (X) x 2, (O) x 1, (X) x 1, (O) x 35.
R10: (O) x 2, (X) x 1, (O) x 1, (X) x 1, (O) x 1, (X) x 1, (O) x 1, (X) x 2, (O) x 1, (X) x 3, (O) x 1, (X) x 2, (O) x 1, (X) x 1, (O) x 35.
R11: (O) x 2, (X) x 1, (O) x 1, (X) x 6, (O) x 1, (X) x 2, (O) x 2, (X) x 1, (O) x 1, (X) x 1, (O) x 36.
R12: (O) x 2, (X) x 2, (O) x 1, (X) x 4, (O) x 2, (X) x 2, (O) x 1, (X) x 2, (O) x 1, (X) x 1, (O) x 36.
R13: (O) x 3, (X) x 2, (O) x 1, (X) x 3, (O) x 1, (X) x 3, (O) x 1, (X) x 1, (O) x 1, (X) x 2, (O) x 36.
R14: (O) x 4, (X) x 2, (O) x 9, (X) x 1, (O) x 2, (X) x 1, (O) x 35.
R15: (O) x 5, (X) x 5, (O) x 1, (X) x 1, (O) x 1, (X) x 2, (O) x 1, (X) x 2, (O) x 1, (X) x 1, (O) x 34.
R16: (O) x 8, (X) x 1, (O) x 1, (X) x 3, (O) x 2, (X) x 4, (O) x 1, (X) x 1, (O) x 33.
R17: (O) x 8, (X) x 1, (O) x 1, (X) x 5, (O) x 1, (X) x 4, (O) x 1, (X) x 1, (O) x 32.
R18: (O) x 8, (X) x 1, (O) x 1, (X) x 5, (O) x 1, (X) x 4, (O) x 1, (X) x 1, (O) x 32.
R19: (O) x 8, (X) x 1, (O) x 1, (X) x 5, (O) x 1, (X) x 4, (O) x 1, (X) x 1, (O) x 32.
R20: (O) x 8, (X) x 1, (O) x 1, (X) x 5, (O) x 1, (X) x 4, (O) x 1, (X) x 1, (O) x 32.
R21: (O) x 8, (X) x 1, (O) x 1, (X) x 5, (O) x 2, (X) x 2, (O) x 1, (X) x 1, (O) x 33.
R22: (O) x 9, (X) x 1, (O) x 1, (X) x 4, (O) x 1, (X) x 1, (O) x 2, (X) x 1, (O) x 34.
R23: (O) x 10, (X) x 1, (O) x 4, (X) x 1, (O) x 1, (X) x 2, (O) x 35.
R24: (O) x 11, (X) x 4, (O) x 39.
R25: (O) x 54.
R26 – 28: 1 ATC, then 1 ldc in each st until the end of the round, sl st to the first st.
Using stitch markers (I used leftover yarn pieces), mark where your handles start and end on each side of the laid flat bag. Of 108 stitches, I added stitch markers where the ^ is:
15 sts, ^ 24 sts ^, 30 sts, ^ 24 sts ^, 15 sts (make sure the bee is on the front).
Then crochet this:
1 Round: 1 ATC, 1 LDC in the next 14 sts, then crochet 50 (or more or less) chainless foundation LDC sts (see video tutorial on how to do this), 1 LDC in the next 30 sts, then crochet 50 (or same as first handle just made) chainless foundation LDC sts, 1 LDC in the next 15 sts, sl st to the first st.
Last Round: 1 ATC, then 1 LDC in each st until the end of the round, sl st to the first st.
Fasten off and weave in your ends.
- Funny Pictures
-
 Cute Cat Memes That Will Make Your Day Brighter
-
 Spot-on and Funny Memes About Introverts Struggles
-
 Top Wonderful Cat Memes on Their Way to Better Your Day
- Recipes
-
 Creamy Old Fashioned Rice Pudding
-
 Russian Tea Cakes (Snowball Cookies)
-
 Rigatoni with Sausage, Tomatoes, and Zucchini
- Lifehacks
-
 How to Crochet a Harlequin Stitch
-
 Removing The Toughest Stains
-
 Crochet Basics: Crumpled Griddle Stitch
- Crochet Ideas
-
 Crochet Christmas Tree
-
 Crochet Goblet of Fire
-
 Crochet Adorable Ammonite
- DIY
-
 DIY Snowman Wreath
-
 Mini Santa Sleigh Ornament
-
 Crochet Gingerbread House Blanket
- Knitting Ideas
-
 Knitted Easter Bunny
-
 Knitted Mobile Phone/Glasses Case
-
 Knitted Cabled Wallet