Crochet Lamb Rattle: A Adorable Toy for Your Little One

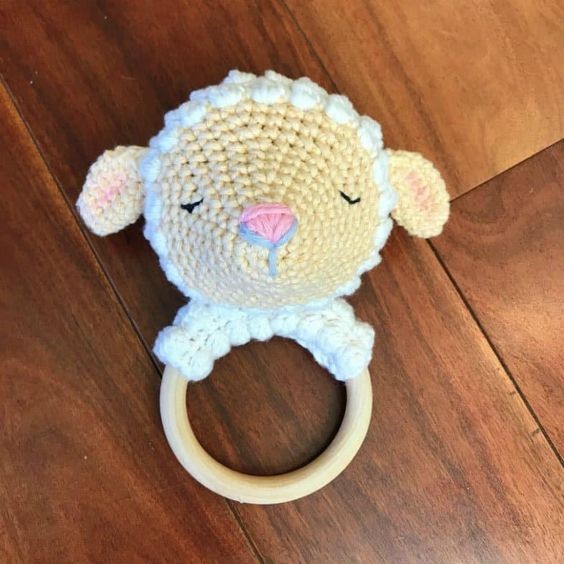
Get ready to meet the cutest little companion for your little one - the Crochet Lamb Rattle! This delightful toy is expertly handcrafted with love and care, making it a truly special addition to your baby's toy collection. Made from soft and gentle materials, this lamb rattle is perfect for tiny hands to grasp and shake, providing endless entertainment and sensory stimulation. Crafted with the utmost attention to detail, this crochet lamb rattle is not only adorable but also safe for your little one. The soft texture ensures that it is gentle on delicate skin, while the securely attached rattle provides a soothing sound that will captivate your baby's attention.
Whether your little one is exploring different textures or practicing their motor skills, this crochet lamb rattle is the perfect toy to accompany them on their journey of discovery. So, why wait? Treat your baby to this enchanting crochet lamb rattle and watch as they embark on countless adventures with their new fluffy friend!
Materials Used:
- Yarn – Paintbox yarns in the following colors (less than one 50g ball each):
White – “Champagne White”
Beige – “Light Caramel”
Gray – “Stormy Grey”
Pink – “Blush Pink” - Size US E/3.5mm crochet hook
- Yarn needle
- Stitch marker
- Stuffing
- Black embroidery thread
- Wooden teething ring (can be found on Etsy or here on Amazon) – size pictured is 3” in diameter
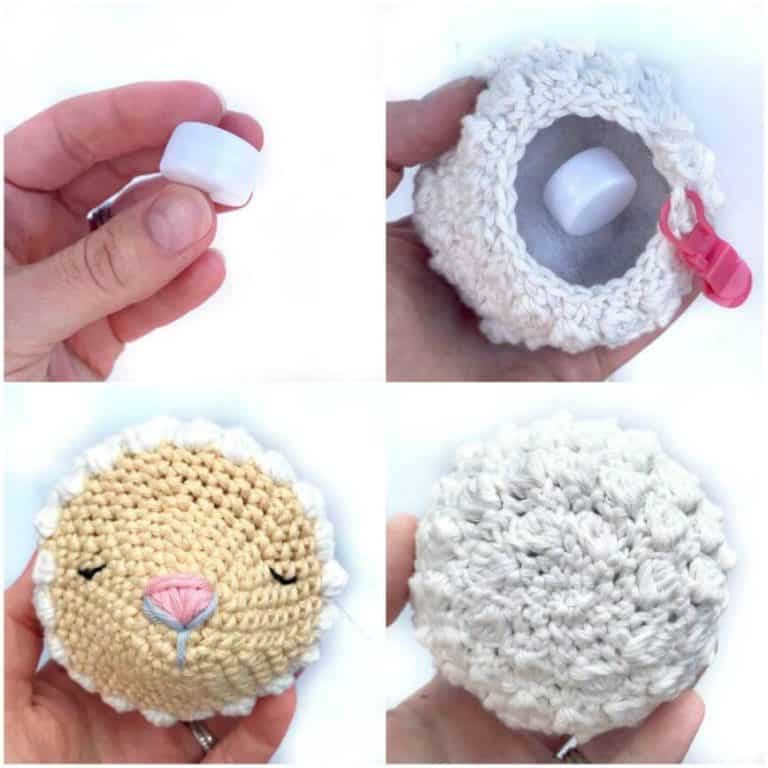
- Rattle disc (can be found on Etsy or here on Amazon)
Stitches/Abbreviations Used:
- R – round/row
- Magic ring
- Ch- chain
- Sl st – slip stitch
- Sc – single crochet
- Dc – double crochet
- Sc2tog – single crochet 2 together
- Bobble st – Yarn over, insert hook into stitch, yarn over and pull up a loop (3 loops on hook). Yarn over and pull through the first 2 loops on your hook. Yarn over, insert hook into the same stitch, yarn over and pull up a loop (4 loops on hook). Then, yarn over, pull through the first 2 loops on the hook. Repeat two more times, until you have 6 loops on your hook. Yarn over, pull through the first 2 loops on the hook. Yarn over, pull through all remaining 5 loops on the hook. This completes one bobble stitch.
- Invdec – invisible decrease (an alternative to the sc2tog stitch). To invdec, insert your hook through the front loop of the indicated stitch, then insert your hook into the front loop of the next stitch. Your hook is now inserted into the front loops of both stitches you’d like to decrease into one stitch. Yarn over and draw up a loop through both stitches, then yarn over and pull through two loops on the hook.
Finished Size:
The lamb rattle pictured measures about 6.5” from the top of the head to the bottom of the wooden ring. Your personal tension, and if you substitute a different yarn or hook size, may affect the measurements of your finished rattle.
Pattern:
Head
You’ll be working in continuous rounds, starting with the front of the lamb’s face.
R1: Using beige yarn, 6 sc in a magic ring. (6)
R2: 2 sc in each stitch around. (12)
R3: (Sc, 2 sc) 6x around. (18)
R4: Sc in each stitch around.
R5: (Sc in the next 2 stitches, 2 sc) 6x around. (24)
R6-R7: Sc in each stitch around.
R8: (Sc in the next 3 stitches, 2 sc) 6x around. (30)
R9: (Sc in the next 4 stitches, 2 sc) 6x around. (36)
R10: (Sc in the next 5 stitches, 2 sc) 6x around. (42)
R11: Sc in each stitch around.
I recommend embroidering the nose and the eyes at this point. To embroider the nose as pictured, first use gray yarn and a yarn needle to make a Y shape. Then, use pink yarn to fill in the top of the Y. Using black yarn or embroidery thread, stitch eyes as pictured – bringing the needle across about three stitches, then tacking down in a curve.
R12: Using white yarn, (bobble st in the next stitch, sc in the following stitch) 21x around. (42)
R13: Sc in each stitch around.
R14: (Bobble st, sc) 21x around.
R15: (Sc in the next 5 stitches, invdec) 6x around. (36)
R16: (Bobble st, sc) 18x around.
R17: (Sc in the next 4 stitches, invdec) 6x around. (30)
R18: (Bobble st, sc) 15x around.
R19: (Sc in the next 3 stitches, invdec) 6x around. (24)
Slightly stuff the head, insert the rattle disc into the middle of the stuffing, and continue stuffing as you go.
R20: (Bobble st, sc2tog) 8x around. (16)
R21: (Sc in the next 2 stitches, invdec) 4x around. (12) Continue stuffing
R22: (Sc, sc2tog) 4x around. (8)
Make sure the head is completely stuffed, then fasten off, using a long tail to pull the final round of stitches into a tight circle. Weave in ends.
Ears (Make Two)
R1: Using beige, 6 sc in a magic ring. (6)
R2: (Sc, 2 sc) 3x around. (9)
R3: Sc in each stitch around.
R4: (Sc in the next 2 stitches, 2 sc) 3x around. (12)
R5-R6: Sc in each stitch around.
R7: (Sc in the next 2 stitches, invdec) 3x around. (9)
R8: (Sc, invdec) 3x around. (6)
Fasten off, leaving a long tail. Flatten the shape and use the yarn tail to sew the open end of the ears shut. I used a pink crayon to color the inside of the ears pink. Pinch to make a crease and attach to the sides of the lamb’s head, at about row 14 of the head.
Teething Ring Cover
R1: Using white, ch 17.
R2: Sc in 2nd chain from hook and in each stitch across. Ch 2, turn. (16)
R3: (Bobble st, sc) 8x across.
R4: Sc in each stitch across. Ch 2, turn.
R5-R8: Repeat rows 3-4 two times.
Wrap the cover around the top of the wooden ring, and use a yarn needle to sew together. Then, attach the head so it is centered. You will need to thoroughly stitch through the base of the head into the ring cover to keep it stable.

- Funny Pictures
-
 These are the Pics That Simply Describe Your Life
-
 Hilariously Accurate Parenting Memes That Show the Other Side of Parenthood
-
 Great Pics That Just Depict Our Lives
- Recipes
-
 Crispy Baked Avocado Fries
-
 Baked Beans and Hot Dogs with Biscuit Topping
-
 Roasted Rosemary Lemon Chicken Breasts
- Lifehacks
-
 Crochet Basics: Twisted Fringe
-
 7 Crochet Tips And Tricks
-
 How To Work Crochet Into Denim
- Crochet Ideas
-
 Crochet Snorlax Plushie Doll
-
 Crochet Cat in 1 Row
-
 Crochet Beautiful Penguin Toy
- DIY
-
 Popsicle Stick and Jingle Bell Christmas Tree Ornament
-
 Upcycled Mason Jar Chicken Vase
-
 Crochet Namaste Stephanie Doll
- Knitting Ideas
-
 Knitted Keepsake Bag
-
 Knitted Textured Heart Dishcloth
-
 Knitted Snowfall Dishcloth