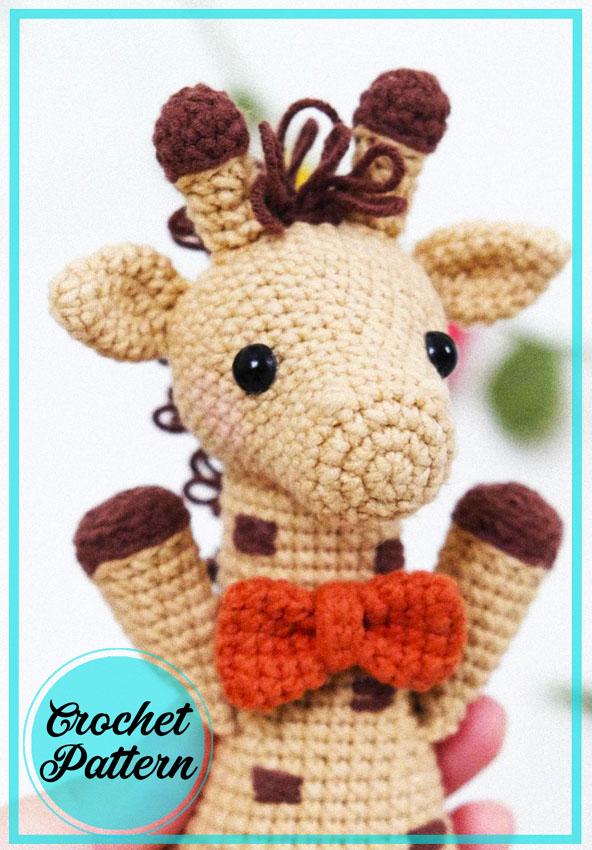
How to Create Your Own Adorable Amigurumi Giraffe, Rafik

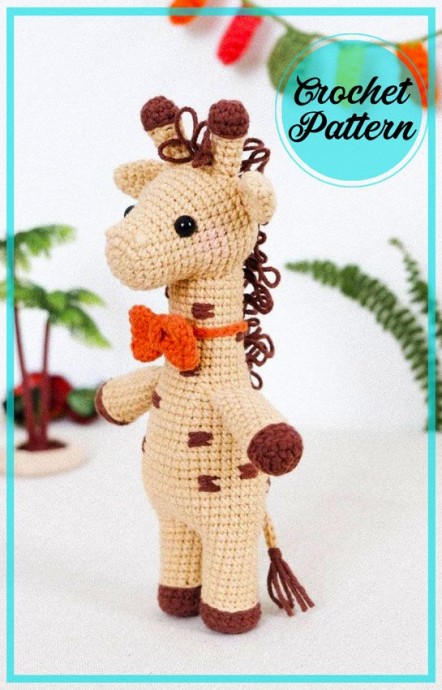
Meet Rafik, the adorable amigurumi giraffe crafted with crochet techniques. This handmade creation is not just a toy, but a work of art that showcases intricate details and vibrant colors. Each stitch is carefully placed to bring out Rafik's charming personality, from his long neck to his cute little ears. Whether as a gift for a child or a decorative piece for your home, this crochet giraffe is sure to bring joy and warmth to anyone who lays eyes on it. Whether you're a seasoned crocheter or a beginner looking for a new project, crafting your own version of Rafik can be a rewarding and fulfilling experience.
Materials Needed
You will need:
- Yarn
- Hook 2 mm
- Holofiber filler
- Safety eyes and half-beads with a diameter of 6-8 mm
Abbreviations
Here are some common crochet abbreviations:
- AR – Amigurumi Magic ring
- MR – Amigurumi Magic ring
- App – Application
- ll – Lift loop
- sc : Single Crochet
- inc : Increase
- dec : Decrease
- tr : Triple Crochet / Treble Crochet
- st : Stitch
- dc : Double Crochet
- hdc : Half Double Crochet
- sl-st : Slip Stitch
- ch : Chain
- ..in : Make increase into the same stitch (e.g., 3inc, 4inc)
- FLO : Crochet into front loops only
- BLO : Crochet into back loops only
- BL : Bobble Stitch: Do 5dc all in the same stitch, then yarn over and pull through all the loops on your hook.
Head Instructions
Main color
Stuff as you knit:
- 1 row: 6 sc in amigurumi ring (6)
- 2 row: 6 inc (12)
- 3 row: (1 sc, inc) x 6 (18)
- 4-6 row: 3 rows – sc in each p. (18)
- 7 row: (5 sc, inc) x 3 (21)
- 8 row: sc in each p. (21)
- 9 row: (6 sc, inc) x 3 (24)
- 10 row: sc in each p. (24)
- Insert safety eyes between rows 10 and 11, eye spacing 8 sc.
- 11 row: (3 sc, inc) x 6 (30)
- 12 row: sc in each p. (30)
- 13 row: (4 sc, inc) x 6 (36)
- 14-17 row: 4 rows – sc in each p. (36)
- 18 row: (4 sc, dec) x 6 (30)
- 19 row: sc in each p. (30)
- 20 row: (3 sc, dec) x 6 (24)
- 21 row: (2 sc, dec) x 6 (18)
- 22 row: (1 sc, dec) x 6 (12)
- 23 row: 6 dec
Pull off the hole, hide the end of the yarn inward.
Hands Instructions
(2 times)
Start with a complementary color:
- 1 row: 6 sc in amigurumi ring (6)
- 2 row: 6 inc (12)
- 3 row: BLO – slst in each p. (12)
- 4 row: BLO the two previous rows – sc in each p. (12)
- Change yarn to base color.
- 5 row: BLO – slst in each p. (12)
- 6 row: BLO the two previous rows – sc in each p. (12)
- 7-14 row: 8 rows – sc in each p. (12)
Fill the handle, but not all the way to the top. Fold the edges and tie them together with the 5th sc. Hide the end of the yarn inside.
Legs Instructions
(2 times)
Start with a complementary color:
- 1 row: 6 sc in amigurumi ring (6)
- 2 row: 6 inc (12)
- 3 row: (3 sc, inc) x 3 (15)
- 4 row: BLO – slst in each p. (15)
- 5 row: BLO the two previous rows – sc in each p. (15)
- 6 row: sc in each p. (15)
- Change yarn to base color.
- 7 row: BLO – slst in each p. (15)
- 8 row: BLO the two previous rows – sc in each p. (15)
- 9-15 row: 7 rows – sc in each p. (15)
- Cut the yarn at the first leg and fasten it.
Leave the loop at the second leg open.
Body Instructions
- 1 row: From the second leg cast on 3 ch, insert the hook into the first leg and work 15 sc, then 3 sc along the chain, 15 sc along the second leg and 3 more sc along the chain (36)
- 2 row: (8 sc, inc) x 4 (40)
- 3-7 row: 5 rows – sc in each p. (40)
- 8 row: (8 sc, dec) x 4 (36)
- 9-10 row: 2 rows – sc in each p. (36)
- 11 row: (7 sc, dec) x 4 (32)
- 12-16 row: 5 rows – sc in each p. (36)
- 17 row: (6 sc, dec) x 4 (28)
- 18 row: sc in each p., knitting handles on the sides (28)
My handles are arranged in this way: 8 sc, 5 sc knitting in a hand, 8 sc, 5 sc knitting in a hand, 2 sc (28).
Your handles may be located differently, depending on the degree of displacement of the beginning of the row (usually an error of 1-2 loops). - 19 row: (5 sc, dec) x 4 (24)
- 20-31 row: 12 rows – sc in each p. (24)
Leave the yarn for sewing.
Sew on the head.
Ears Instructions
(2 times)
Main color:
- 1 row: 6 sc in amigurumi ring (6)
- 2 row: sc in each p. (6)
- 3 row: (1 sc, inc) x 3 (9)
- 4 row: (2 sc, inc) x 3 (12)
- 5-6 row: 2 rows – sc in each p. (12)
- 7 row: (2 sc, dec) x 3 (9)
- 8 row: (1 sc, dec) x 3 (6)
No need to refill.
Leave the yarn for sewing.
Horns Instructions
(2 times)
Start with a complementary color:
- 1 row: 9 sc in amigurumi ring (9)
- 2-3 row: 2 rows – sc in each p. (9)
- Change the yarn to the main yarn.
- 4 row: BLO – slst in each step (9)
- 5 row: BLO of the two previous rows – sc in each p. (9)
- 6-8 row: 3 rows – sc in each st. (9)
- Put in the filler.
Leave the yarn for sewing.
Mane Instructions
7 sc with extended loops in amigurumi ring, slst in the first p. Without breaking the yarn, dial 30 ch. Tie 29 extended stitches, securing each to the chain with a connecting post. Watch the video on my Instagram profile @mycrochetwonders, called “We knit a giraffe’s mane” for a visual guide.
Tail Instructions
Dial a chain of 11 ch
Tie 10 slst in a chain. Leave the yarn to sew on.
Attach the tassels to the tip of the tail.
To attach the four strands, yarn them one at a time without tightening. Then tighten all yarns at once.
Tie Instructions
Dial 6 ch
Next, knit in a circle of the chain:
- 1 row: 4 sc, 2 sc in the last point of the chain, 4 sc on the other side of the chain (10)
- 2-5 row: 4 rows – sc in each p. (10)
- Tie two such details. Sew them together.
Fold in center and close with a lintel.
For a jumper, dial 8 ch and chain 7 sc. Embroider specks on the neck and torso. Sew on ears, horns, tail, and mane. Attach the butterfly and embroider the nostrils between the 4th and 5th rows of the head.
- Funny Pictures
-
 Cute Cat Memes That Will Make Your Day Brighter
-
 Spot-on and Funny Memes About Introverts Struggles
-
 Top Wonderful Cat Memes on Their Way to Better Your Day
- Recipes
-
 Creamy Old Fashioned Rice Pudding
-
 Russian Tea Cakes (Snowball Cookies)
-
 Rigatoni with Sausage, Tomatoes, and Zucchini
- Lifehacks
-
 How to Crochet a Harlequin Stitch
-
 Removing The Toughest Stains
-
 Crochet Basics: Crumpled Griddle Stitch
- Crochet Ideas
-
 Crochet Christmas Tree
-
 Crochet Goblet of Fire
-
 Crochet Adorable Ammonite
- DIY
-
 DIY Snowman Wreath
-
 Mini Santa Sleigh Ornament
-
 Crochet Gingerbread House Blanket
- Knitting Ideas
-
 Knitted Easter Bunny
-
 Knitted Mobile Phone/Glasses Case
-
 Knitted Cabled Wallet